Dying Light 2 Stay Human Trophy Guide
Author: Lewis_y123.
Genres: Action Adventure, Horror.
Dying Light 2 Stay Human directory.
Welcome to the Dying Light 2 Stay Human trophy guide which will help you through Villedor, an overrun city 15 years after the initial outbreak in Harran. The World is sparse, dangerous and full of Humans and Zombies all of whom want a piece of you if you get in their way.
- Platforms: PlayStation 5, PlayStation 4, Xbox Series, Xbox One, PC.
- Trophies: 58: Platinum: 1, Gold: 1, Silver: 8, Bronze: 48.
- Achievements: 57: 1,000 G.
- Release Date: 4th February 2022.
- Developer: Techland.
- Publisher: Techland.
- Missable: 5: Boot Licker, Fit as a Fiddle, Ironheart. Archivist, Audiophile.
- Glitched: 6: Herzlich Wilkommen!, Get Outta My House!, Municipal Services, Don Quixote, Man On a Mission, True Nightrunner.
- Online: 2: Being All Social, That’s Teamwork!.
- Difficulty Rating: 3/10.
- Approx. time to 100%: 120+ Hours.
Stage 1: Complete the Story & Preparation.
Important Notices:
This guide contains major spoilers throughout the game, so please read at your own risk. It is also strongly recommended that you make regular backup saves in case any trophies happen to bug out or if your save gets corrupted. The overall aim of Stage 1 is to complete the story whilst also working towards a few other trophies that will save you time in the later stages. There will be a few things to keep in mind if you want to minimise clean-up time:
- Collect and SAVE 81 inhibitors: Fit as a Fiddle, Ironheart which is missable.
- Choose the same faction when assigning facilities: Boot Licker which is missable.
- Complete any random encounters you come across: A Friend in Need.
- Kill enemies with spears as often as possible: Get the Point?.
Your primary focus should be mementos and tapes as most can be found during main quests and side quests, in addition to some also being semi-missable: Archivist, Audiophile. Though not as necessary, the final thing to note is that you should fast travel and use your paraglider as little as possible when travelling from point A to point B as this will save some time in the final stage for Ultramarathon. You will unlock the following trophies as you make your way through the story:
- Into the Unknown.
- First Shot.
- Herzlich Wilkommen!.
- Under Pressure.
- On the Trail of the Enemy.
- Light in the Darkness.
- Get Outta My House!.
- Debris and Ashes.
- We Will Be Heard!.
- Known Associate.
- Brush With Death.
- Going Down.
- Family First.
- Your World, Your Rules.
- Tunnel Entrance.
- Sancho Panza.
- Flag Burning.
- You Never Forget Your First….
- Oh, So This is How It Works!.
- Man On a Mission.
- Good Night & Good Luck.
- Can’t Touch This!.
- Night Hunter.
- Death From Afar.
- Slowpoke!.
- Lightning Reflexes.
Stage 2: Remaining Collectibles & Inhibitors:
In Stage 2, you should aim to be finishing off the remaining collectibles and also any activities which contain inhibitors. This will also be a good time to get any remaining kills with spears in case you still haven’t obtained Get the Point?. Something to note here is that if you previously allocated facilities to different factions, you will be unable to get Boot Licker unless you start another playthrough. In addition, there are some trophies that you can work towards whilst travelling around the map:
- Stealth takedown enemies: You’re Going Down!.
- Takedown enemies from above: Don’t Look Up.
You will be able to earn the following trophies throughout Step 2:
- Municipal Services.
- Tube Map.
- Tickets, Please!.
- Can’t You Read the Signs?.
- It Wasn’t That Hard, Was it?.
- Revenants.
- Boot Licker.
- After the Fall.
- Fit as a Fiddle.
- Ironheart.
- Get the Point?.
- Archivist.
- Audiophile.
- Street Art Aficionado.
Stage 3: Complete any Remaining Activities.
If you upgraded your stats in the previous stage, your primary goal here is to finish running around the map to clean up any parkour activities. It’s recommended to start off with airdrops so that you can obtain military tech, making the other activities easier due to the ability to upgrade the Nightrunner tools. Also, note that you shouldn’t throw away the Sunken City gear from the airdrops as it will provide useful in the final stage. Assuming you have been completing any random encounters you have come across, it’s likely that you will have finished saving survivors and that you have reached Level 9, meaning you can purchase some skills to obtain the related trophies. You will also be able to unlock the following trophies along the way:
- Don Quixote.
- Find Anything Interesting?.
- Ban Hammer.
- A Friend in Need….
- Parkour Master.
- Combat Master.
- Tanning Salon.
- Terminal Headache.
- Modder.
- You’re Going Down!.
- Don’t Look Up.
- True Nightrunner.
- Bing Bang Boom!.
Stage 4: Co-op & Remaining Trophies:
During the final stage, you should dive into the co-op for both trophies, making sure to use Gaming Sessions if needed. Assuming you kept hold of the loot from the Sunken City in the previous stage, you should then focus on reaching the 1,000,000 Old World money and finally finish off travelling 960km.
Then, as long you have earnt every other trophy in the game you will then unlock the highly sought after Platinum:
- Pilgrim’s Path.
TIPS & STRATEGIES:
Nightrunner Tools.
Something that is going to help you when you are going on zombie-killing sprees or just doing parkour are Nightrunner tools, which there are 3 of.
- Paraglider,
The Paraglider can be activated (Square) and will allow you to practically fly around the map though it will cost a bit of stamina, which can be recovered through air vents, and you can even activate the Paraglider whilst standing on one. Upgrading it will allow you to boost (L3) the Paraglider so that you can stay in the air for longer and gain a speed boost. However, because gliding does not count towards your total time needed for Ultramarathon, it’s recommended that you only use the Paraglider when it is essential, so as to reduce the grind later. - Grappling Hook,
Using the Grappling Hook (L2) whilst equipped will allow you to swing to the opposite side of a building. Also, upgrading this will let you pull enemies towards you and will allow you to practically climb up buildings. - UV Light.
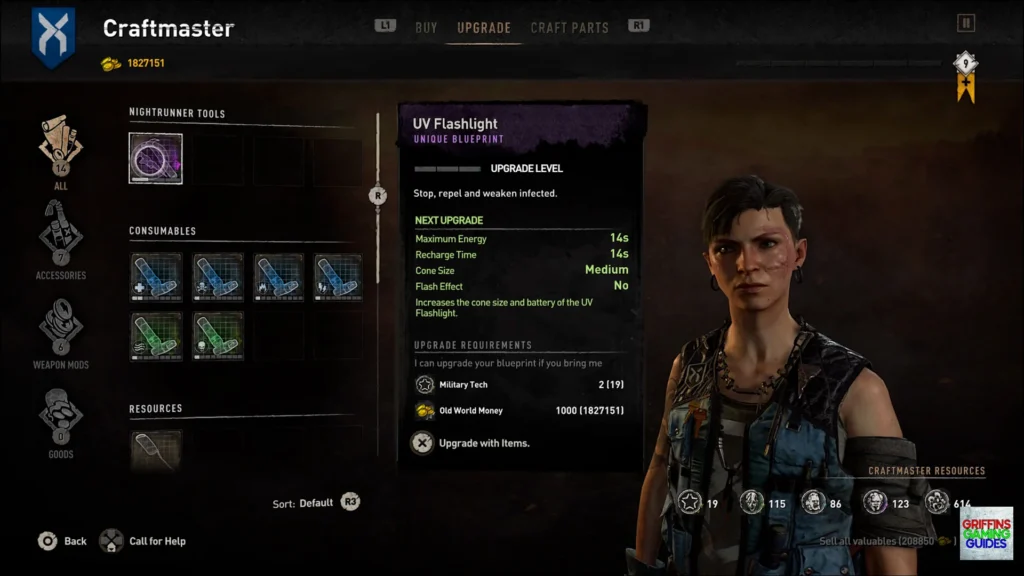
This final tool, when equipped, will of course stun zombies. The light can be improved by upgrading it at a craftmaster like with the previous tools.
As for how you can upgrade the tools, you can do so at any craftmaster providing that you have military tech from airdrops, which you will get whilst going for Find Anything Interesting?.
- Finding & Repairing Weapons.
Looking for a good way to get some decent gear early on?.
Luckily, there is a 15 – 30 minute cooldown on loot respawning (outside of the Sunken City), so you can use this to your advantage to farm some. An early game weapon spawn location is shown below.
Pilgrim’s Path
Unlock every trophy.
You will need to unlock the other 57 trophies throughout Dying Light 2 Stay Human in order to unlock Pilgrims Path.
5 G
Into the Unknown
Reach Villedor.
This trophy will be unlocked during the Prologue: Pilgrims Path, after you meet Hakon. Once he saves you from turning into a zombie and shows you the beautiful sunset, the trophy will pop.
Notes:
- It should be noted that there are two mementos earlier in the prologue that will save you time whilst going for Archivist.
- In addition to that, the prologue is a good time to get Lightning Reflexes.
10 G
First Shot
Use an Inhibitor for the first time.
Whilst following the prologue with your new friend Hakon, you will learn about Biomarkers and how important they are. However, as Aiden doesn’t have a Biomarker, Hakon will explain that one can be found in an abandoned GRE hospital. Later on in the mission, Aiden will fall down an elevator shaft, at which point he will be unable to get out because he doesn’t have enough stamina. Luckily for you though, there is an Inhibitor in the nearby room where you can upgrade your stamina and unlock this trophy.
5 G
Herzlich Wilkommen!
Enter the Bazaar.
The Bazaar is the main safe zone to the survivor faction and contains story quests, side quests, as well as a Quartermaster to upgrade your blueprints, as well as a trader for selling your excess loot. Entering the Bazaar by interacting (Square) with any of the doors should pop this trophy. However, like many of the trophies in Dying Light 2, there is also a chance that the trophy will not pop when it is supposed to during the playthrough, so it’s strongly recommended to make a backup save during the story quest The Only Way Out that you can return to if the trophy doesn’t unlock as expected.
10 G
Under Pressure
Activate your first Water Tower.
This trophy will be obtained during the main story quest Water Tower whilst following Sophie’s/Aitor‘s instructions to reclaim the water supply for the Survivors or PK. Whilst choosing who to give the water tower to, you should choose wisely so as to save yourself from another potential playthrough for Boot Licker, so see that trophy for more information.
10 G
On the Trail of the Enemy
Learn Waltz’s location.
This trophy will unlock at the end of the main story quests Revolution or Into the Dark, as depending on your story choices you will either be working with the PK or the Survivors. Once you learn of Waltz’s location, the trophy will pop. Former GRE scientist turned into a Renegade, Waltz is a familiar face to Aiden.
20 G
Light in the Darkness
Activate your first Electrical Substation.
You will activate your first Electrical Substation as part of the story quest A Place to Call Home. After arriving in the central loop, Lawan will ask you to activate the substation in order to give the city power. Upon arriving at the substation, you will be greeted by the Peacekeepers who will ask that you activate the substation for them, which is when the Renegades will turn up and attack you. Shortly after saving the PK, your next objective is to activate the substation and give power to the city. Note: Make sure to assign facilities to the same faction for Boot Licker in order to minimise the number of playthroughs needed.
20 G
Get Outta My House!
Defeat the Renegades attacking the Fish Eye.
After claiming the Electrical Substation during A Place to Call Home, Lawan will contact you and ask that you meet her at the Fish Eye Canteen where you will meet Frank, at which point the Renegades will launch an attack on the Fish Eye and you will be tasked with defending it. After taking care of the Renegades, you will need to save Frank. During this point of the story, you will also meet Jack Matt, who is the leader of the PK, and at that point, the trophy should pop.
20 G
Debris and Ashes
Reach the Observatory.
During the quest Veronika is where this trophy is unlocked, though the description is slightly misleading as this will actually be the second time you will have reached the Observatory in the story. After speaking to Veronika inside the bunker, you will be required to enter the Observatory through the hatch, at which point the trophy will pop.
20 G
We Will Be Heard!
Restore the radio broadcast tower.
This trophy will be unlocked during the main quest Broadcast. During this quest, you will also unlock two Nightrunner tools. One of these is the Grappling Hook, which can be used to traverse the map at ease and can also pull enemies towards you when upgraded. The second tool is the GRE Detector, which allows you to activate the different radio towers scattered around the map, making Inhibitors easier to locate.
There will be one semi-missable memento and one highly important story choice to make during this quest. The memento can be found after you encounter Leon, at which point you will enter the power distribution room where there will be a zombie for you to kill and loot to collect for Chris’ dog tags. The story choice comes towards the very end, where you will either have the choice between either the PK and Frank or Juan and Frank depending on the choices you made earlier. Either way, you should choose to side with Frank for a future memento.
20 G
Known Associate
Learn the whereabouts of Veronika Ryan.
This trophy requires you to work out where Veronika Ryan is located. Depending on the choices you have made so far, this trophy will either be unlocked during the story missions Nightrunners or Empire. Before the world became overrun, Veronika used to work as a GRE scientist and is believed to be one of the only remaining GRE doctors alive. Finding her means that Aiden has hope of finding information on his sister.
25 G
Brush with Death
Wake up after the missile strike.
After the unfortunate events that unfold during the mission Veronika, this trophy will be obtained. Something that you may want to keep in mind is that completing this mission will cause some of the city to be destroyed and become foggy until you complete the game, which can be annoying if you would like to explore and take in the scenery, so it’s recommended to do everything you want to do here before starting this mission.
25 G
Going Down
Enter the X-13 elevator.
This trophy will be unlocked during X13, shortly after arriving at the facility. The trophy will pop once you enter the elevator. Something that you should keep in mind is that it doesn’t matter if you collect any collectibles during this section as they will all be granted to you upon completion anyway.
25 G
Family First
Find your sister.
This trophy will be obtained towards the end of X13. It will unlock after you find out the whereabouts of your sister, Mia.
50 G
Your World, Your Rules
Complete the game with any ending.
Though there are a few possible endings, it doesn’t matter which one you get as this trophy will be obtained during X13. Complete the game to earn the trophy.
15 G
Municipal Services
Assign all Facilities.
See Boot Licker for more information.
15 G
Tunnel Entrance
Activate your first Metro Station.
See Tube Map for more information.
25 G
Tube Map
Activate all Metro Stations.
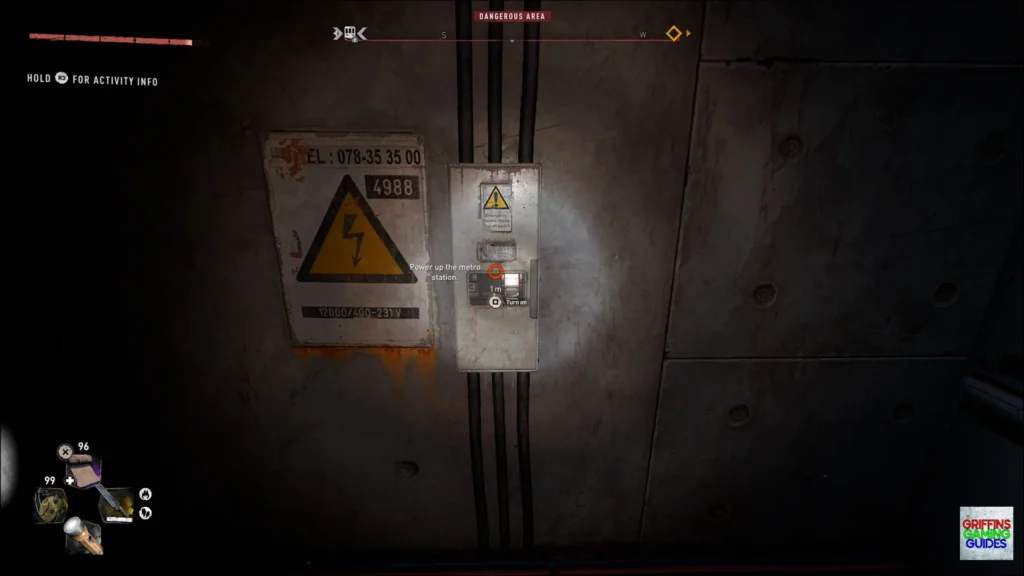
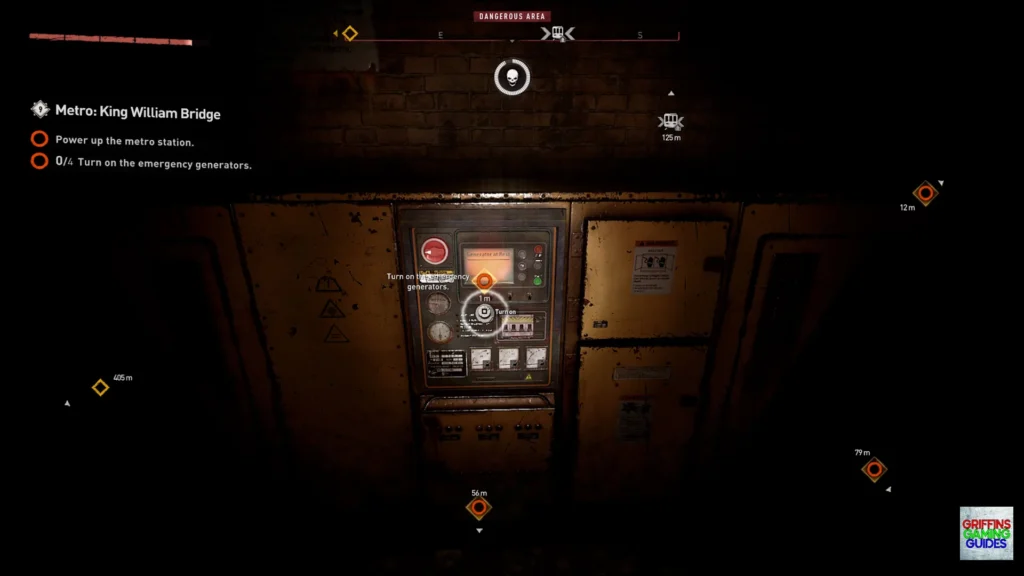
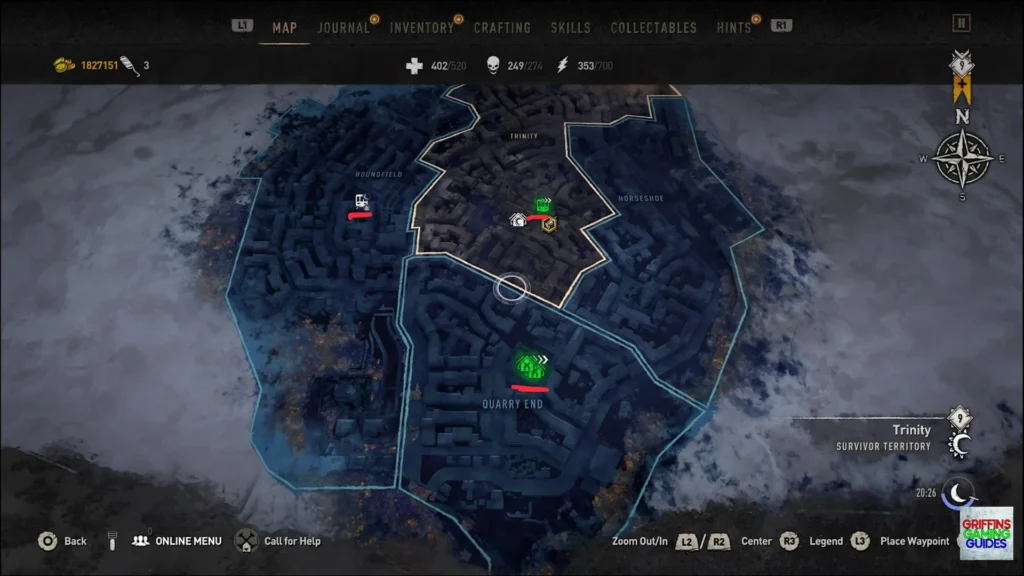
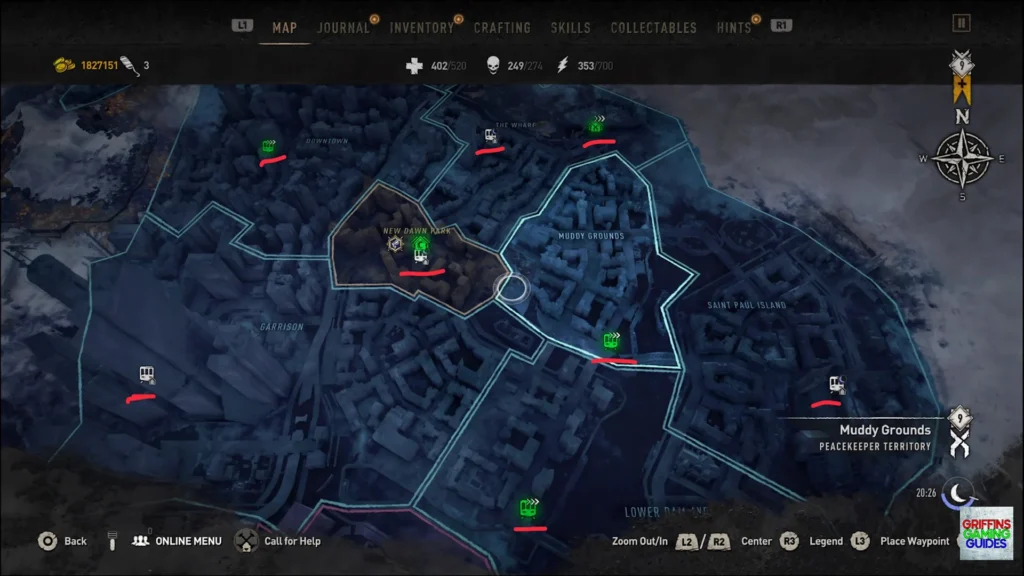
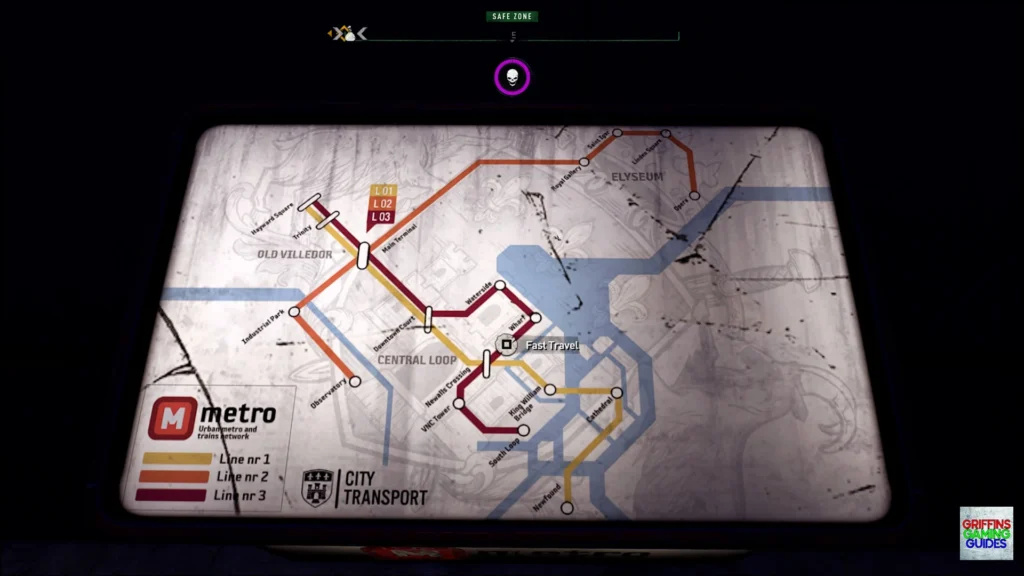
Added to Dying Light 2 is a fast travel system in which you can fast travel into a specific district as long as you have it activated. There are a total of 11 districts, which are only accessible once you reach the Central Loop – three metro stations are also automatically unlocked at various points of the story. It is recommended that you go to them during the night as fewer zombies will be roaming around inside. Something to keep in mind is that some metro stations will contain an Inhibitor for you to collect after claiming them, which will help with your progress towards Fit as a Fiddle and Ironheart. In order to claim them, you will need to:
- Interact with the main switch (Square).
- Activate the backup generators (Square).
- Flick the main switch again (Square).
Claiming a metro station will also open up the ability to unlock Tickets, Please! The locations of all the metro stations across Old Villedor and Central Loop are shown below.
15 G
Sancho Panza
Activate your first Windmill.
See Don Quixote for more information.
5 G
Tickets, Please!
Use a Metro Station to Fast Travel.
This trophy requires you to fast travel across the map via one of the metro stations. However, whilst this trophy may seem straightforward, the requirement can be confusing as fast travelling using your map in the pause menu won’t pop the trophy. Instead, what you will need to do is walk into the claimed metro station of your choice and interact (Square) with the map to manually fast travel that way.
For more information on how to capture a metro station, refer to Tube Map.
15 G
Don Quixote
Activate all Windmills.
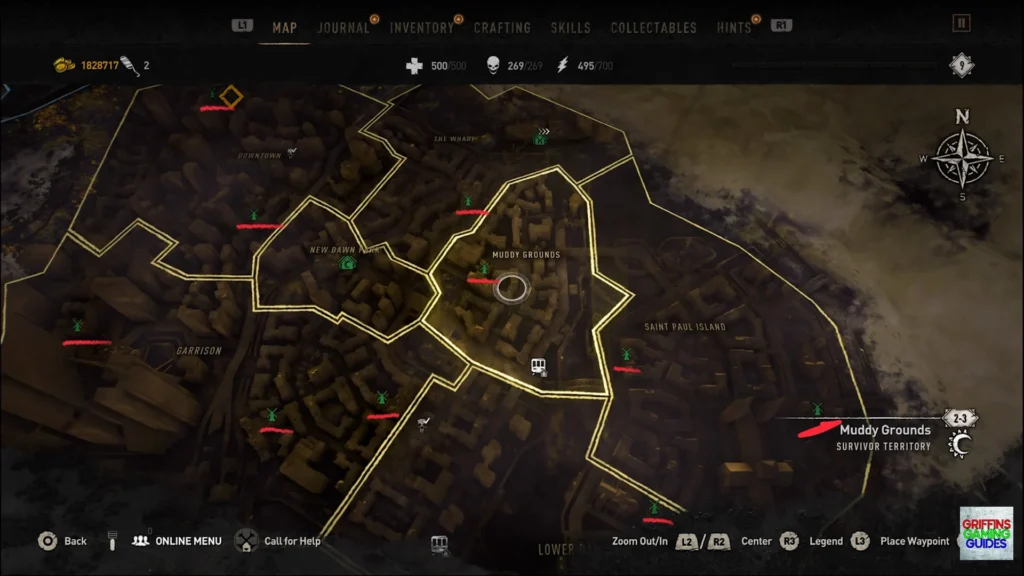
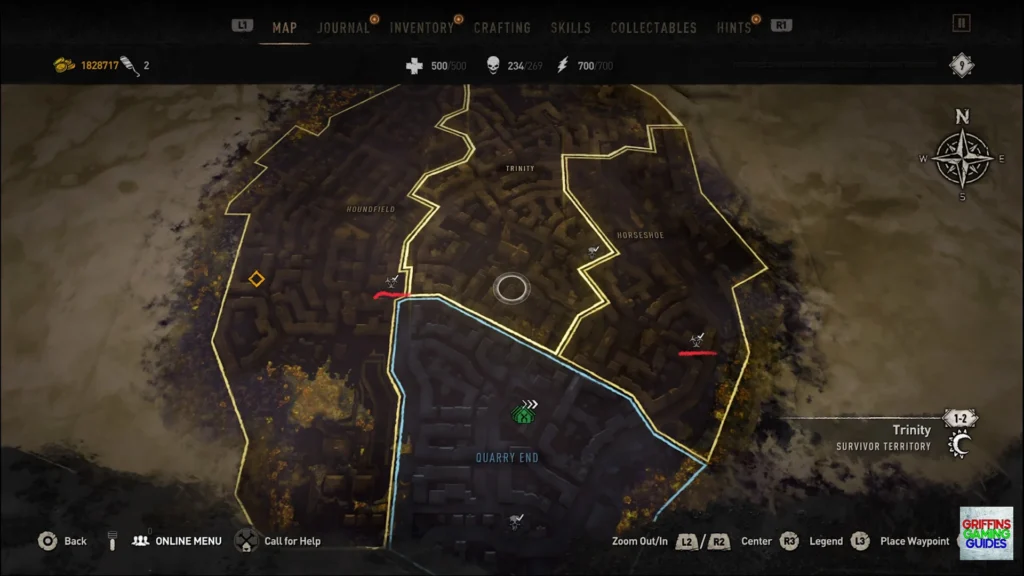
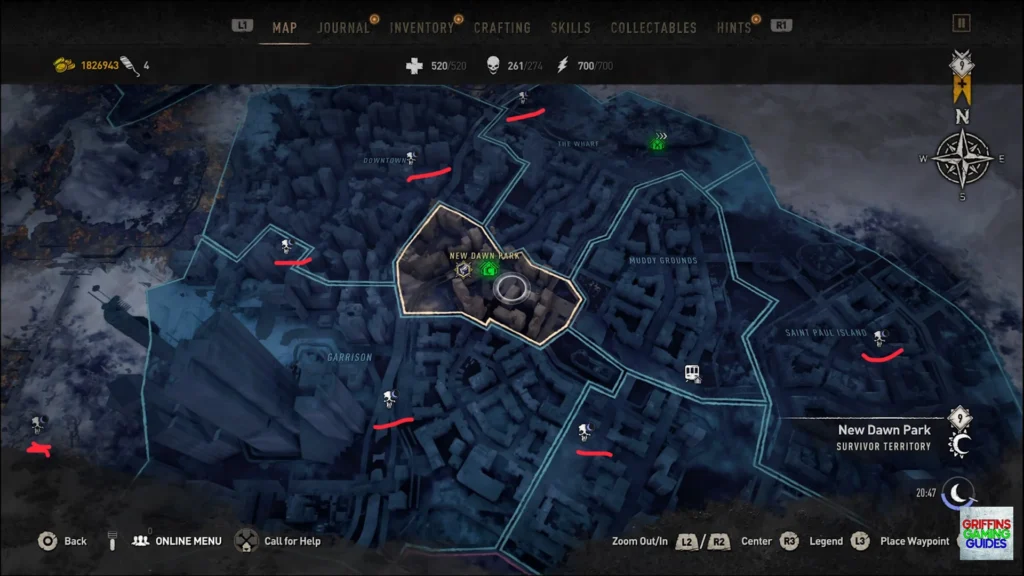
Across the map of Villedor, there are a total of 17 windmills to locate and activate. Once activated, they act as a safe zone, offering a bed, stash and a UV light to protect you from the scary monsters that lurk around at night. This trophy can be done at any time and the locations of all 17 windmills are shown below.
Some windmills will also activate a nearby Survivor/PK outpost and are home to side quest givers. Hovering over the windmill on your map will show a stamina requirement. Whilst it may seem daunting, if you want to make them easier, it’s recommended that you upgrade the Paraglider at a Quater Master to reach the top of the windmill with ease.
15 G
Can’t You Read the Signs?
Collect all Inhibitors hidden in GRE Quarantines.
A new addition to Dying Light 2 is GRE hospitals. There are a total of 6 hospitals around the map, all of which contain 4 Inhibitors to collect to help along with your journey for both Ironheart and Fit As A Fiddle.
Notes:
- It is recommended that you tackle these during the night as they will be significantly easier since there won’t be any volatiles indoors.
- Another thing to keep in mind is that every hospital will contain an audio recording for you to collect for Audiophile.
15 G
Find Anything Interesting?
Open all Airdrops.
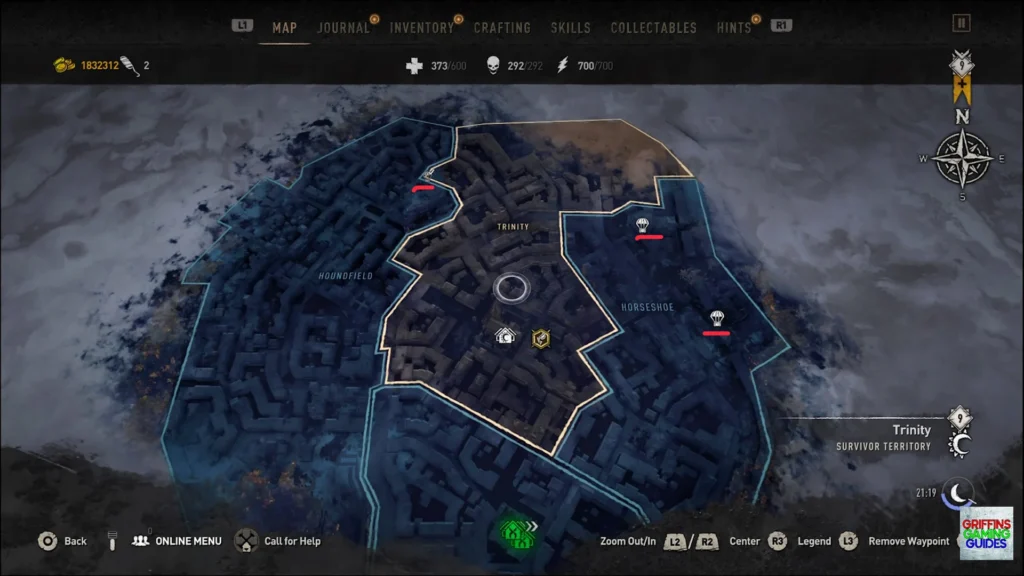
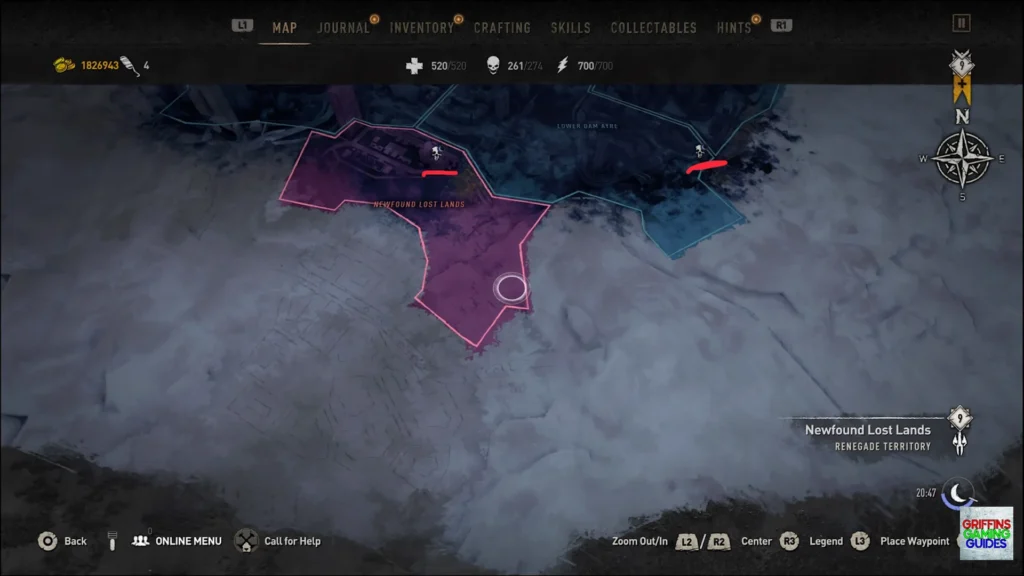
Looking for a way to upgrade your Nightrunner tools? You can obtain the required military tech via airdrops, with the exception of the Sunken City airdrops which will instead contain valuable gear to help significantly towards Who Wants to be a…. All airdrops outside of the Sunken City will be located high up on rooftops. so you will need to do a bit of parkour if you want to reach them, you should also be cautious whilst playing in co-op as if someone grabs the loot from an airdrop you may not receive the trophy. The Sunken City airdrops will either be in the water or guarded by Demolishers, depending on if you trusted Matt and drained the water during Now or Never. All 26 airdrop locations are shown below.
15 G
It Wasn’t That Hard, Was It?
Defeat your first GRE Anomaly.
See Revenants for more information.
25 G
Revenants
Defeat all GRE Anomalies.
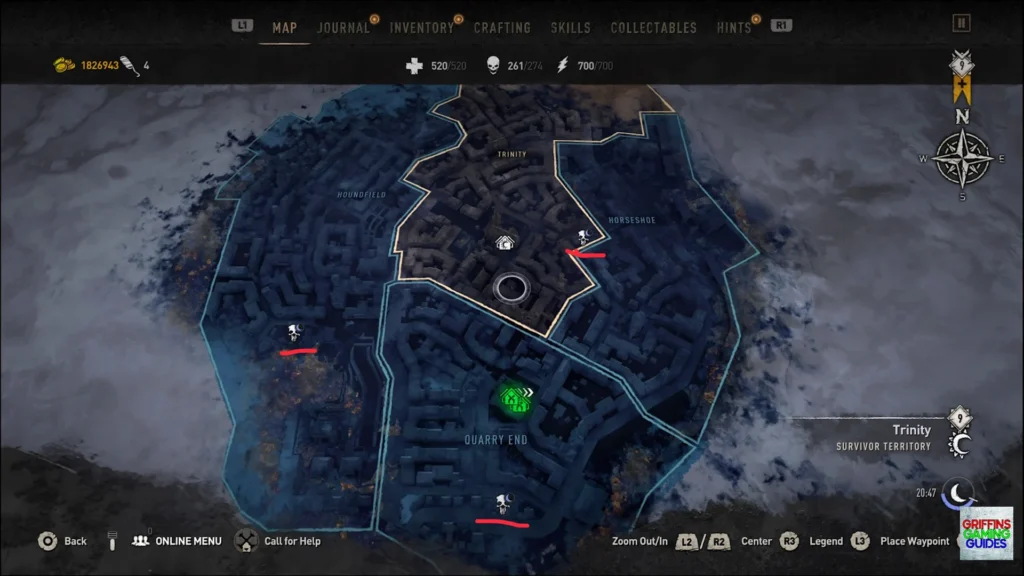
A new type of zombie added to Dying Light 2 is the Revenant. There are a total of 12 around the map and can only be found in GRE anomaly zones during the night. Revenants can be tough to kill due to them constantly spawning, so make sure to come prepared. This will also be a good time to work towards Get the Point?. After killing the Revenant, you can loot the site for valuables and inhibitors, each site containing 2 Inhibitors to help towards Fit as a Fiddle and Ironheart. Locations of all 12 GRE anomaly zones are shown below.
15 G
Flag Burning
Clear your first Bandit Camp.
This trophy will be unlocked during the story mission The Raid. Following the events of Jack and Joe’s thugs ambushing the Survivors from the Bazaar, you will be required to talk to Sophie, who will task you with taking over the Bandit Camp. Go at it loud and dangerous or even stealthily, the choice is yours as either way the bandits will need to die. Once you have cleared out the bandits, you will need to raise the flag, which can be done by interacting with it with Square. Once you have done so, the trophy will pop.
25 G
Ban Hammer
Clear all Bandit Camps.
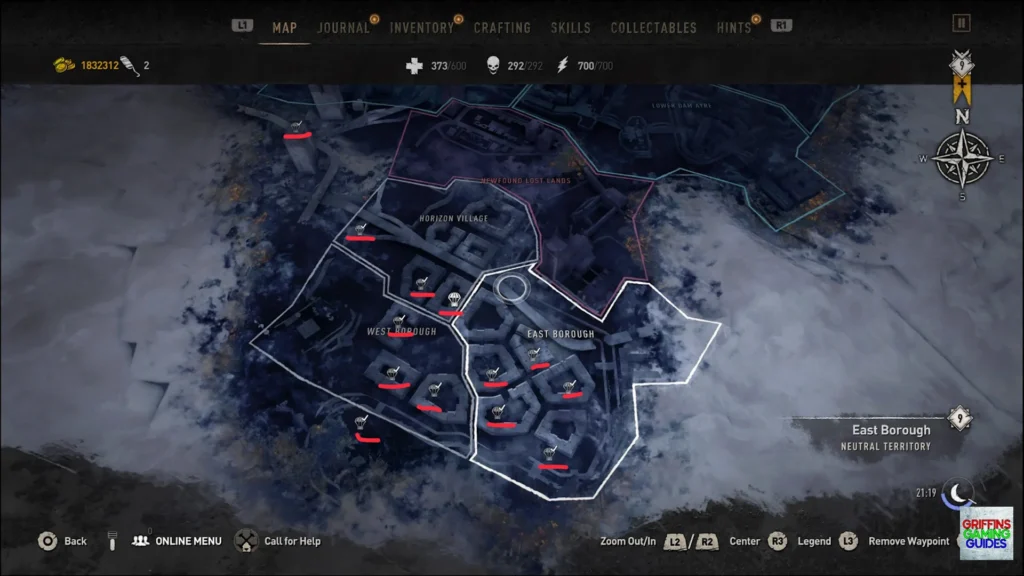
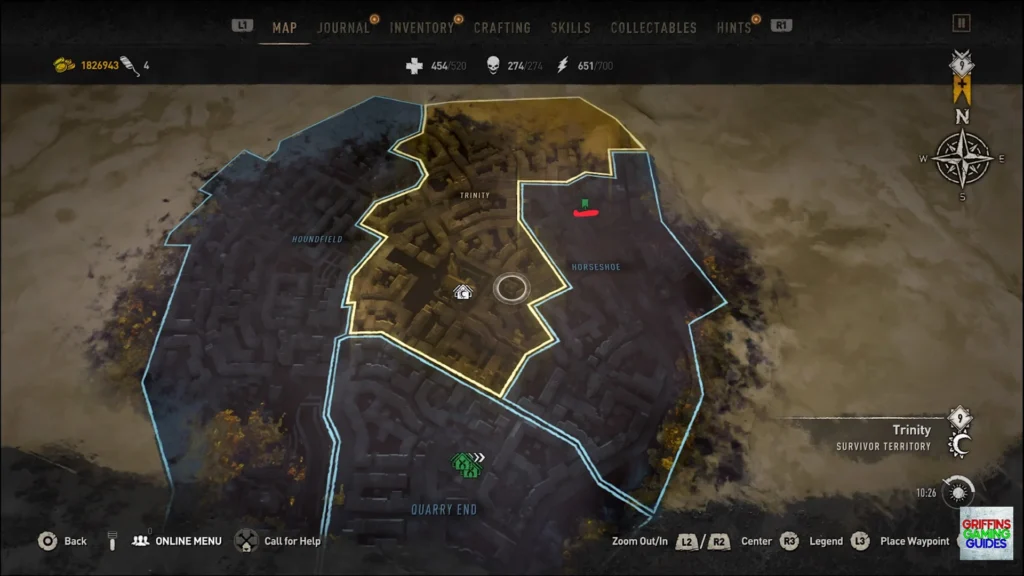
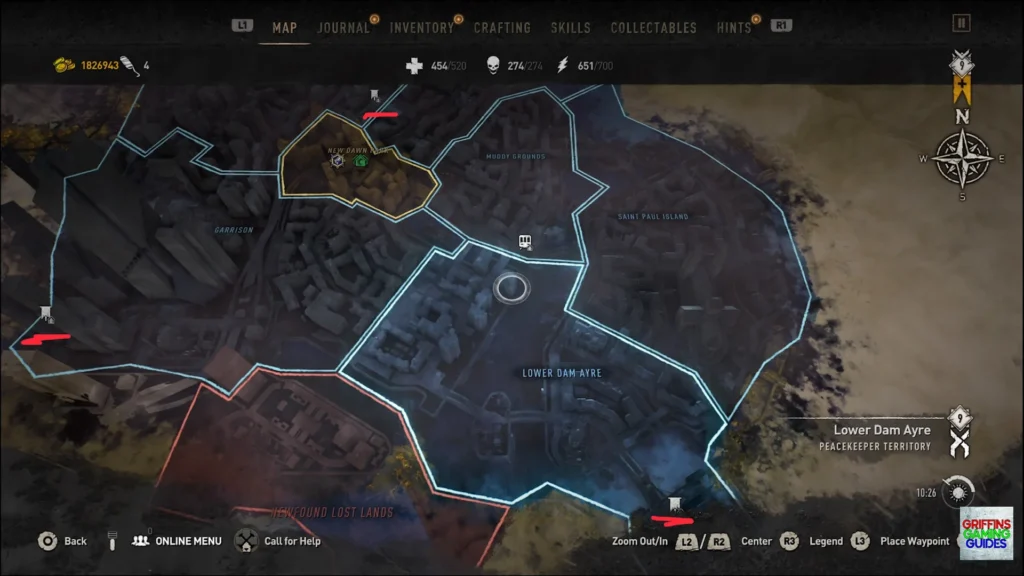
You will first be introduced to Bandit Camps during The Raid, and from there on you will be able to capture them for rewards and to unlock a safe zone. In order to capture them, you will need to clear out the surrounding enemies and then raise the flag with Square. There are a total of 4 to capture, and they will get tougher as you progress in the game, so it is recommended that you come prepared. However, here are some tips that may help:
- Kick enemies into spikes and off rooftops
- Attack the enemies from a distance with a bow or throwables.
- It may be worth attacking at night where you can lure the zombies to the Camp.
All Bandit Camp locations are shown below.
5 G
You Never Forget Your First…
Craft your first item.
This trophy will be obtained after crafting an item for the first time. This will take place minutes into the prologue as it is required that you craft a bandage to progress in the mission with Spike.
Here are the steps:
- When you complete the parkour sequence with Spike, you will come to a point where he tells you to get honey and chamomile. You can interact with the beehive (Square) to collect the honey and use your survivor sense (R3) to help you locate the surrounding flowers for chamomile.
- Once you have collected the honey and chamomile, you will want now need to craft the bandages, which you can do by going into your inventory (TouchPad), scrolling (R1) to the crafting menu, and holding Cross to craft the item.
5 G
Oh, So This Is How It Works!
Modify your weapon for the first time.
See Modder for more information.
15 G
A Friend in Need…
Help 50 survivors in Encounters.
Whilst travelling across Villedor, you will want to keep an eye on your HUD for random encounters, which are shown by a diamond icon. Whilst there are blue and orange encounters, only the blue encounters have a chance of being a survivor in need of help. For this trophy, you will need to help 50 survivors in these encounters. Not every encounter will be a survivor as some will require you to chase after a certain enemy or kill an enemy, so you will want to listen out for someone screaming for help. It is recommended that you mainly play during the day due to there being fewer types of other encounters. at this time.
All types of survivor encounters are noted below:
- Survivor tied up: Interact with them using Square.
- Survivor about to turn: Give them an Immunity Booster (Square).
- Survivor being burnt: Interact with them using Square.
- Survivor being hanged: Shoot them down (bow or throwing knife).
Rescuing survivors that are in need is also a good way to obtain XP for Parkour Master and Combat Master.
25 G
Parkour Master
Achieve maximum Parkour Proficiency.
See Combat Master for more information.
25 G
Combat Master
Achieve maximum Combat Proficiency.
In order to obtain this trophy as well as Parkour Master, both your combat and parkour proficiency must reach max level, which you can do so by obtaining XP. XP can be obtained from pretty much anything, like completing missions, killing zombies, and completing combat/parkour trials. In addition to that, there will be a bonus XP gain during the night, considering you survive. Some methods will be better than others due to the XP amount varying on the type of activity, however, random encounters are a reliable way to rank up as they can grant you anywhere between 200 – 1000 of each type of XP depending on the encounter. You will want to keep an eye out for both the blue and orange random encounters while working on this, which will also give you an opportunity to work towards A Friend in Need.
15 G
Boot Licker
Reach City Alignment 7 for any faction.
Whilst progressing through the story, you will unlock the ability to activate facilities and choose to give them to the PK or Survivors for bonuses. All 7 facilities must be given to one faction for you to unlock this trophy. It is entirely your choice as assigning a facility will not affect the story whatsoever. Check out the Boot Licker trophy guide for everything you need to reach city alignment 7 for a given faction.
15 G
Who Wants To Be a…
Collect 1,000,000 in Old World Money.
For this trophy, you need to collect a total of 1,000,000 in Old World Money during your playthrough. Whilst this trophy may seem daunting at first glance, it is entirely doable solo and without duplicating any valuables. You should start off by collecting some Rank 7, 8, or 9 gear – a good time to get some is whilst going for Find Anything Interesting? as the Sunken City loot will give you some high-level gear. Another good way to find some is from legendary encounters.
It is highly recommended that you temporarily change over to easy mode so that the gear is worth significantly more money. You can do so by pressing pause (Options), going to Options, and selecting Difficulty Level. Luckily, the trophy is accumulative and because of it, there is a way to cheese it by selling your gear and buying it again.
Once you are ready to actually obtain the trophy, you will want to head to a trader and begin selling your gear, making sure not to exit the trade as this will cause you to lose the items. You should then buy the gear back so that you can keep selling and buying it again until you finally obtain the trophy. Note: If the trophy doesn’t pop by the time it should, buy your gear back, then exit the trade and sell something again.
25 G
Man On a Mission
Meet all your Sparker love interests.
For this trophy, you will need to meet up with all of Aiden’s potential dates. First things first, you will need to meet 3 requirements:
- Complete the story quest The Raid.
- Claim the Larch windmill.
- Complete Welcome on Aboard (needed for the second match).
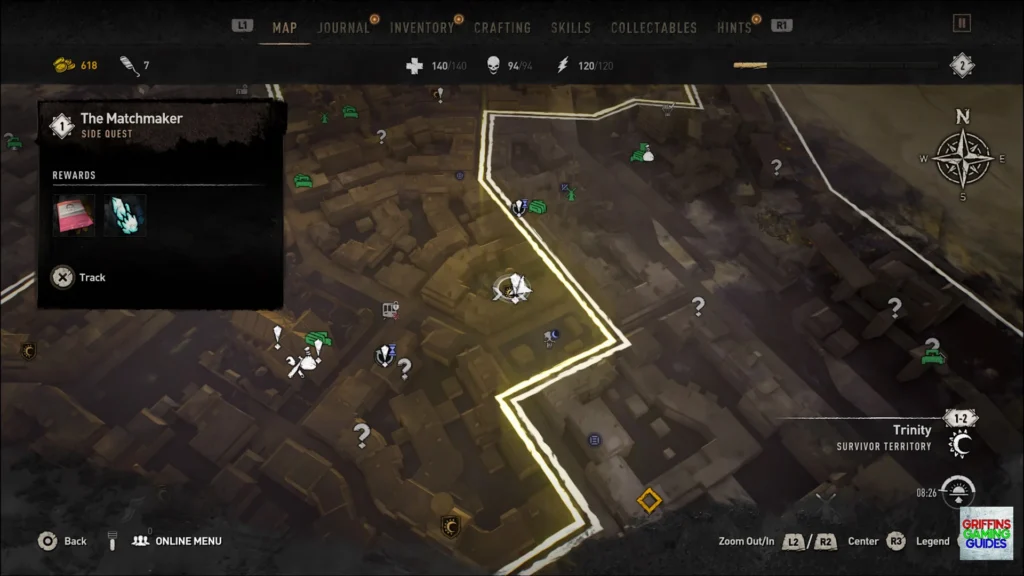
Once both requirements are met, you will be able to start a side quest called Matchmaker – located at the Bakery outpost. Starting the quest will also grant you Aiden’s dating card. The overall objective of the first section of the quest is to find the sparker cards for some potential matches. It’s just like Tinder but in Dying light!
Starting the quest will also grant you Aiden’s dating card. The overall objective of the first section of the quest is to find the sparker cards for some potential matches. After completing the quest, you should either wait or sleep for 24 hours so that the next section of the quest can appear. Once you’re ready for another date, head back to the Bakery where a new quest will have spawned, this time named “As_Sparker_2”. Though your first match is here, Juliet will soon, unfortunately, reject you and you should again let another 24 hours pass.
Next up, still meeting at the Bakery, the second match will have arrived. However, there is a potential bug with this part where if you previously completed Sentimental Value, the trophy may pop after the dialogue. If you don’t receive the trophy after speaking to Vinnie, you should skip another 24 hours so that you can get back to dating. Third time lucky? If you aren’t already, you should now be headed towards the Bakery where you should talk to Maya and finally obtain the trophy.
15 G
Ultramarathon
Travel at least 960km.
Note:
If you happen to take a break from the game, you should be cautious as the distance travelled counter seems to get reset with some updates. Unfortunately it is not a visual bug. This is likely to be your final trophy due to how time consuming it is, as it requires you to have travelled for a grand total of 960km. The main thing to note here is that only running and walking count towards the progress, so you should avoid using your Paraglider wherever possible while you’re playing through the game.
It’s very likely that you won’t even be halfway to this trophy by the time you have all the other trophies, which is why it’s recommended that you use the good old rubber band method so that you can obtain this whilst you are AFK, while also making sure to be inside a safe zone to prevent yourself from getting killed. Something else you should do is equip the Grappling Hook as it will prevent your game from pausing whilst you are AFK. As of patch 1.15, you can now see how much progress you have made via the extras tab in the main menu.
15 G
After the Fall
Fall from a combined height of at least 10,994 meters.
This trophy requires that you fall for a distance of 10,994 metres, though this does not have to be done in one try. This is likely to be obtained naturally whilst going for all other trophies. However, if you haven’t managed to obtain this trophy by the time you finish the story, the highest point on the map is the VNC Tower, which you can take the elevator up to after the story mission Broadcast. Simply jump off the building and you will have this in no time.
15 G
Good Night & Good Luck
Survive your first night.
Night time occurs at 19:00 until 08:00 in game time and can be seen by a moon icon on the bottom right-hand side of your screen. You will also get bonus XP during this time, which helps towards Parkour Master and Combat Master. In order to make it through the night and get this trophy, you will either want to wait or sleep in a bed (Square). It is recommended that you stay inside a safe zone for the entire night, however, if you are feeling extra risky and choose to venture out, be cautious as dying will cause the trophy to fail.
15 G
Can’t Touch This!
Kill 20 enemies in a row with melee weapons without taking damage.
To get this trophy, you need to kill a total of 20 enemies with melee weapons, both consecutively and without taking any damage. Unfortunately, using a bow will not count for the trophy, which means you will need to find yourself a decent melee weapon to start off with. It is highly recommended that you go for this during the daytime as there will be no Spitters or Volatiles to throw you off. Once you have found a large group of enemies, here are some tips that you may find helpful:
- Equip mods to your weapons.
- Make use of blocking (L1) and dodging (R1).
- Check your surroundings.
15 G
Night Hunter
Kill a Volatile.
Making a return, meet the Volatile! This time they have evolved, becoming stronger and scarier due to the lack of sun they have seen. This trophy will be unlocked during X13 when you are tasked to deal with the Renegades and begin to turn, making you stronger and enabling you to take down the Volatiles that are about to swarm the area. If you would, however, like to get the trophy earlier you can find Volatiles in:
- Chases.
- Volatile nests (completed GRE quarantines and Dark Hollows).
Just make sure to come prepared and geared up if you want to challenge a Volatile as they are deadly.
15 G
Death From Afar
Kill a Spitter using a ranged weapon.
Whilst the first Dying Light had Toads, Dying Light 2 has Spitters, which are even deadlier and scarier. Be cautious when fighting them and make sure to take them out quickly so they can’t damage you too much. Typically they will spawn almost anywhere at night, so once you have your bow or crossbow at hand, you can venture out and hunt one. An alternative and safer option is to wait until the quest due to there being guaranteed Spitters in the area.
15 G
Tanning Salon
Use the UV Flashlight to kill a Viral.
To unlock this trophy, you need to use your UV Flashlight to weaken a Viral, then kill it once it’s in that weakened state. You will unlock the UV Flashlight upon completion of Welcome on Aboard. It is highly recommended that you upgrade it at a Craft Master so that it becomes much stronger and so the battery lasts longer.
Once you are ready to obtain this trophy and have the UV Flashlight equipped, you will want to find a lone Viral on the streets and hold L2 to use it until the zombie drops to the ground, after which you should kill the zombie with your weapon.
Credit to Lewis_y123 for the video.
15 G
Terminal Headache
Perform 50 headshots with a ranged weapon.
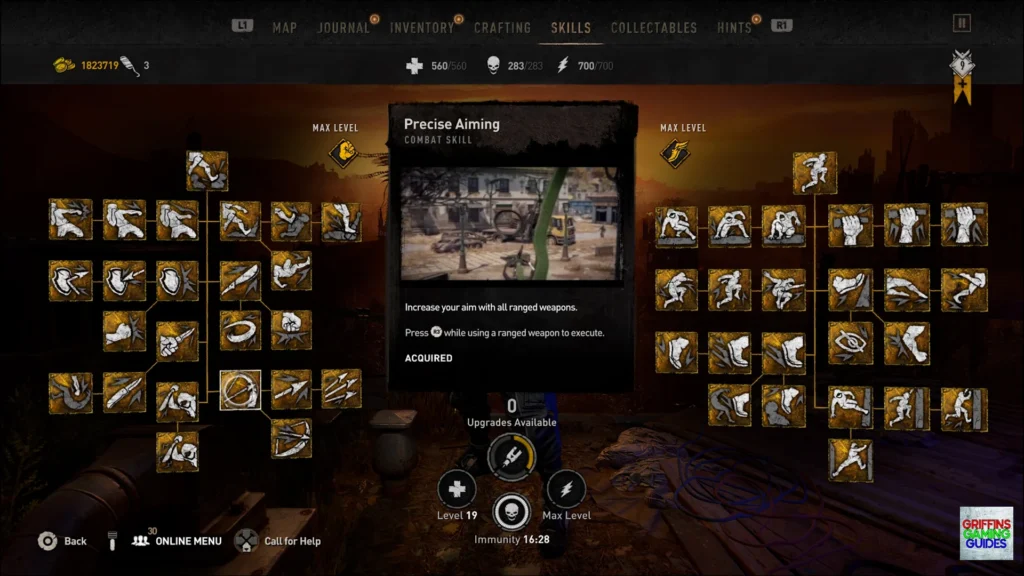
For this trophy, first you should get your hands on either a bow or the crossbow. Once you have one by your side with some arrows of your choice, you can go ahead and get started on your murderous rampage! You need to get a total of 50 headshot kills to get the trophy. If you are struggling to score a headshot, you can obtain the skill ‘Precise Aiming’ which will allow you to aim down the sights of your bow (R3).
15 G
Slowpoke!
Lose the maximum level of Chase.
Another new type of zombie added to Dying Light 2 is the Howler. Howlers are like the Screamers from the previous game, but just a bit more grown up and less threatening. They only spawn during the night time and will not attack you. However, they will let out a scream which will alert all nearby zombies of your presence and will begin your chase level.
To maintain or increase your chase level, simply kill zombies whilst the chase is active. For this trophy, you will need to increase your level to the maximum amount, then lose it. The higher your chase level, the more difficult nights are to survive through, so it is recommended that you stay close to a safe zone in case you need to fall back to a UV light, though keep in mind that you shouldn’t stay in the UV light for too long or you will lose the chase level. To lose the chase level you can:
- Get killed.
- Stay in a safe zone for 15 seconds.
- Evade the zombies.
15 G
Being All Social
Join a co-op session.
You will get this trophy after joining your first co-op session. A co-op game will be available to join once the prologue is completed. You should first press pause (Options) and select Online Menu (Cross), then choose either Quick Join or Find Games.
15 G
That’s Teamwork!
Kill 100 enemies while playing with at least 2 other players.
After getting Being All Social, your next goal is to put down 100 enemies, providing that there are at least 2 other players in the session. Once you are in a session with at least 2 other players, venture out and get hunting those zombies! It should be noted that kills are cumulative, meaning you don’t need to kill all 100 enemies in the same lobby to get the trophy.
15 G
Lightning Reflexes
Perform a Perfect Block 10 times in a row without taking damage.
In order to perform a perfect block, you must first find an aggressive human enemy. It is strongly recommended that you try to get the NPC away from any other surrounding enemies so that they don’t interfere and damage you; causing you to miss the trophy. A good time to get this trophy is during the prologue. Following the events of Aiden getting bitten whilst making your way through the tunnels, you will come to a point where you will encounter a Renegade, after which you will be introduced to the combat tutorial. To perform a block, you must press L1, and to make it a perfect block you must block at the last second before the enemy hits you. Do this 10 times and the trophy is yours!
Credit to Lewis_y123 for the video.
15 G
Modder
Modify your weapons at least 50 times.
In order to obtain this trophy, you must first acquire a weapon mod blueprint. You can buy some from any craftmaster’s inventory. Another way to get a good weapon mod blueprint early on is the side quest The Spark of Invention, which can be found in the Bazaar. Once you have gotten a blueprint for a weapon mod, you will then need to apply it to a weapon, which can be done by:
- Opening your inventory (Touch Pad).
- Selecting a weapon (Cross).
- Choosing Modify (Triangle).
This will also unlock Oh, So This Is How It Works!. Each weapon modification will cost specific materials, all of which can be purchased from any Craftmaster. However, if you have a weapon charm available, they also count as modding weapons and are much cheaper to apply.
25 G
Fit as a Fiddle
Max out your Health.
See Ironheart for more information.
25 G
Ironheart
Max out your Stamina.
In order to achieve both this trophy and Fit as a Fiddle, you’re going to need 156 Inhibitors, however, there are only 126 in the game. While this may seem impossible, it can actually be done in one playthrough:
- First, you will need 81 Inhibitors saved up
- Next, make a back up save cloud with PlayStation Plus / USB.
- Finally, pump all of your Inhibitors into one stat.
- Load into the backup save and do the same with the other stat.
If you however choose not to do this method, the rest of the Inhibitors can be found in NG+ with new locations. Inhibitors are scattered across the map, some found during quests and some after completing activities. Listen out for “Inhibitor detected” and the GRE key flashing at the bottom of your screen. It is recommended that you go for these trophies towards the final stages due to some Inhibitors, which you can find whilst going for other trophies. Some examples are noted below:
- The First Biomarker (1).
- GRE Quarantines (24): Can’t You Read the Signs?.
- GRE Anomalies (24): Revenants.
- Claimed Metro Stations (6): Tube Map.
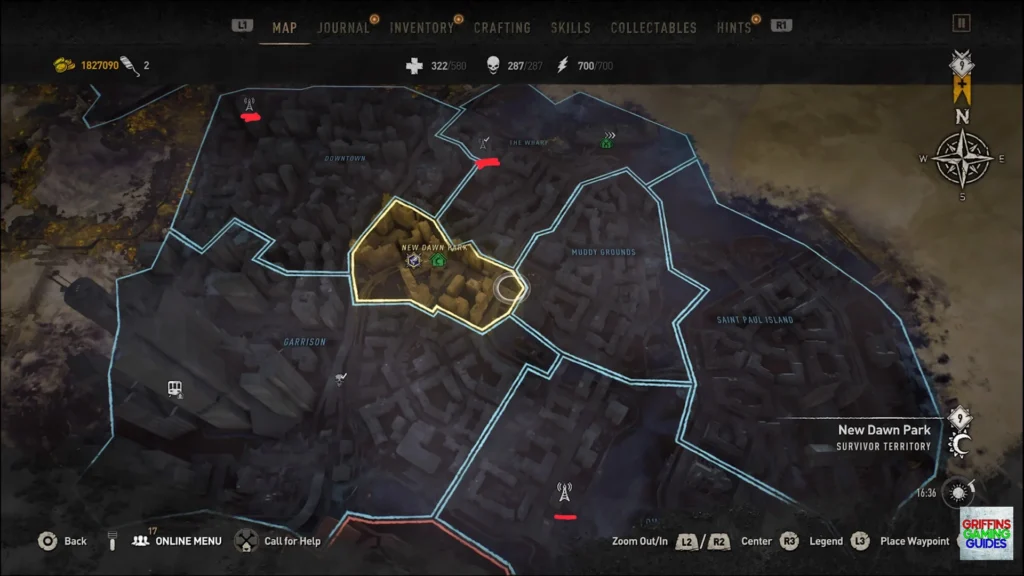
There are also 2 semi-missable inhibitors that can only be found during the quest: Cathedral. If you would like to narrow down an exact location to the inhibitors, you can activate Radio Towers, provided that you have unlocked the GRE Detector from the Broadcast quest. Locations of all Radio Towers are shown below.
15 G
You’re Going Down!
Perform 50 takedowns.
A takedown is a move that will allow you to kill an enemy and go unnoticed, meaning you will have the element of surprise to clear out an area. However, attempting to take down stronger enemies will not kill them and instead will alert the nearby enemies. A takedown can be done by sneaking up to an enemy and following the option given to “Takedown” which are performed with Square. Do this 50 times to unlock the trophy.
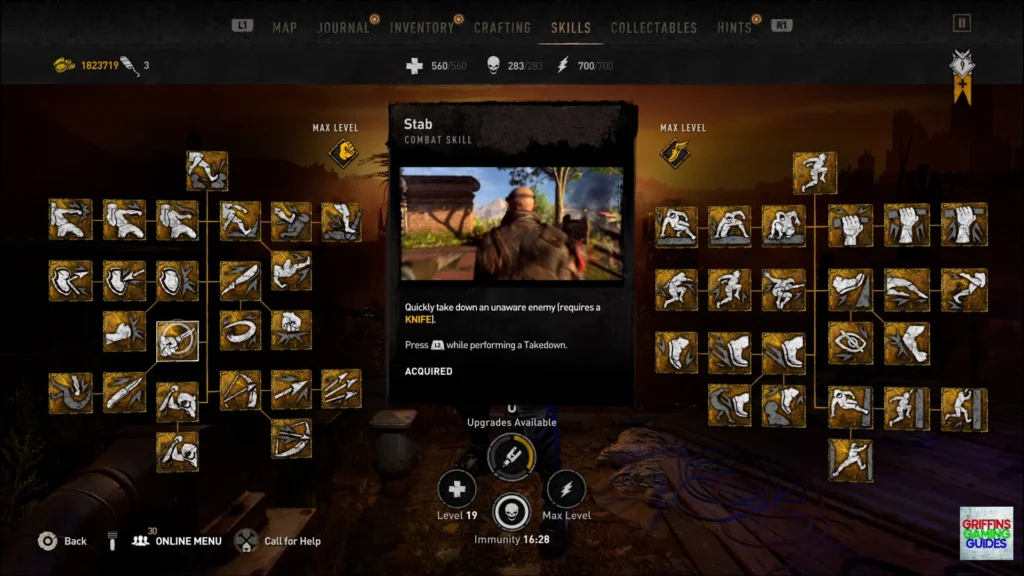
If you would like to speed up the takedown move, you can obtain the Stab skill to unlock the ability to use a knife (L2) when performing the takedown.
Credit to Lewis_y123 for the video.
15 G
Don’t Look Up
Perform Smash on at least 50 enemies.
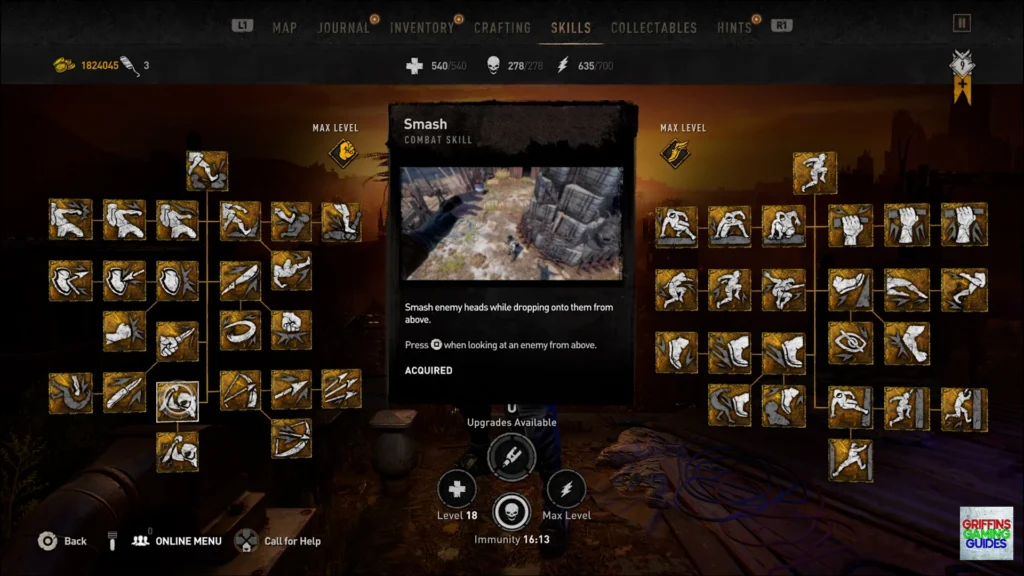
The Smash ability allows you to drop onto an enemy from above, killing weaker enemies instantly. To unlock the ability, you can find it in your skill tree under the combat section. Once you have the ability unlocked, you should traverse the nearby rooftops so that you can get the jump on the enemies and perform the Smash ability when prompted to Takedown which you can do with Square.
You’ll need to do this a total of 50 times to get the trophy. Something to keep in mind, though, is that performing the Smash ability on an enemy that is wearing a helmet will not kill them.
Credit to Lewis_y123 for the video.
15 G
Get the Point?
Kill 50 enemies with a Spear.
This trophy requires you to use spears to kill 50 enemies. Typically, you can find spears in combat sequences whilst progressing through the story, and they can also be found while doing activities. A good time to get this trophy is whilst going for Revenants due to the constantly spawning zombies and nearby spears. Spears can do quite a bit of damage to enemies in the early regions, however, they aren’t a one-hit kill on stronger enemies such as Volatiles. In addition, once you throw a spear, it can no longer be used, so it is recommended that you throw the spears only at weaker enemies.
15 G
True Nightrunner
Complete all Nightrunner Trials.
If you would like to test your parkour and combat capabilities in Dying Light 2, you can visit a parkour or combat trial. For this trophy you will need to specifically complete the ones named Nightrunner, of which there are a total of 10. All you will need to complete the trial is to obtain ANY medal, it doesn’t matter if it’s a bronze, silver or gold. If you would like to make them easier, it is recommended that you upgrade the Paraglider at a Craft Master. All Nightrunner trial locations are shown below.
25 G
Bing Bang Boom!
Perform an Air Kick after a Double Wall Run.
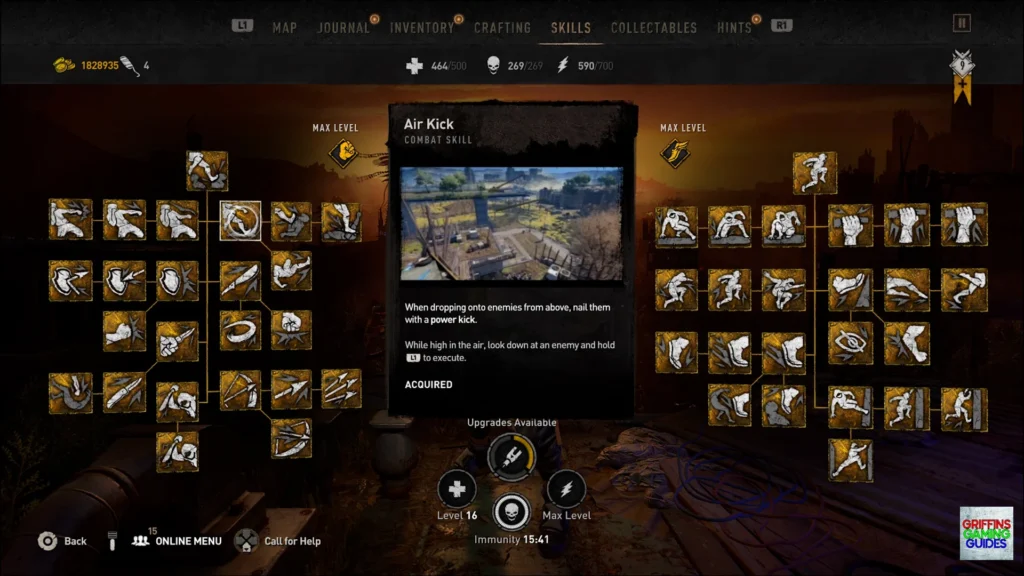
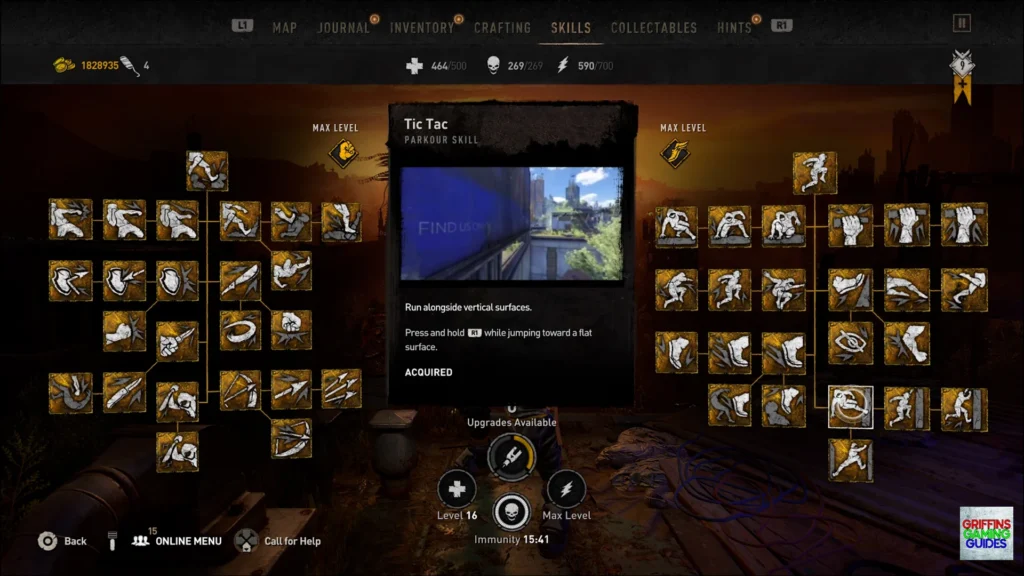
In order to obtain this trophy, you must perform a Double Wall Run followed by an Air Kick manoeuvre. But before you get started, you must first unlock some skills. The skill tree can be found by pausing the game (Options) and scrolling to skills (R1). The skills required are listed below.
Once all of the skills shown above are acquired, your next objective will be to find a zombie located near two narrow walls, such as an alleyway. In order to perform this badass move, you will want to:
- Run up to the first wall and hold R1 to wall run.
- Look at the second wall and hold R1 to move to the wall.
- Launch yourself towards the zombie by pressing R1.
- Hold L1 to air kick the zombie.
Credit to Lewis_y123 for the video.
25 G
Archivist
Find all Collectible Notes.
Whilst exploring the lands of Villedor, you may come across notes, such as safe codes, posters, newspapers, dog tags, and playing cards; also known as mementos, which offer lore about the game for you to dive into. Activating survivor sense (R3) whilst approaching the collectible will make them easier to narrow down. Check out the Archivist trophy guide for how to find all Collectible Notes in Dying Light 2.
25 G
Audiophile
Find all Collectible Recordings.
To unlock this trophy you will need to collect all recordings in the game, of which there are 63. Just like Archivist, a few recordings are semi-missable so it is recommended that you go for these during Stage 1 to minimise cleanup time. However, if missed, they can be gotten through co-op. Also, activating survivor sense (R3) whilst approaching the collectible will make them easier to narrow down. Recordings also offer lore for you to dive into, also in the form of tapes. It should be noted that there will be a tape in every GRE hospital whilst you are going for Can’t You Read the Signs?.
Missable Tapes
The missable tapes are shown in the table below, while a complete video guide of the locations can be found at the bottom.
Location:
Requirements:
Description:
Carriers X – Must interact with the carrier at the PK metro station which is available after entering the PK headquarters in the Central Loop
If you have the Carriers quest active, you will be able to visit the Carriers HQ. After entering through the doors, the tape will be on the table in front of the trader.
Now or Never; Completing Space Cock will cause the compound to become inaccessible
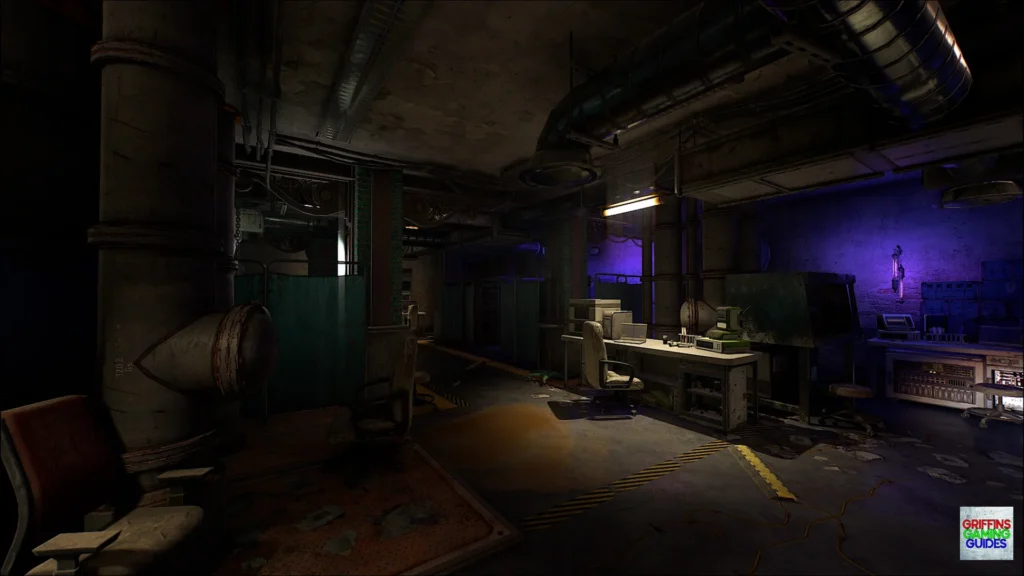
These tapes can be found on the bottom floor of the compound in Waltz’s lab. After entering, turn to the left and the first tape will be on the table with the laptop near the chair. The next tapes will be in the next room, on the table with the radio and on the table next to the bed.
You can find a third party video guide from another YouTuber who has a very good take on what you need to. Please ensure you subscribe to Gaming With Abyss and check their video out here.
25 G
Street Art Aficionado
Discover all Graffiti Tag Collectibles.
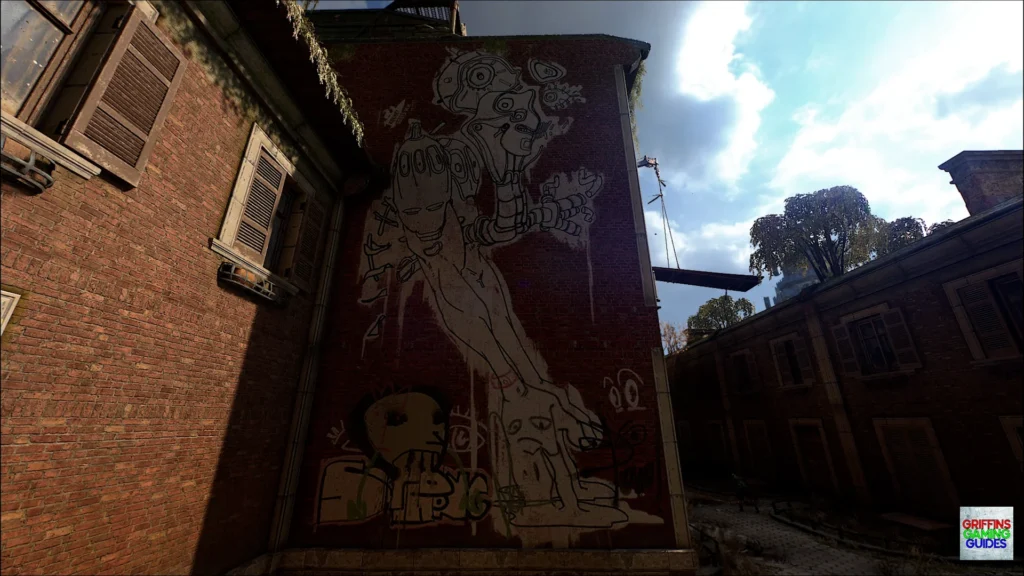
The third and final collectible comes in the form of graffiti tags, and unlike the previous collectibles, none of these are missable. There are a total of 70 that you need to pick up. Once you have found the graffiti, look around for a box of art supplies nearby that you can pick up with Square.
You can find a third party video guide from another YouTuber who has a very good take on what you need to. Please ensure you subscribe to Gaming With Abyss and check their video out here.
That’s the Dying Light 2 Stay Human guide complete, I hope it helped you through the game.
