Grand Theft Auto San Andreas Snapshots (The Definitive Edition)
Here we will go over all of the Grand Theft Auto San Andreas Snapshots (the Definitive Edition) of which there are 50 with all of them being found in San Fierro, the third main region in San Andreas.
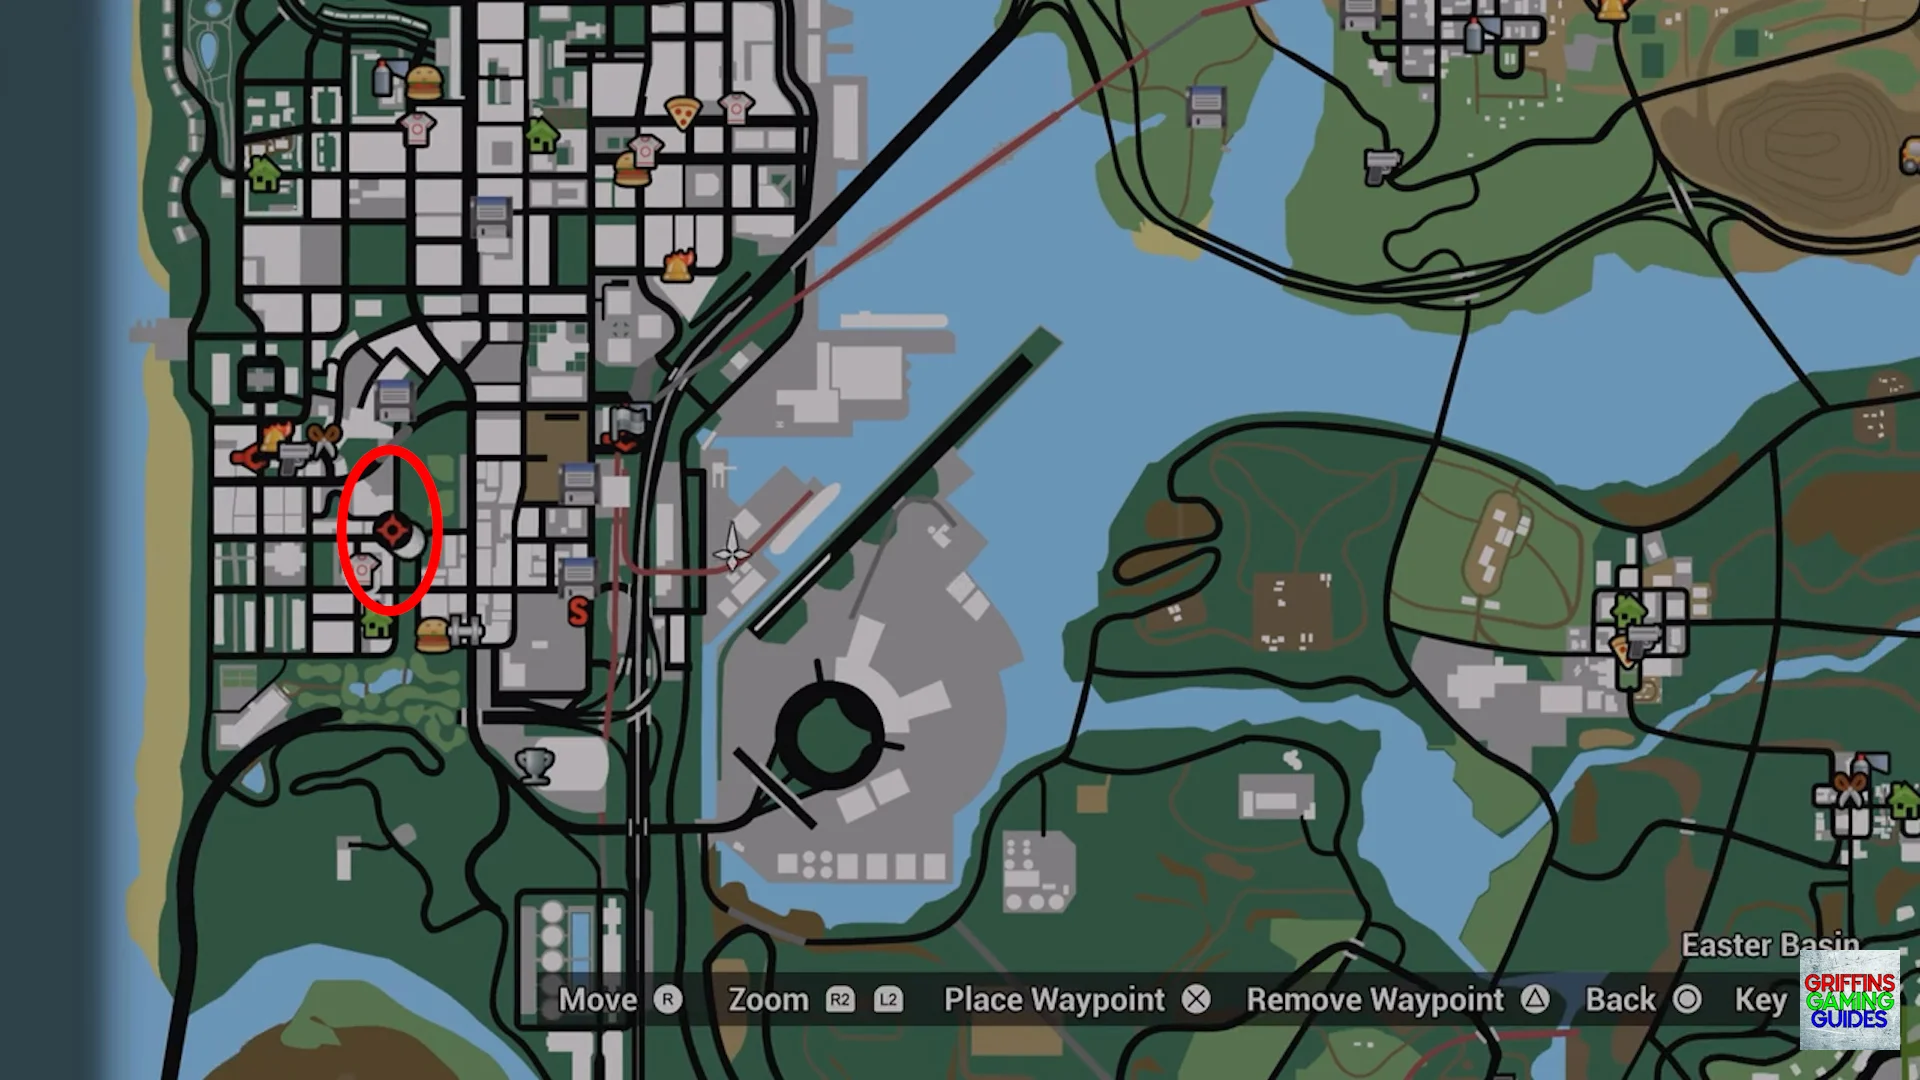
To be able to access all 50, you will also need to progress through the game to where The Desert becomes available once the Yay Ka-Boom-Boom story mission is completed, you can then continue through The Desert completing the Green Goo story mission which then unlocks the way to Las Venturas. The Snapshots will require you to aim your camera, one of which you can collect in the bedroom of CJ’s house back in Grove Street at a given target then take a picture of the required object which will be symbolised by a blue and pink spinning camera icon. Snapshots will need to be completed as you work towards attaining 100% completion which unlocks Remastered.
San Andreas Snapshots
Below you can find the locations of all 50 Snapshots in San Fierro.
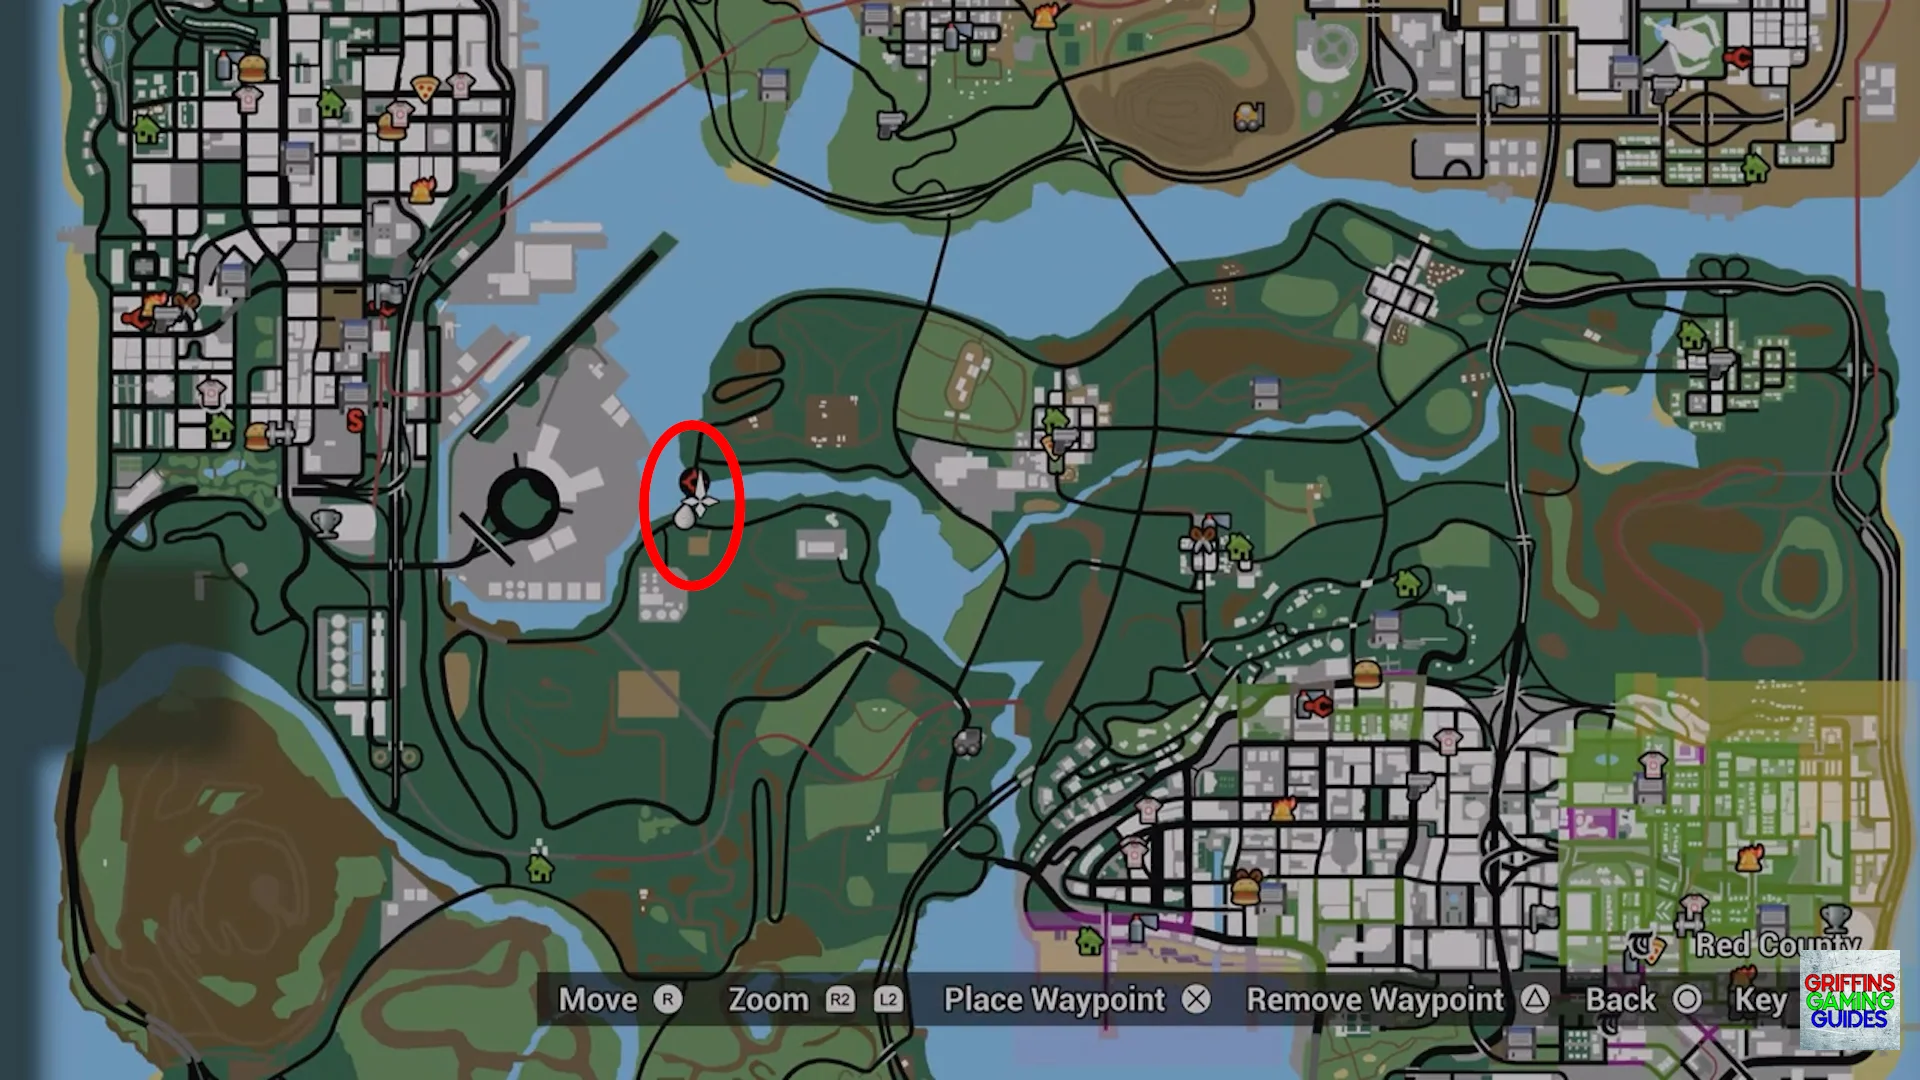
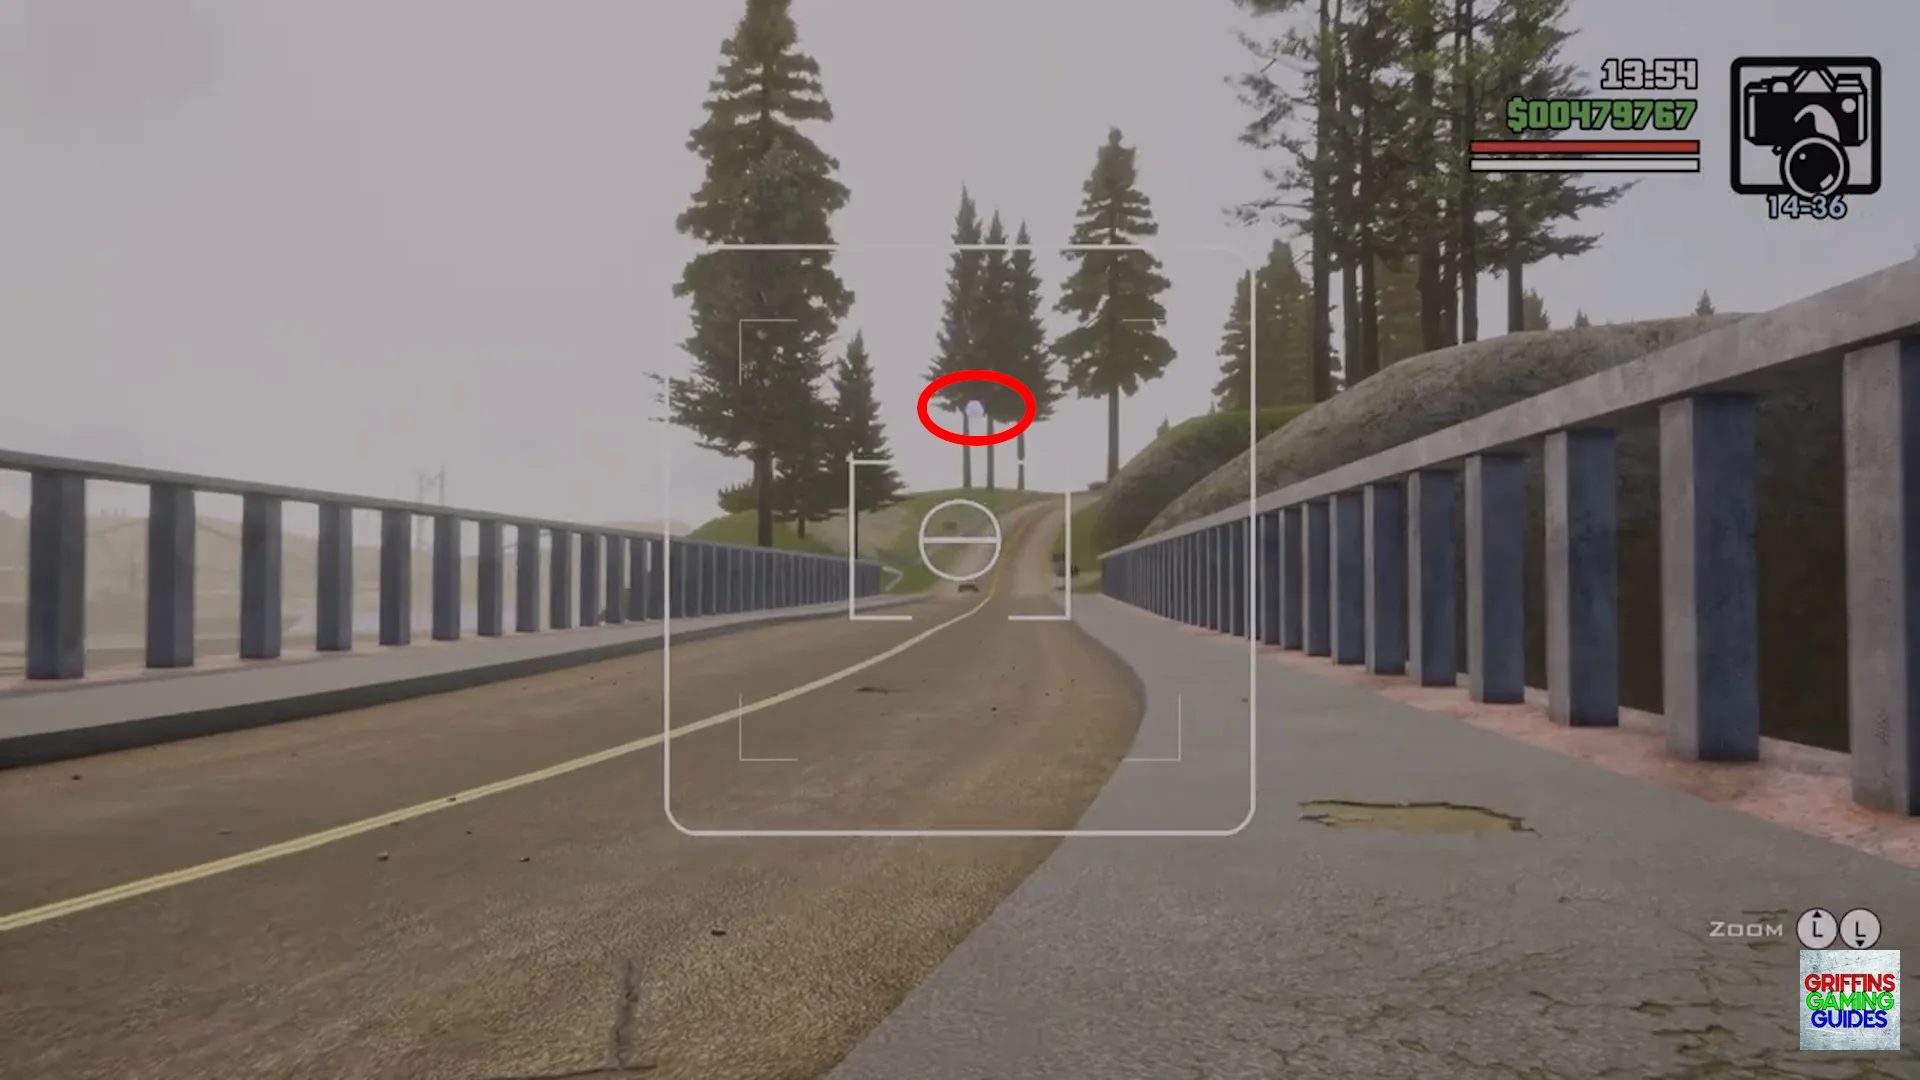
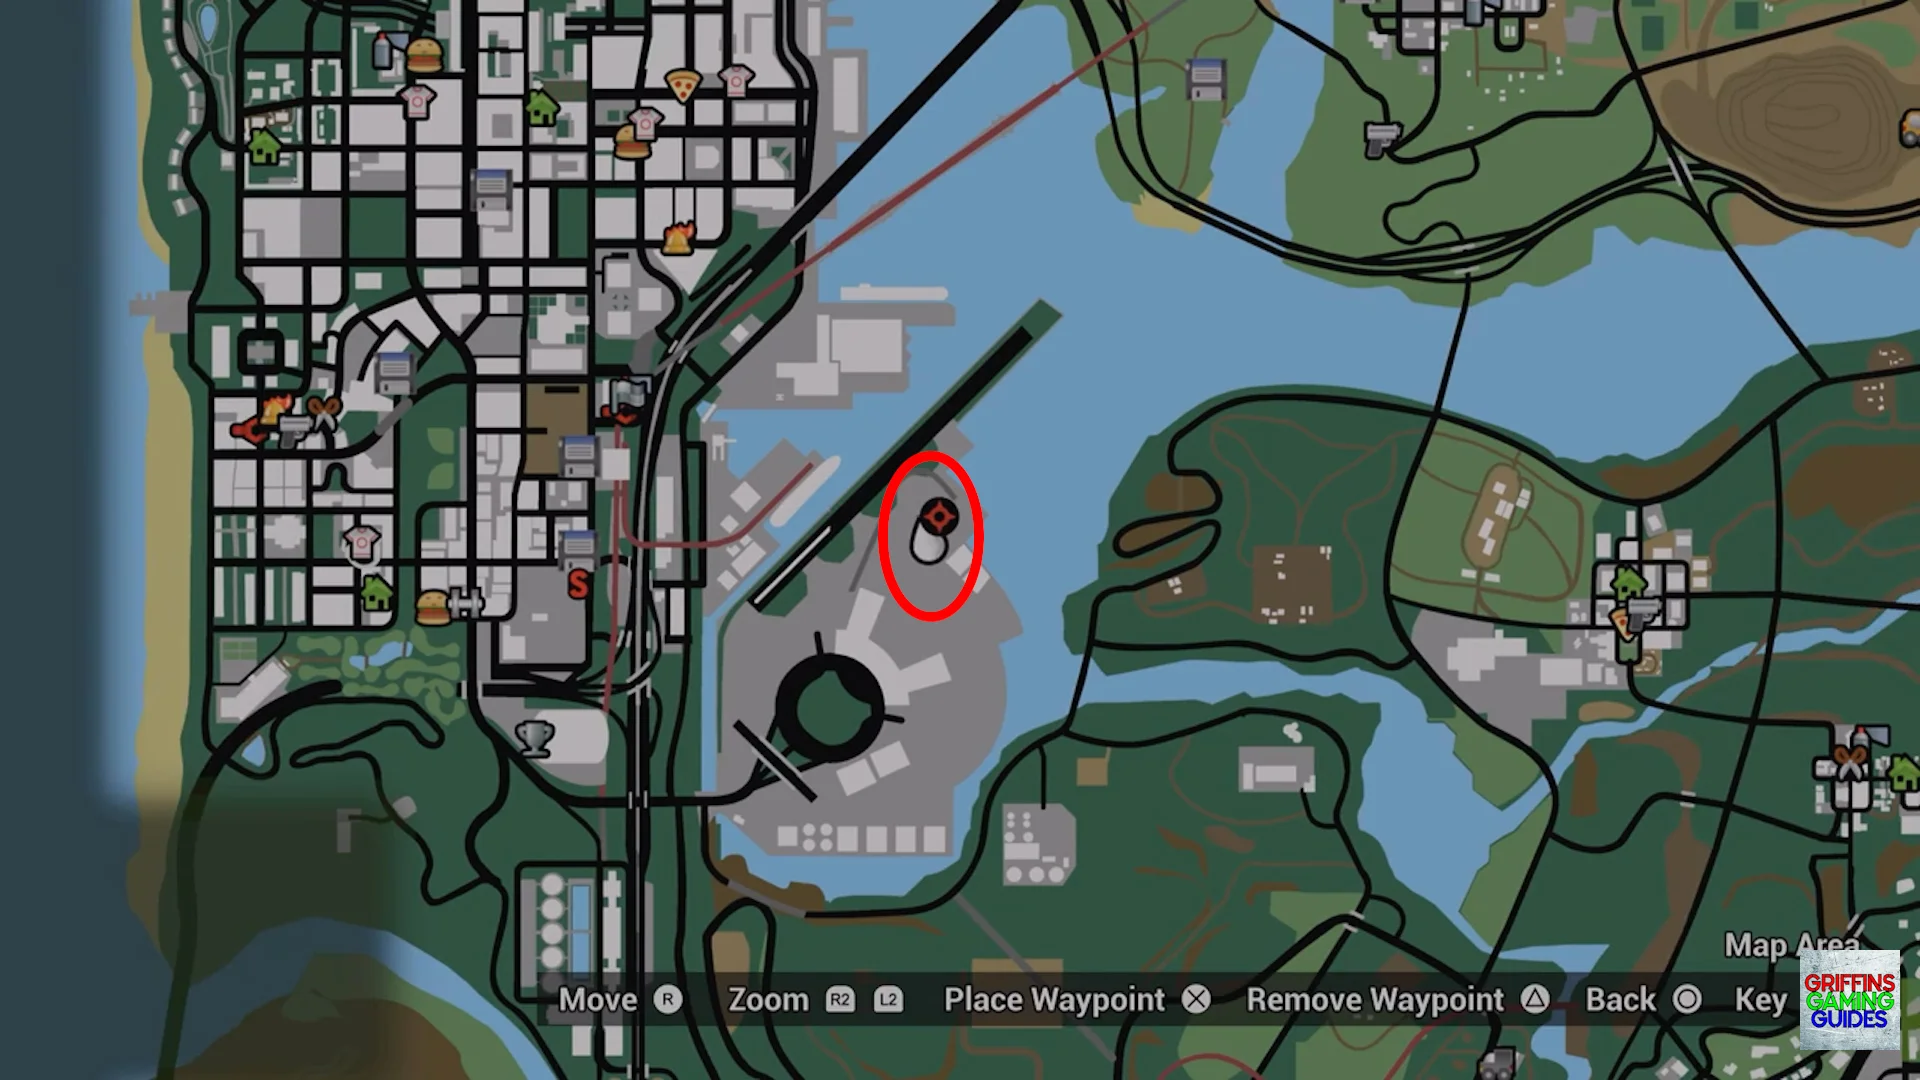
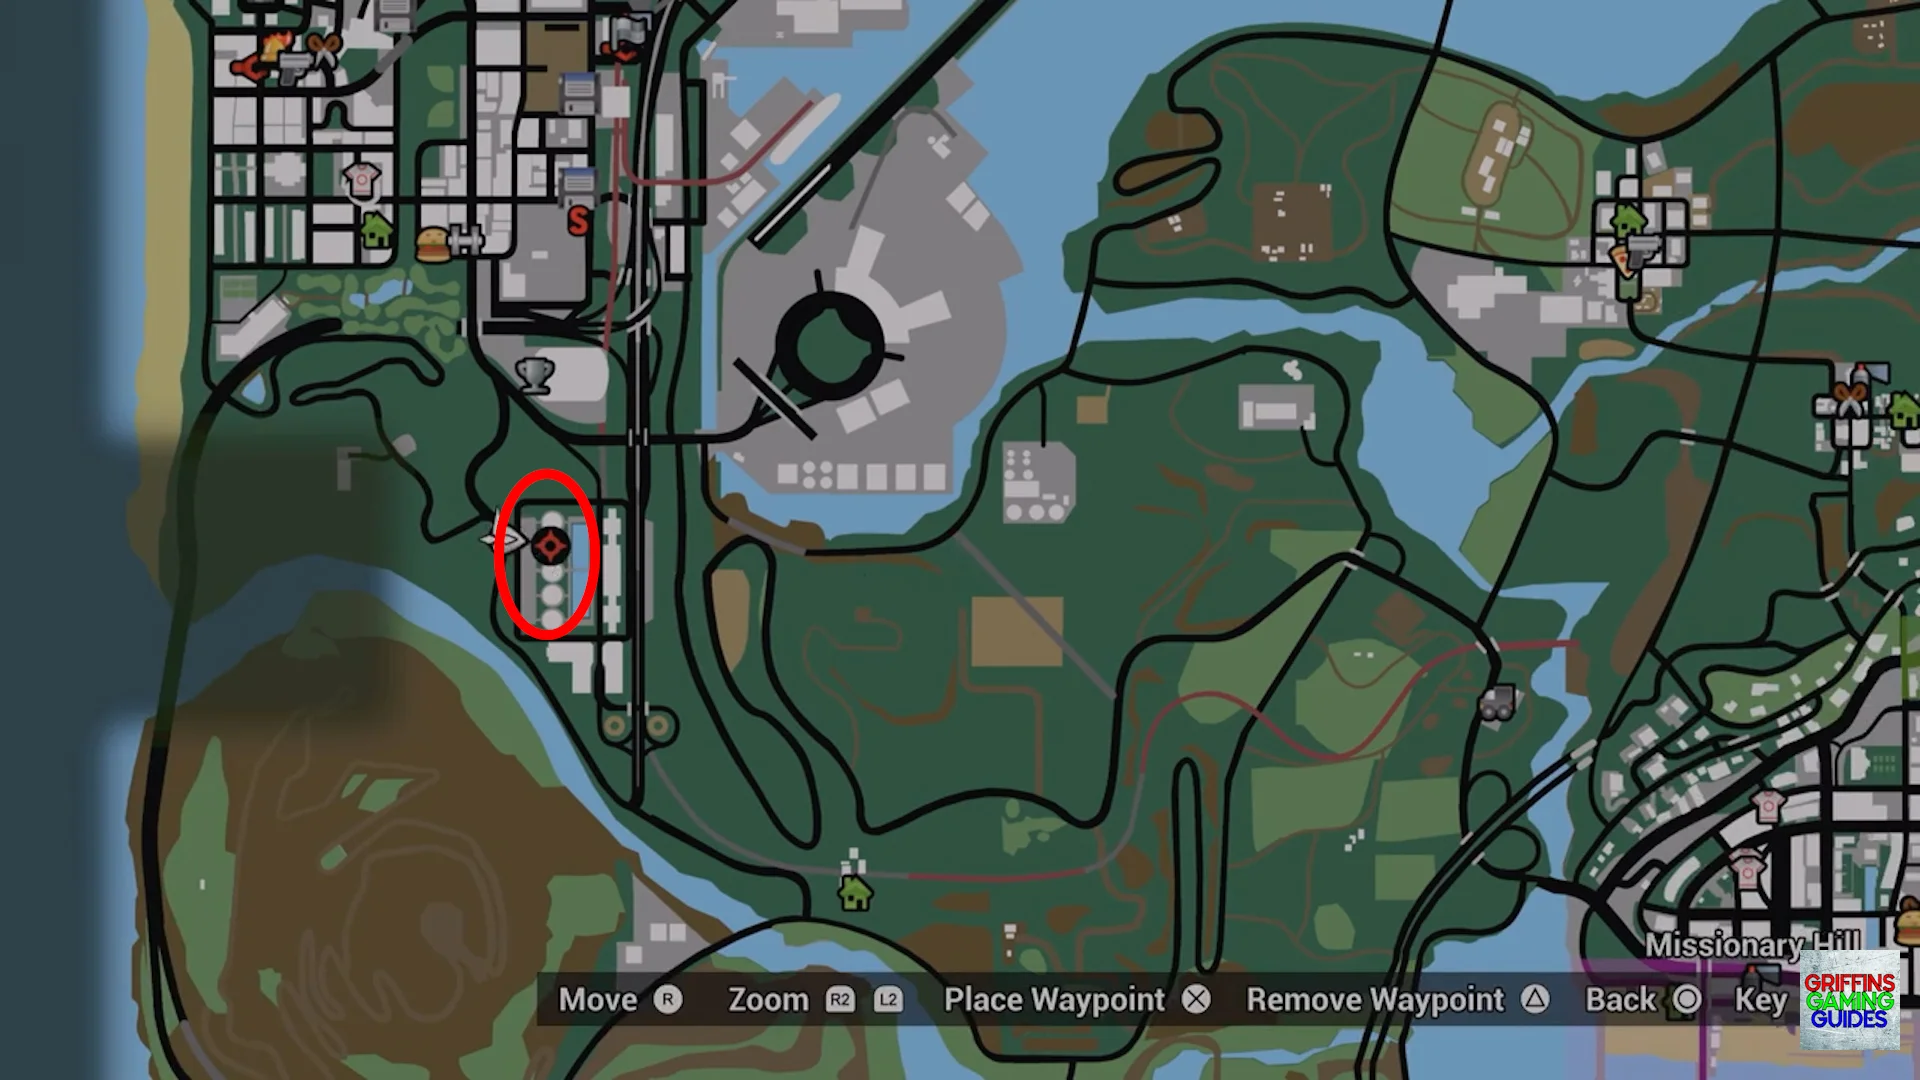
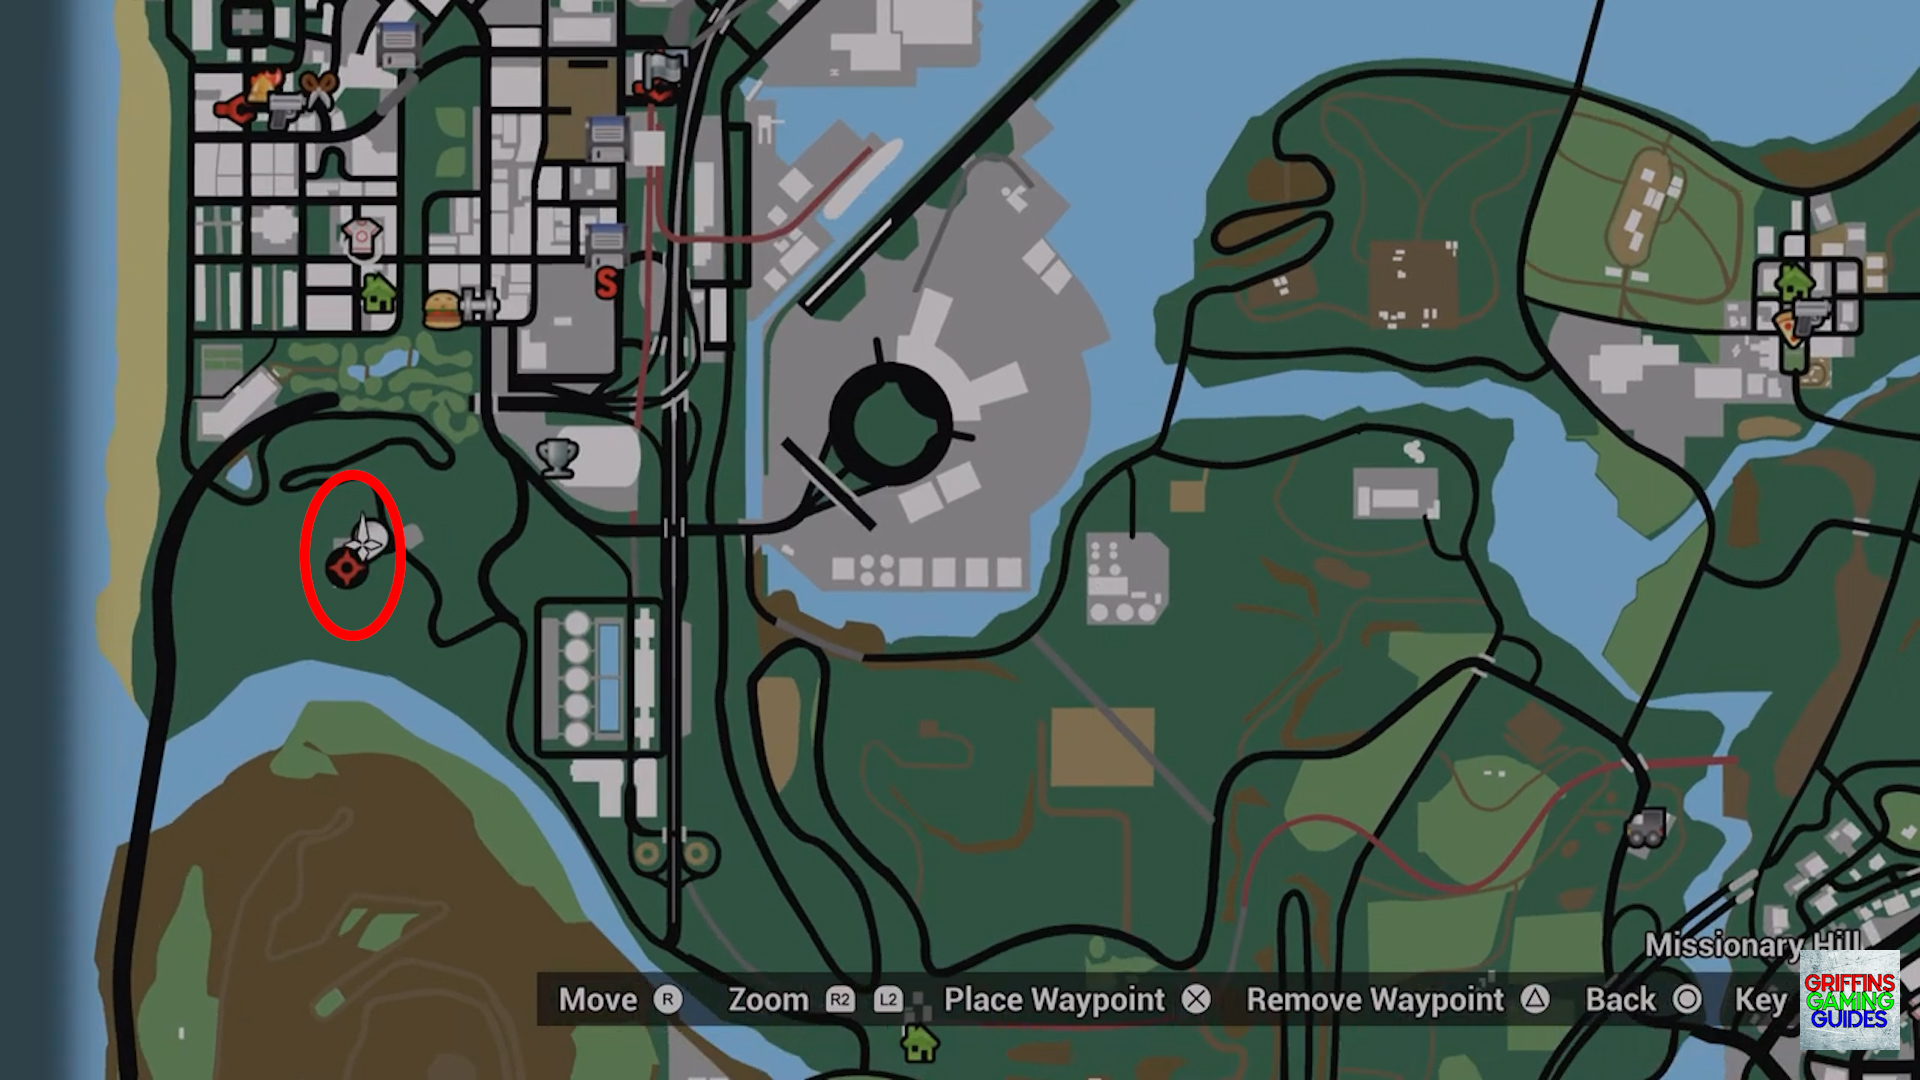
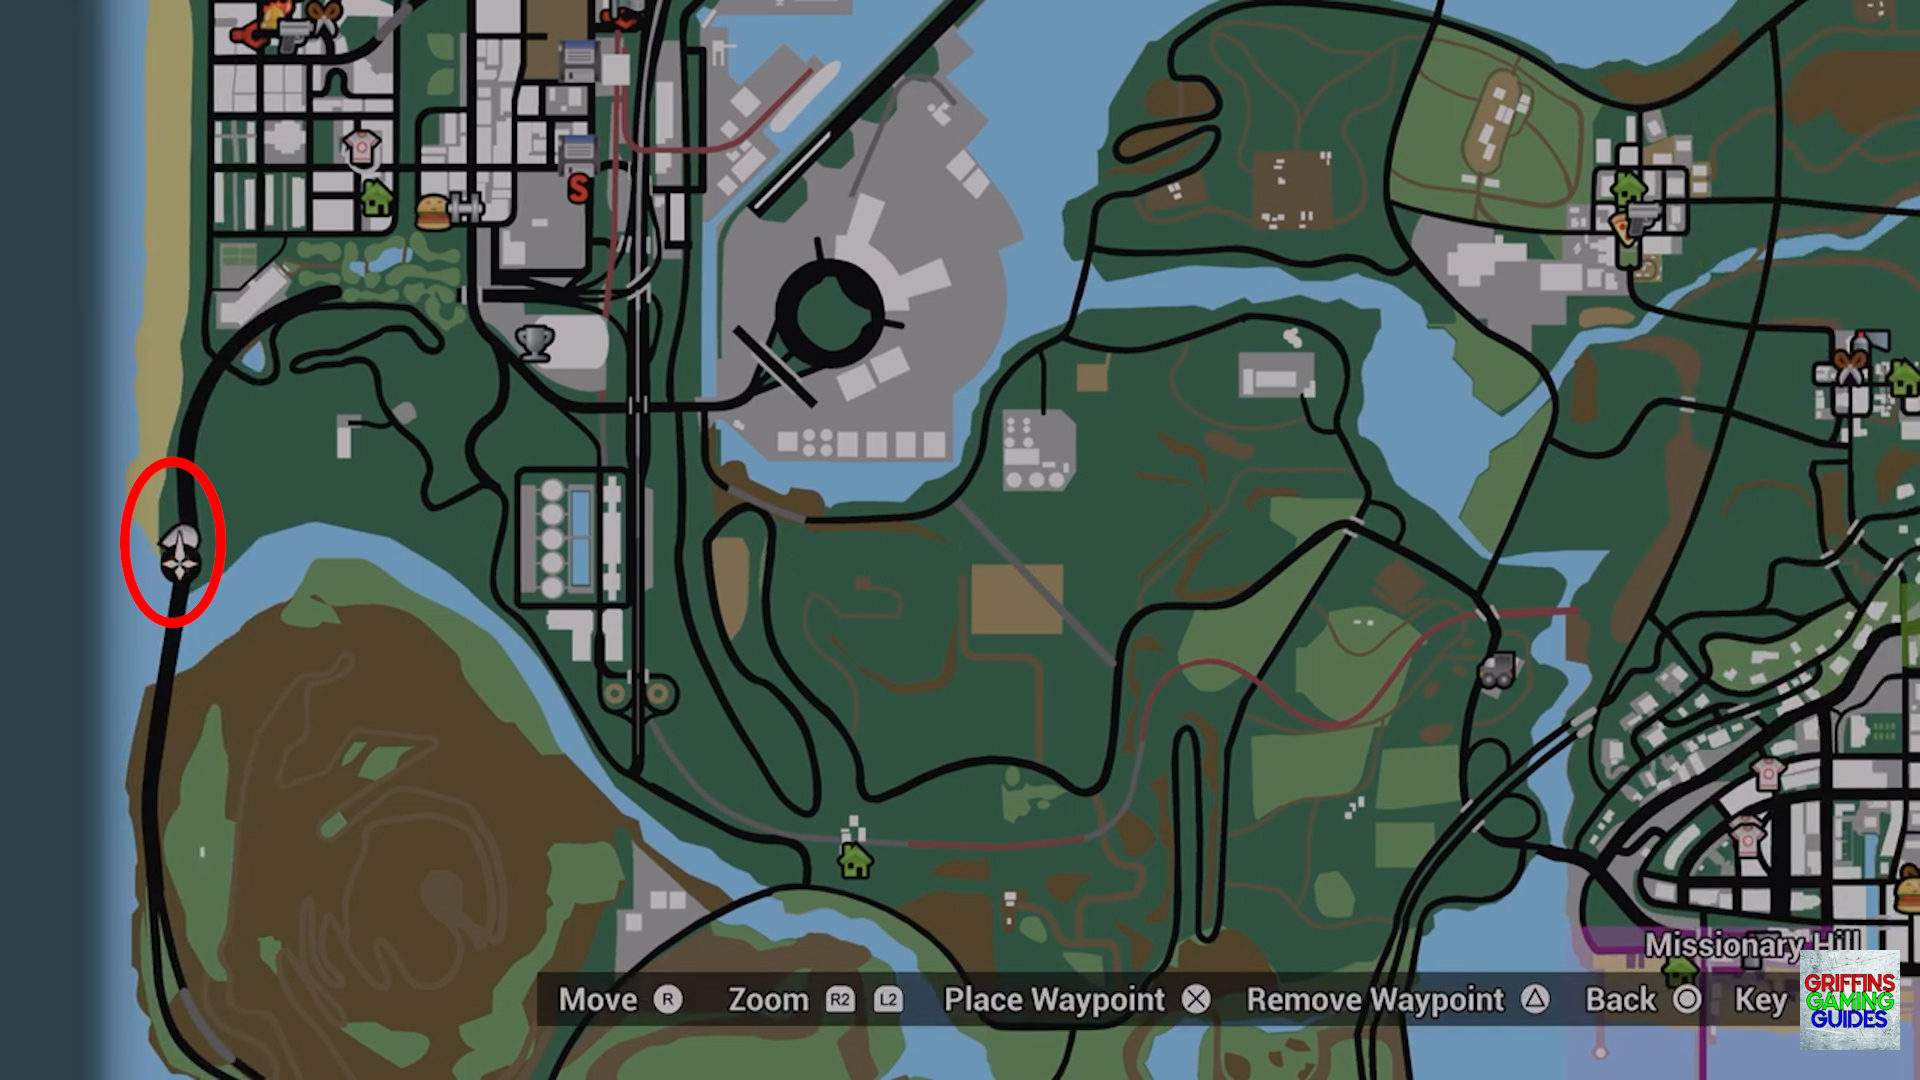
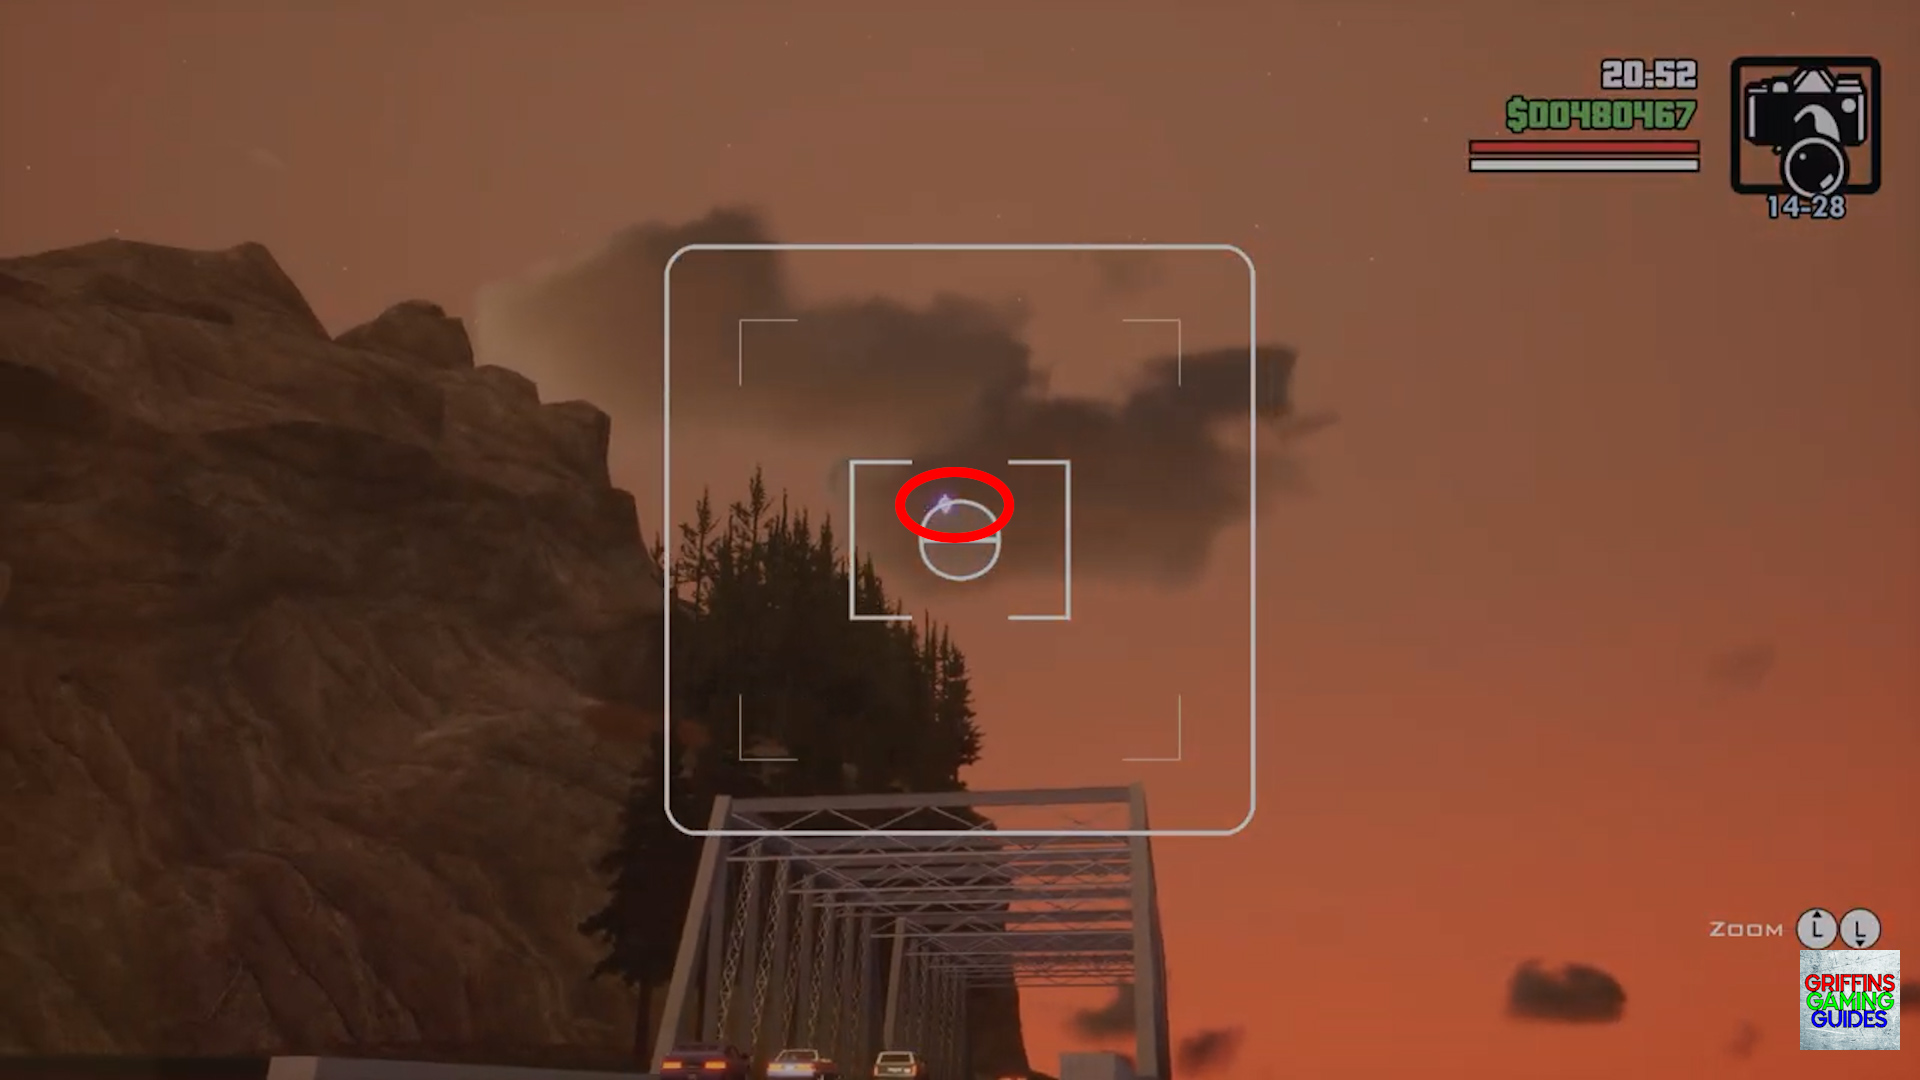
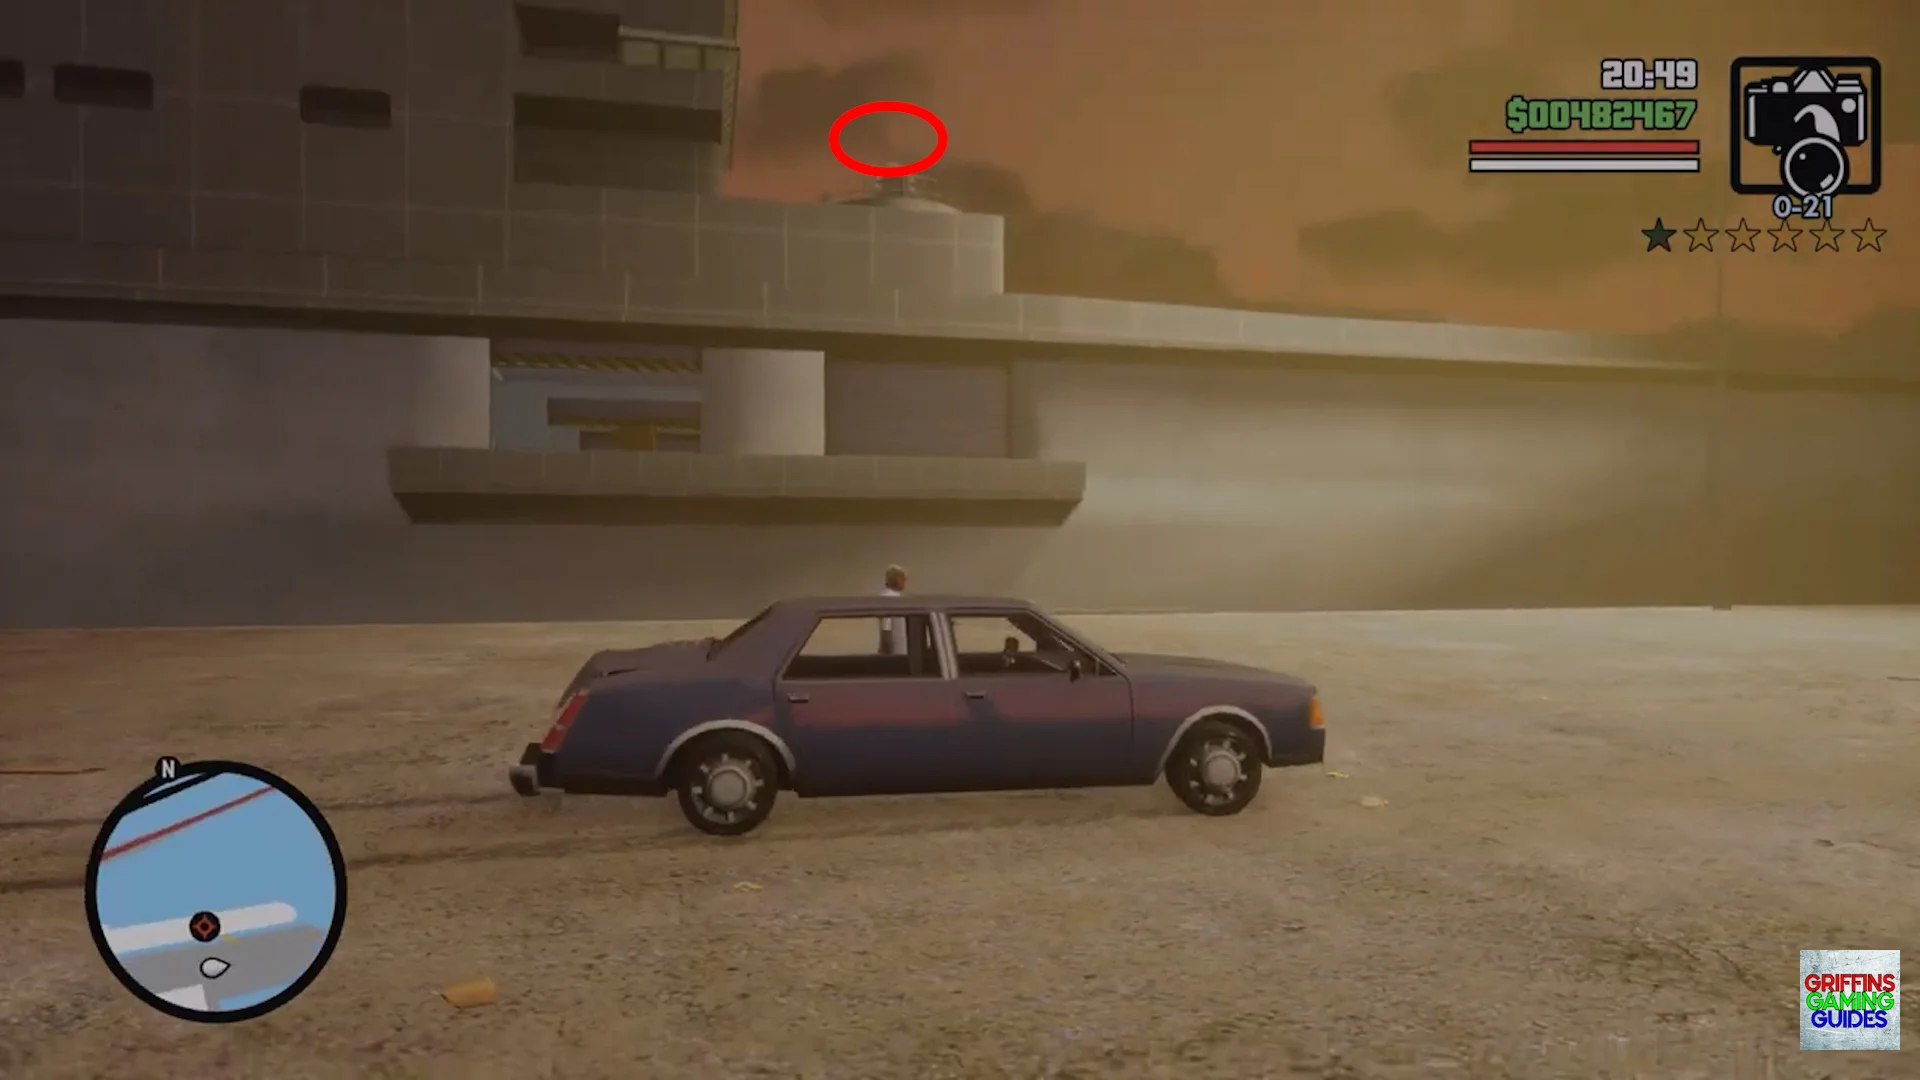
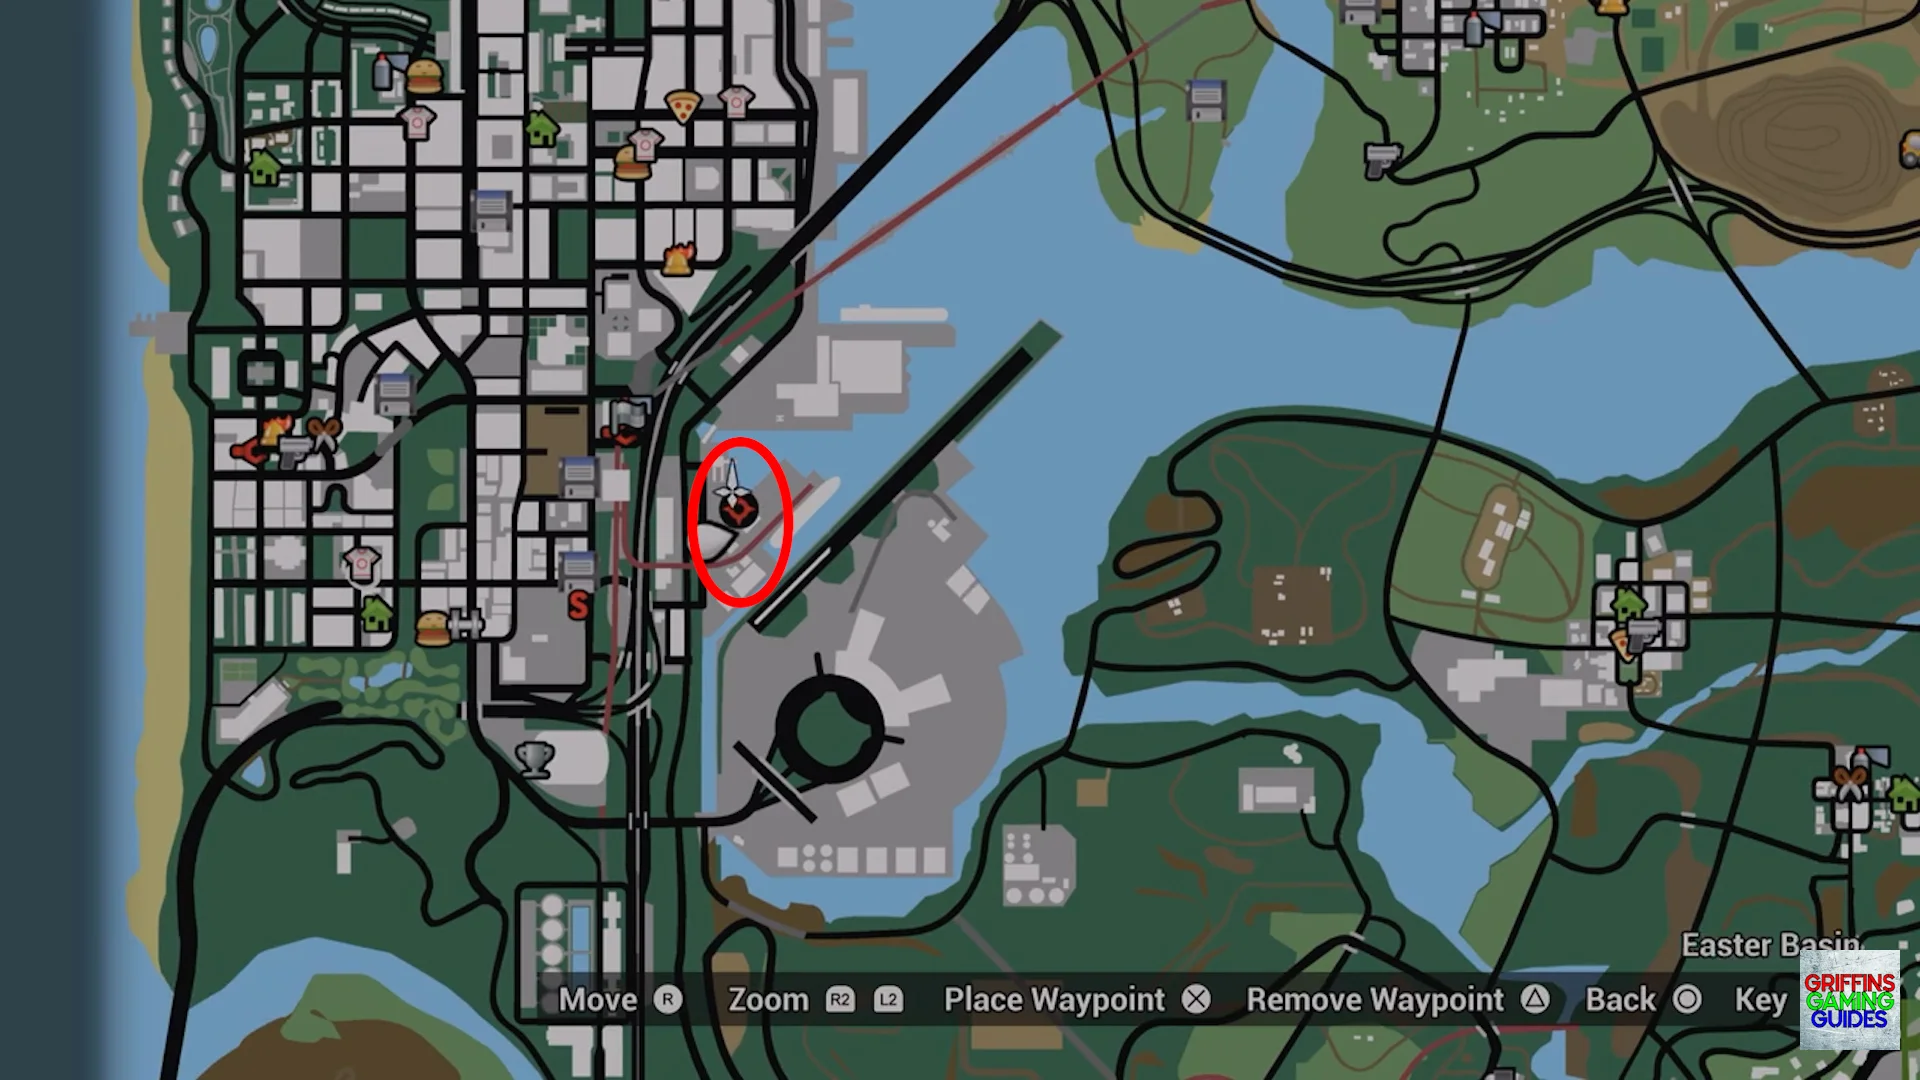
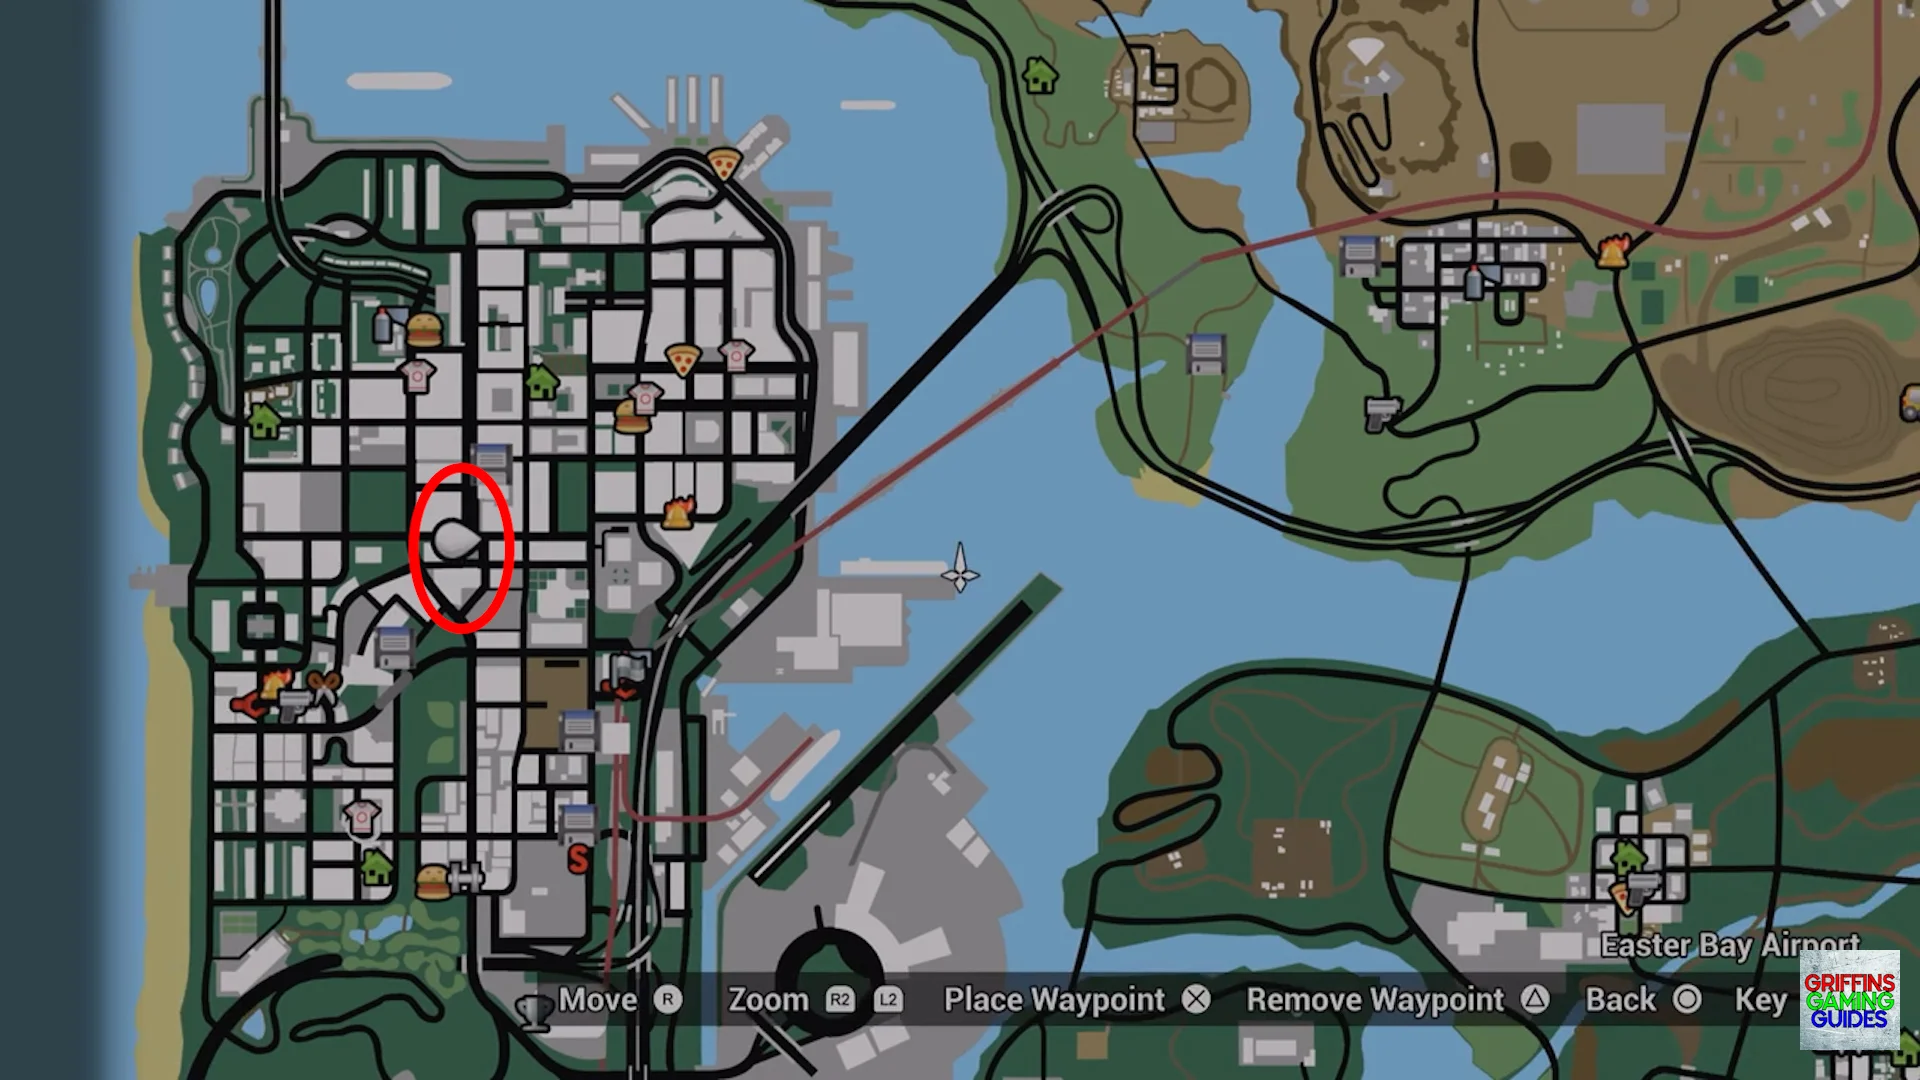
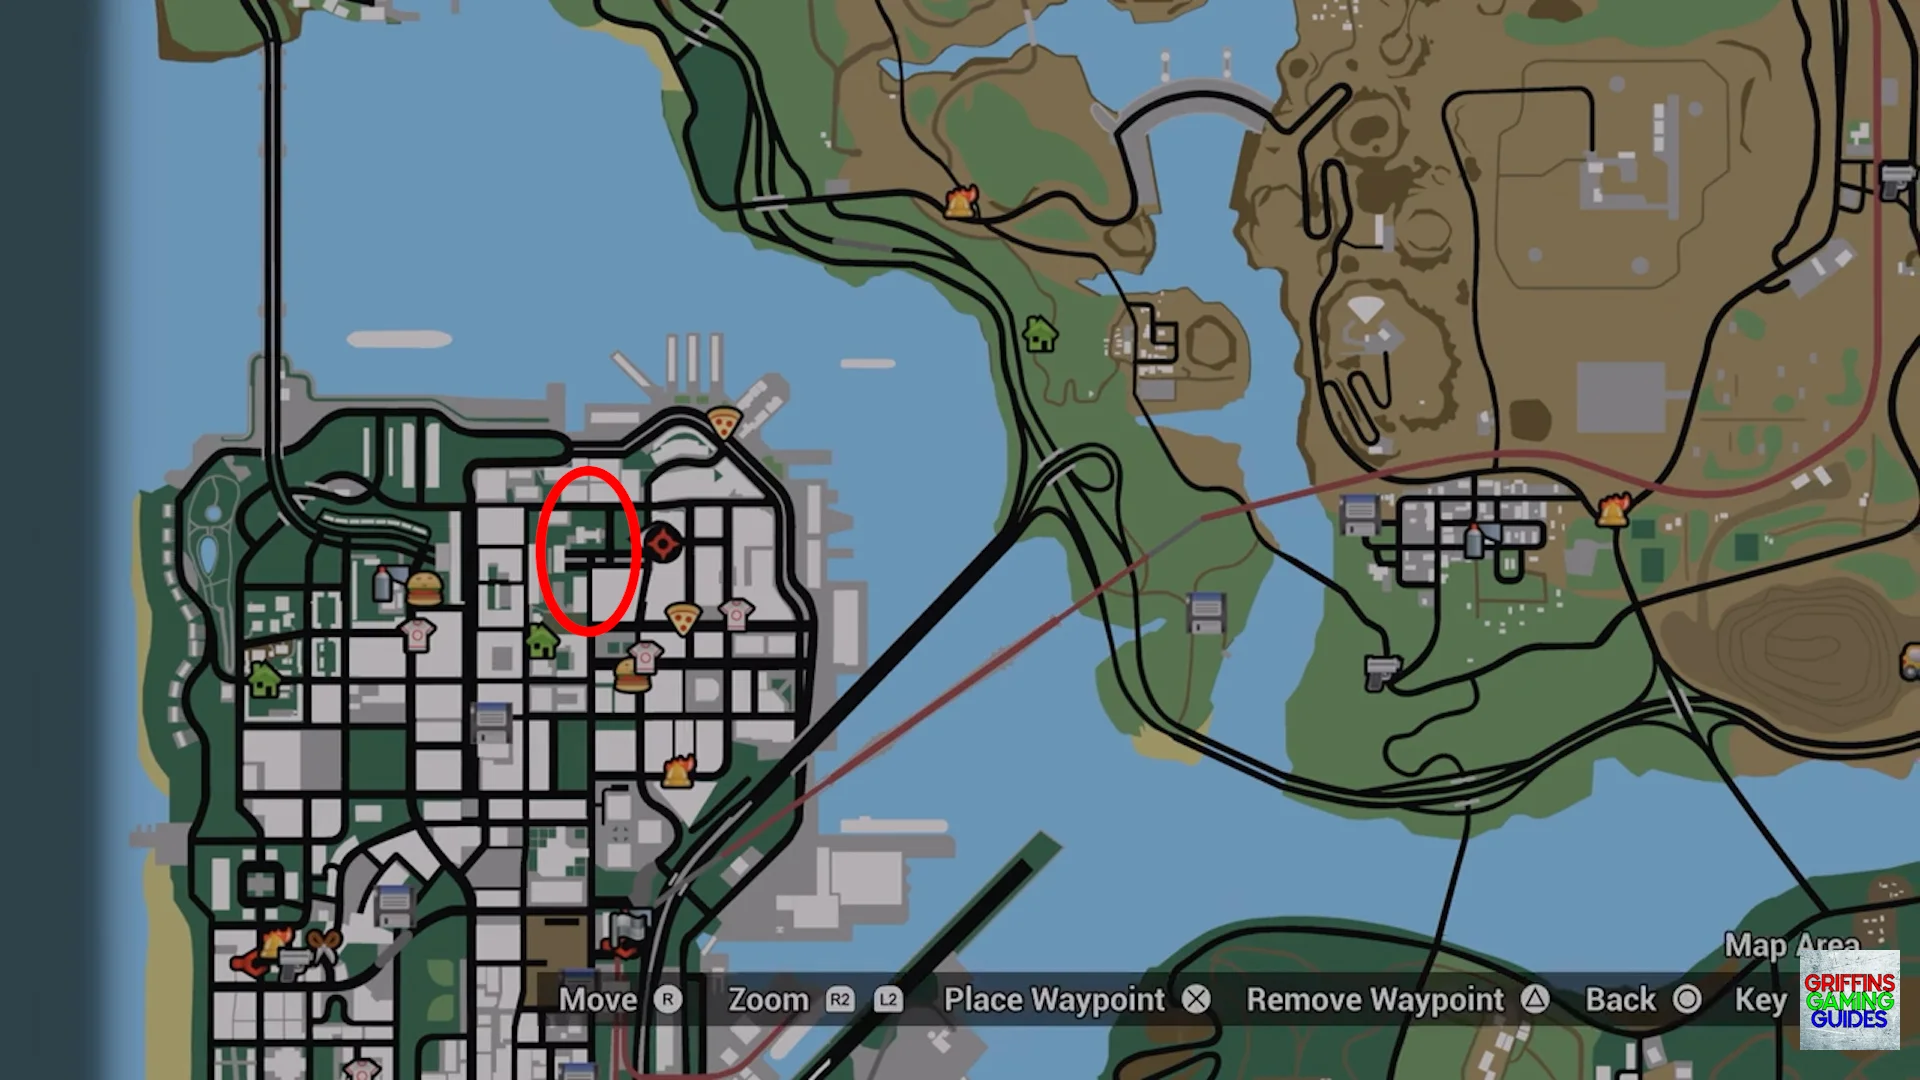
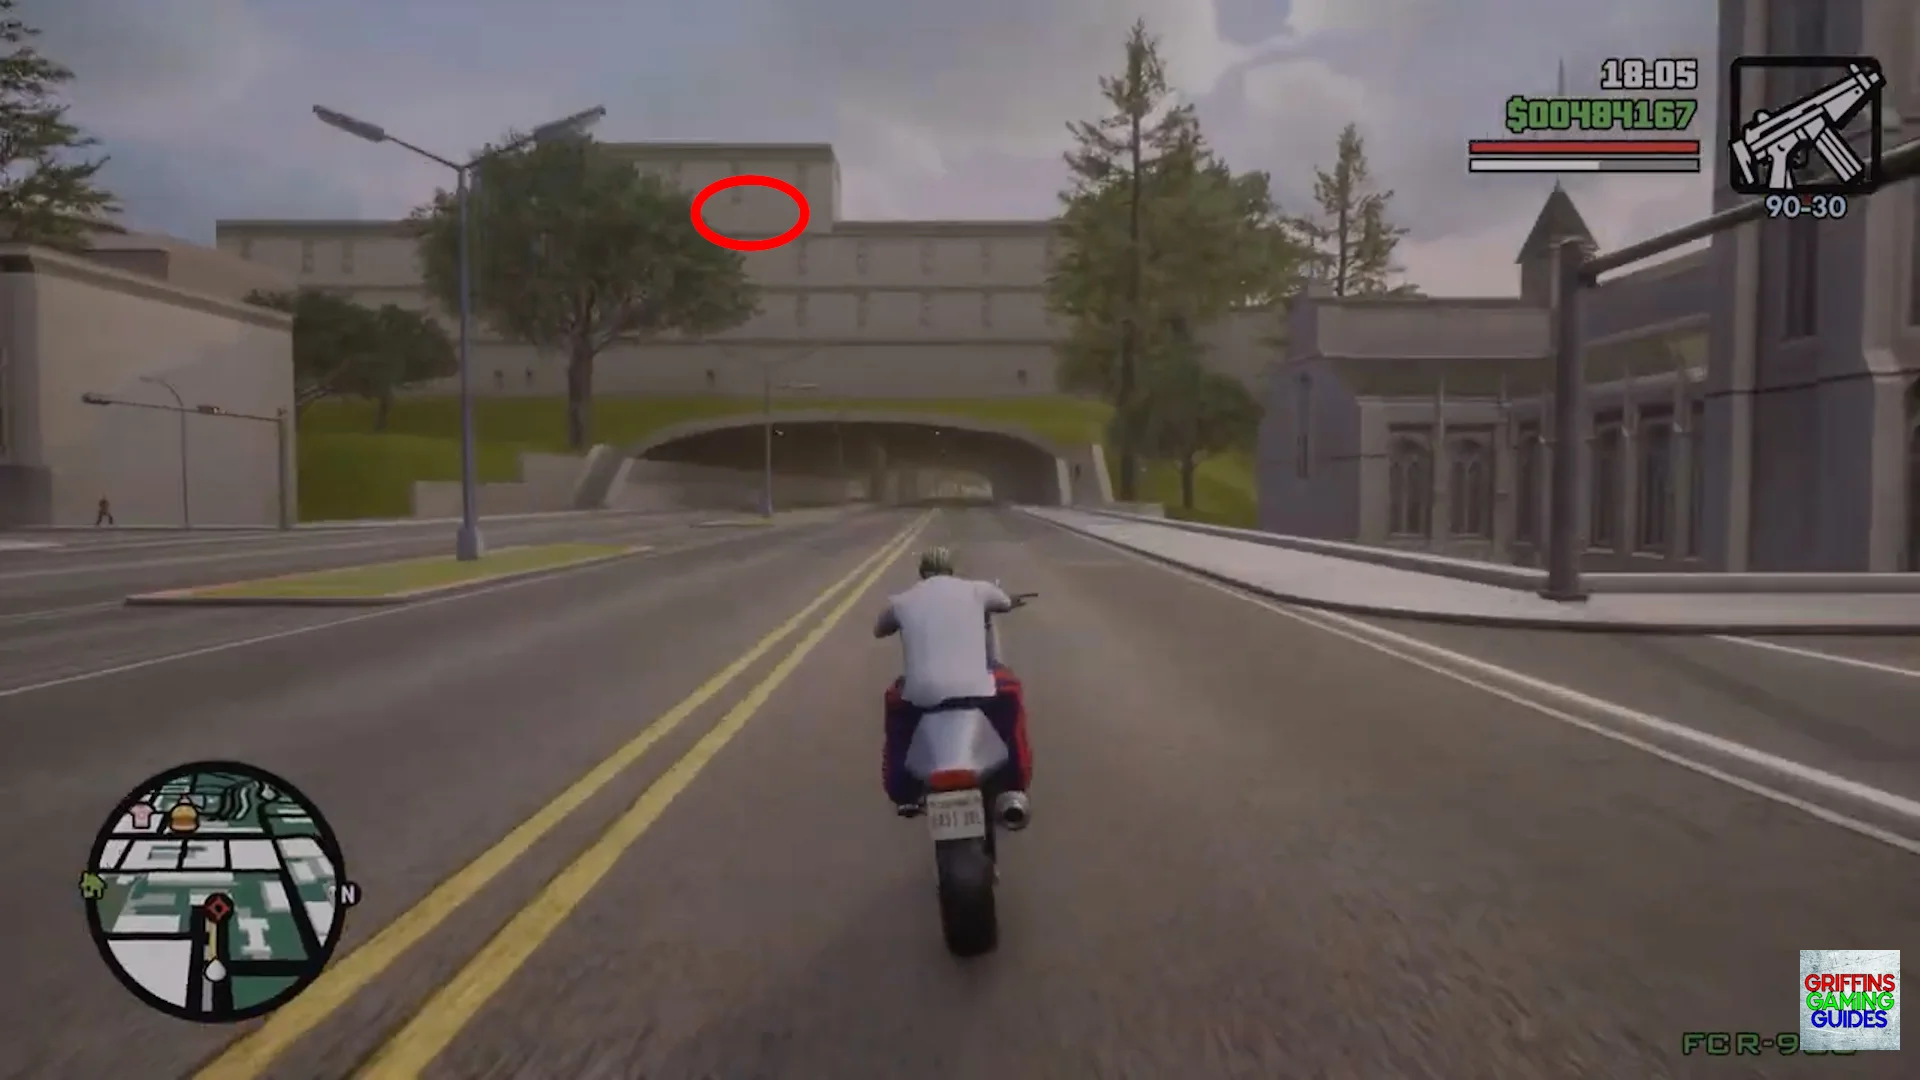
Snapshot 1
Location: The Panopticon.
Look to the Northern end of the bridge over the river.
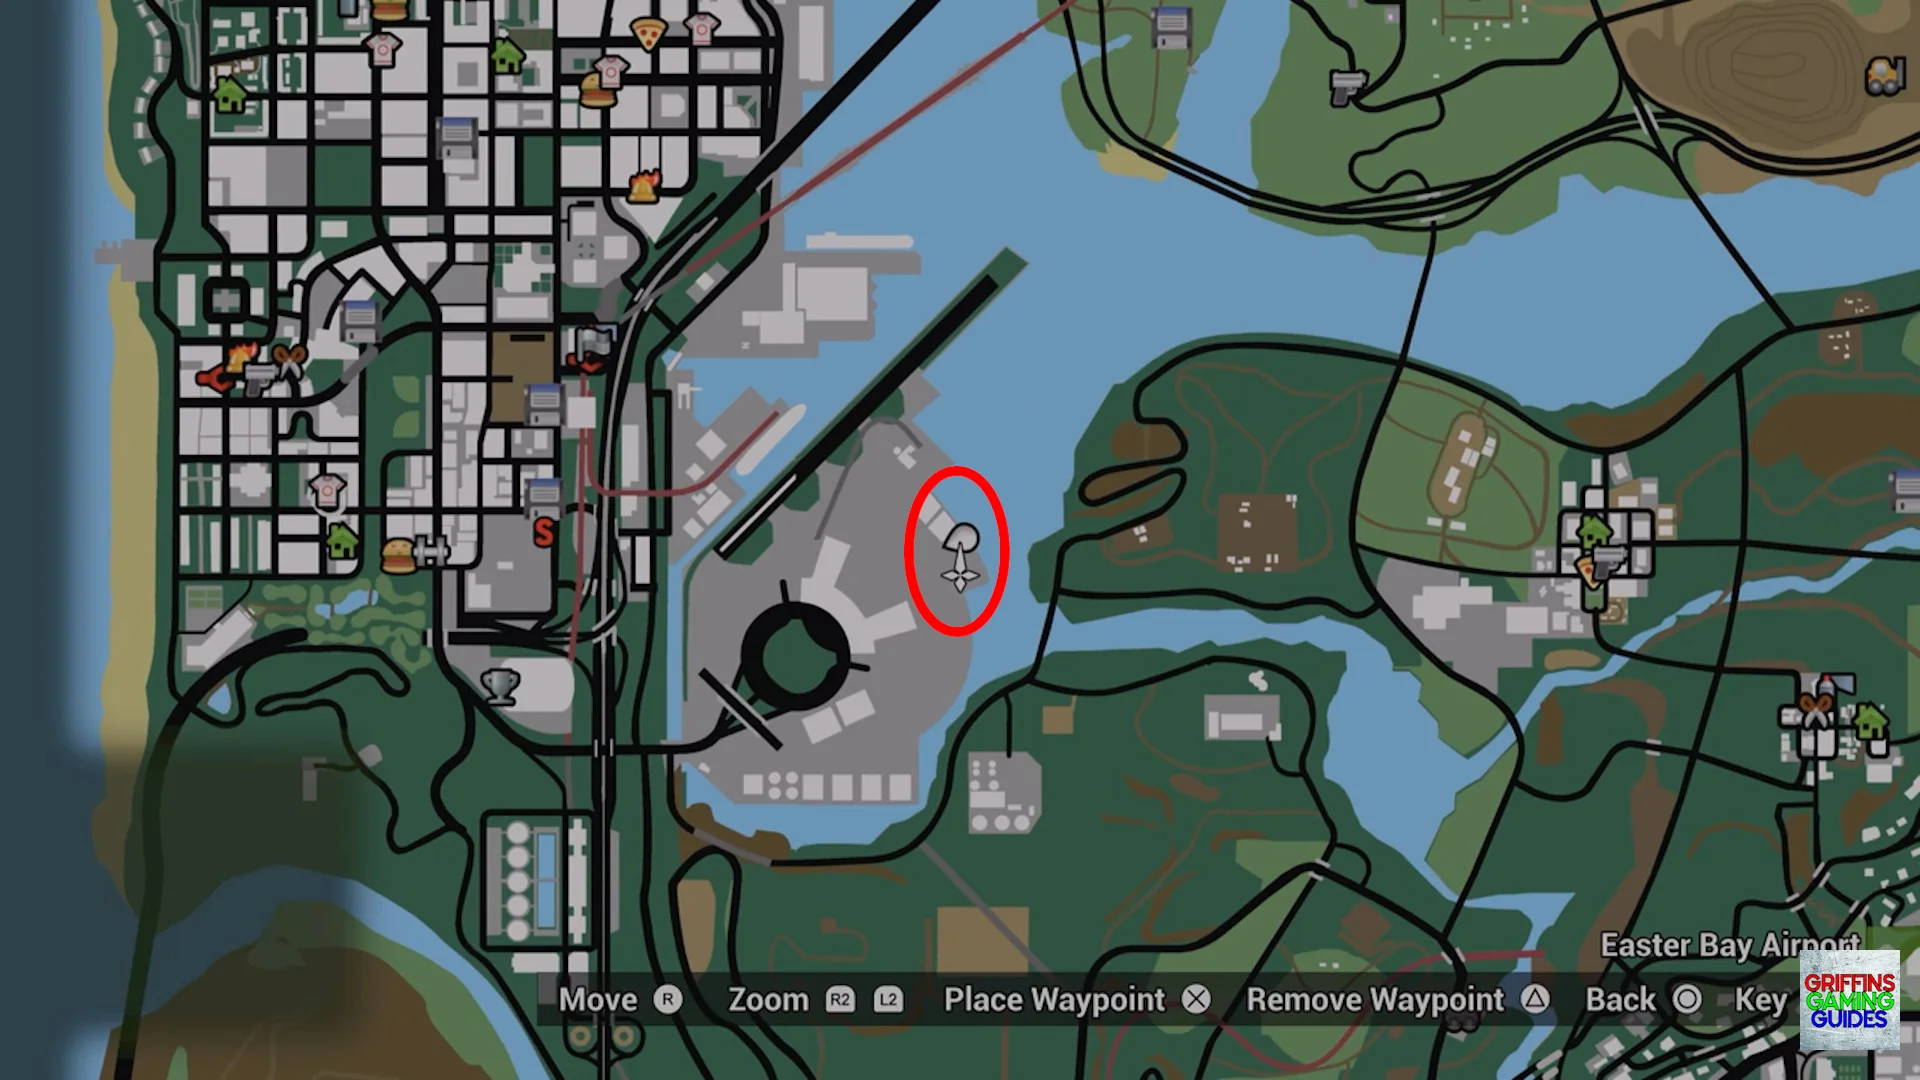
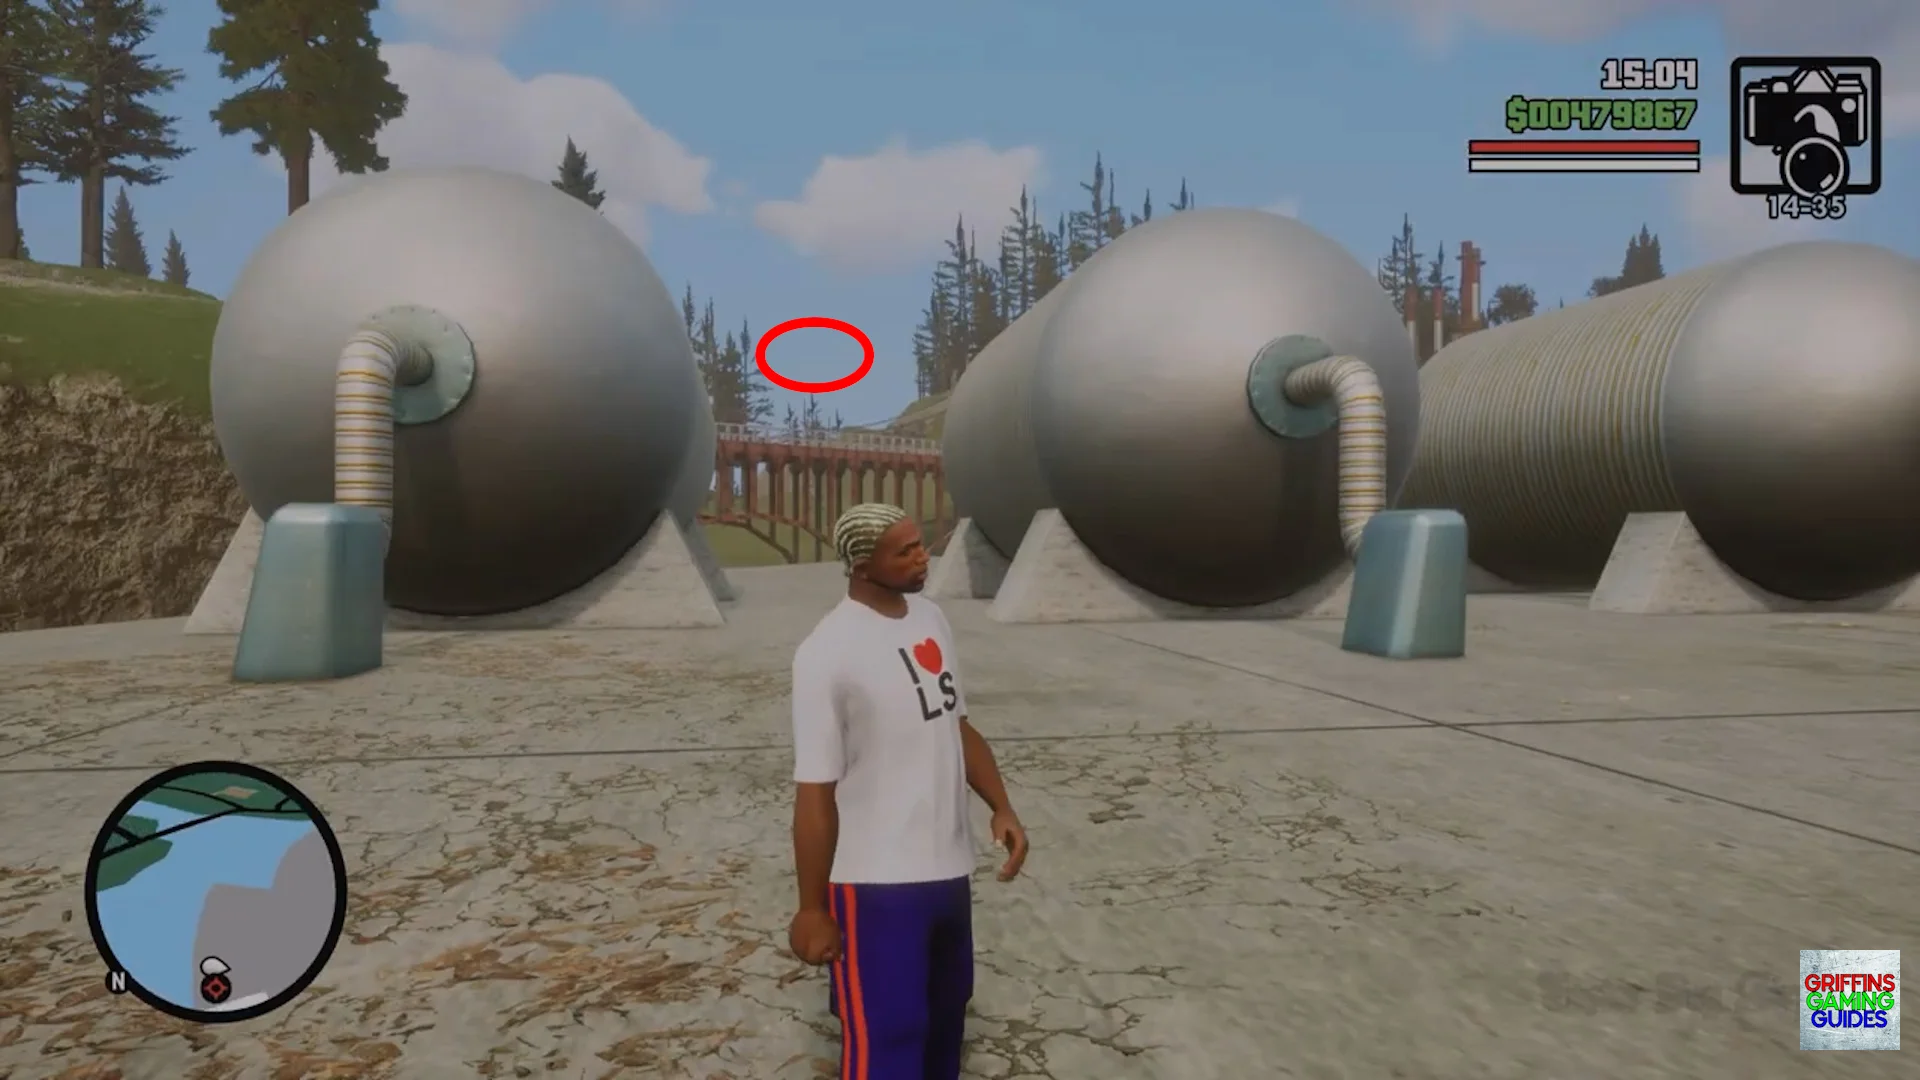
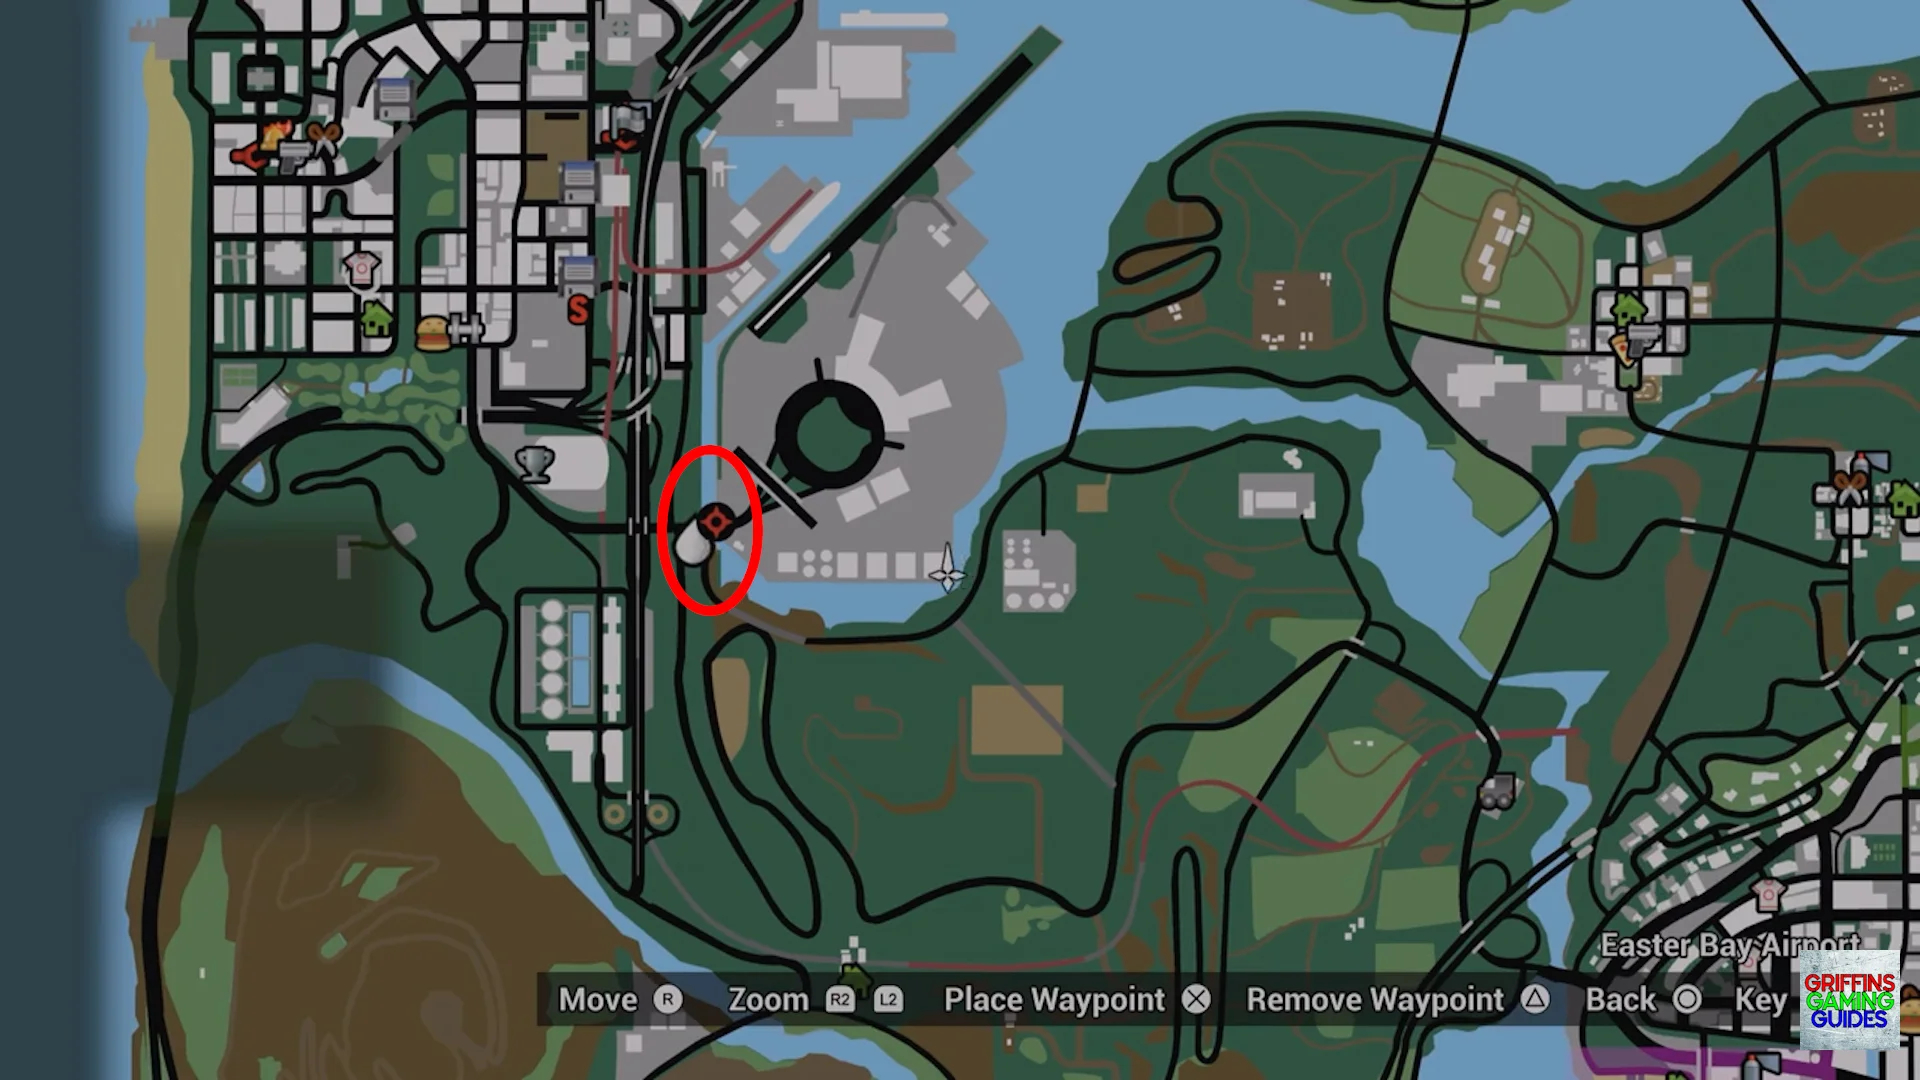
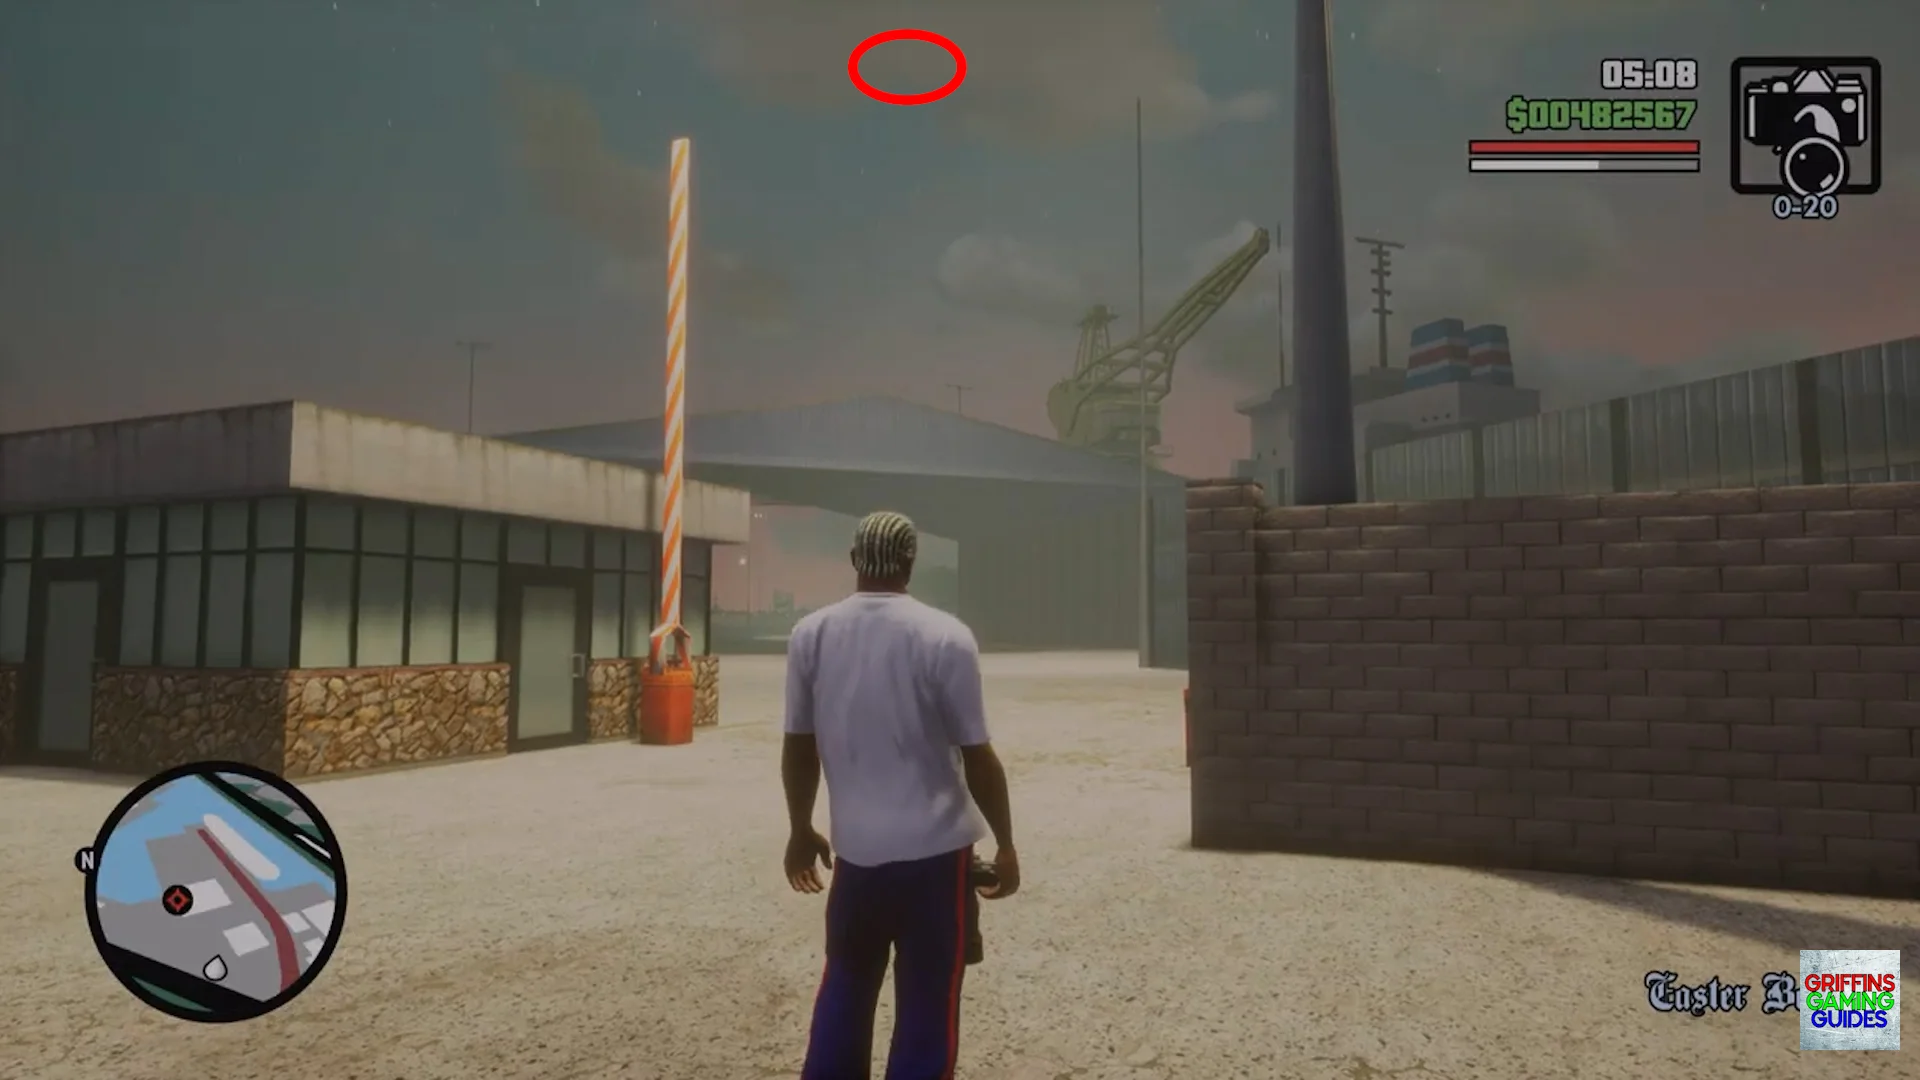
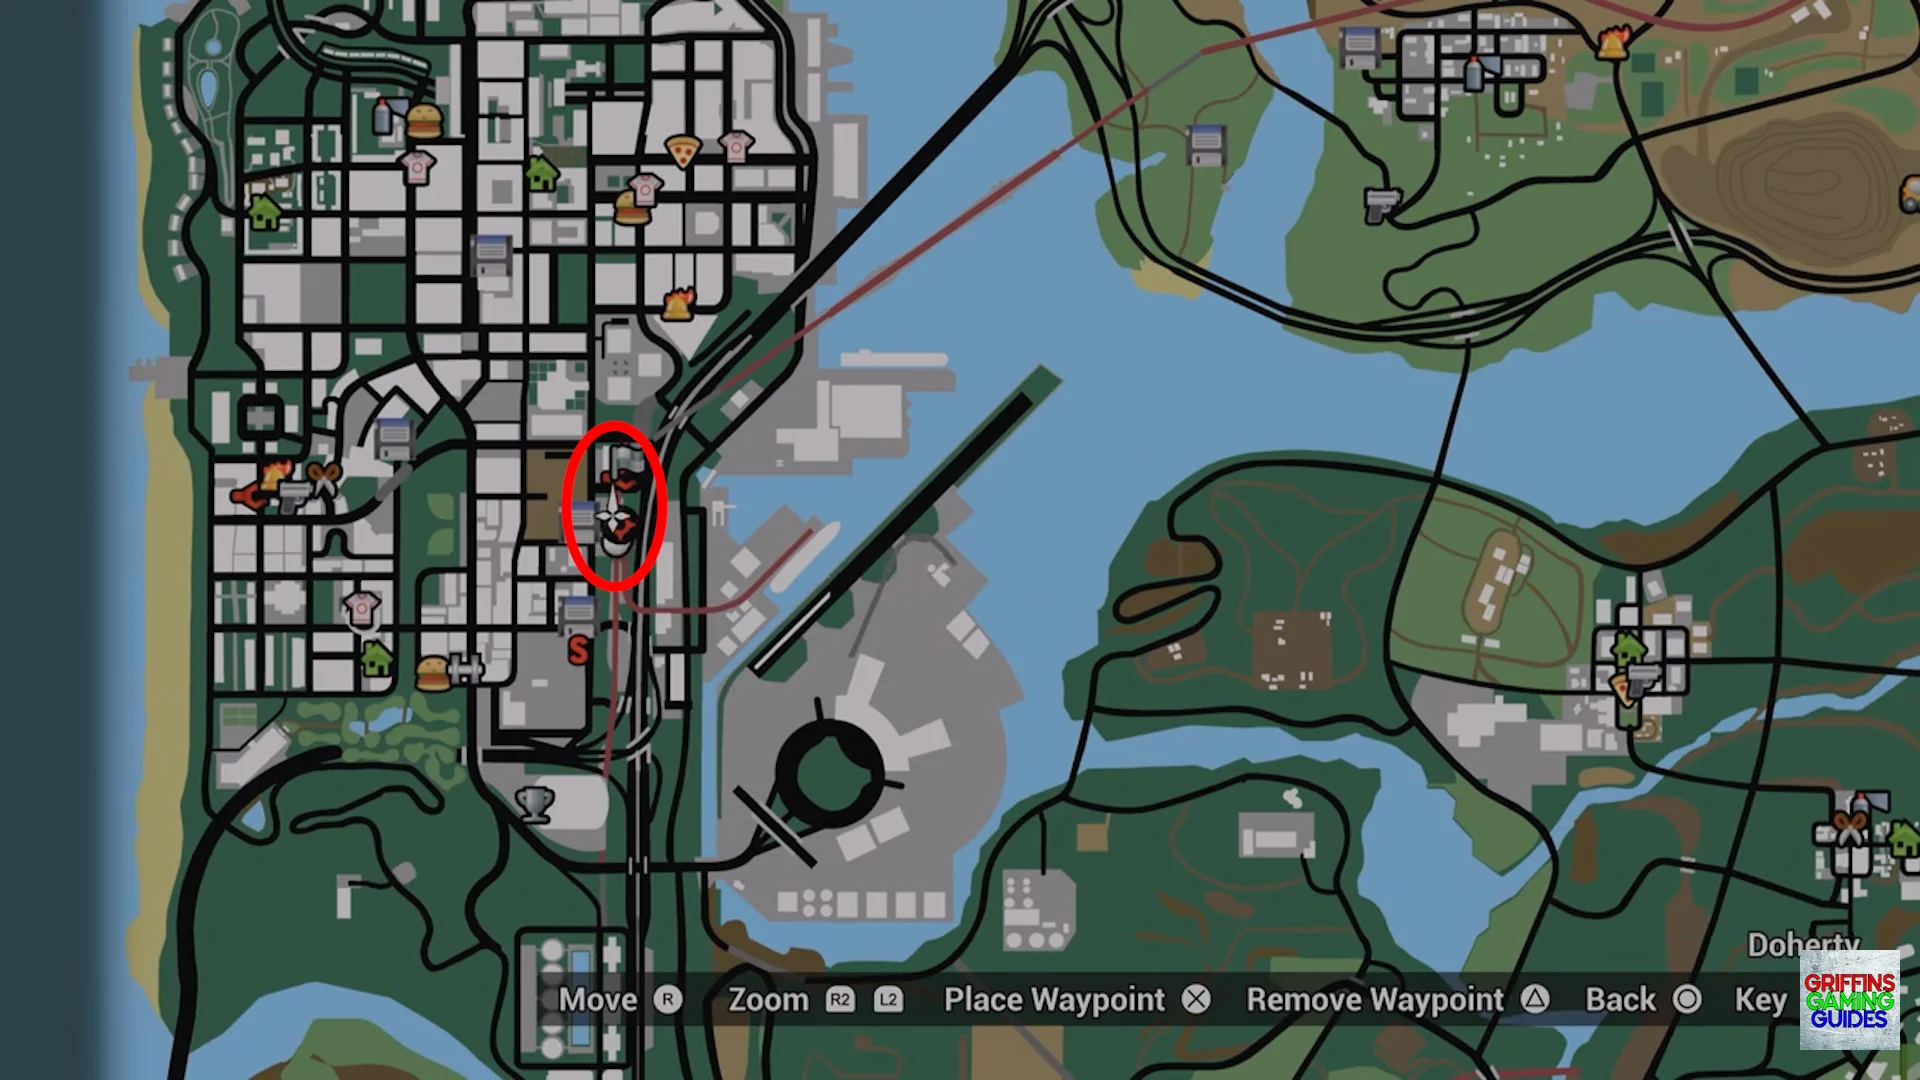
Snapshot 2
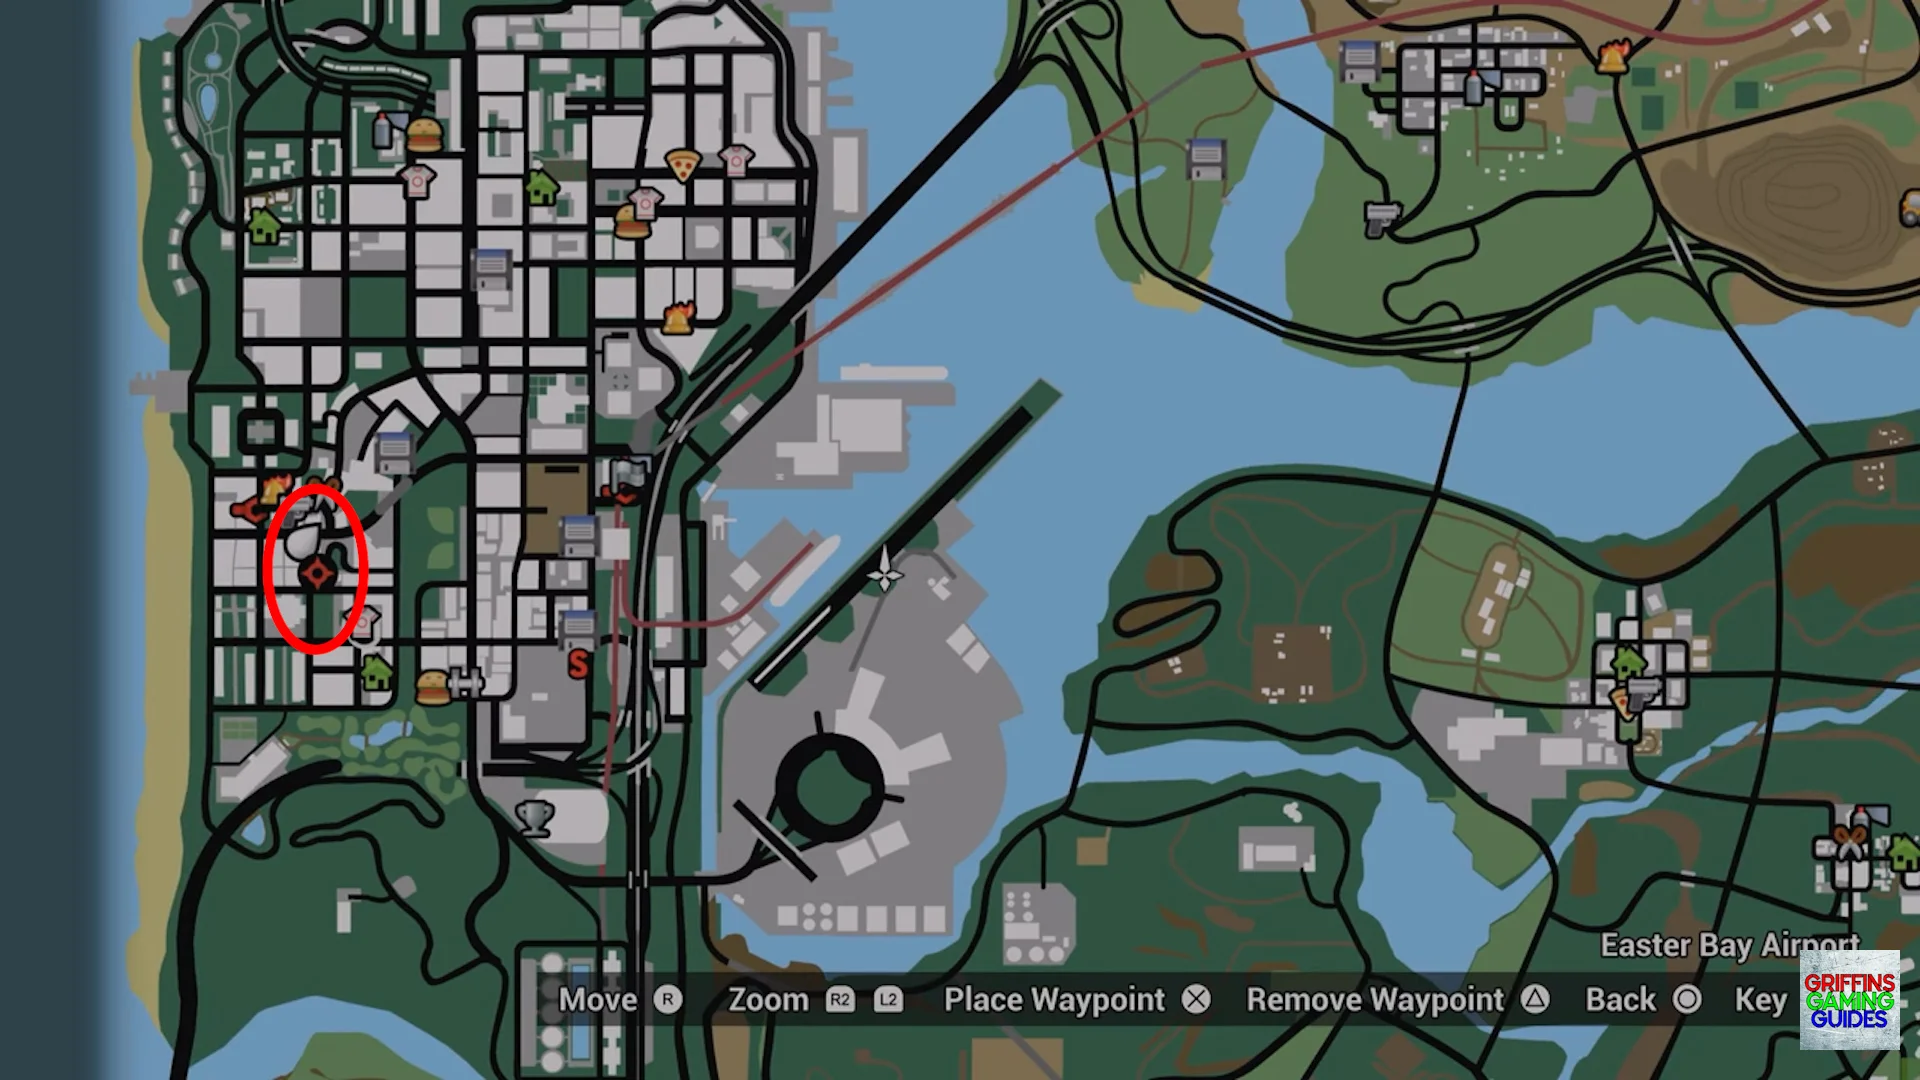
Location: Easter Bay Airport.
Look in-between the first and second gas tanks closet to the water’s edge.
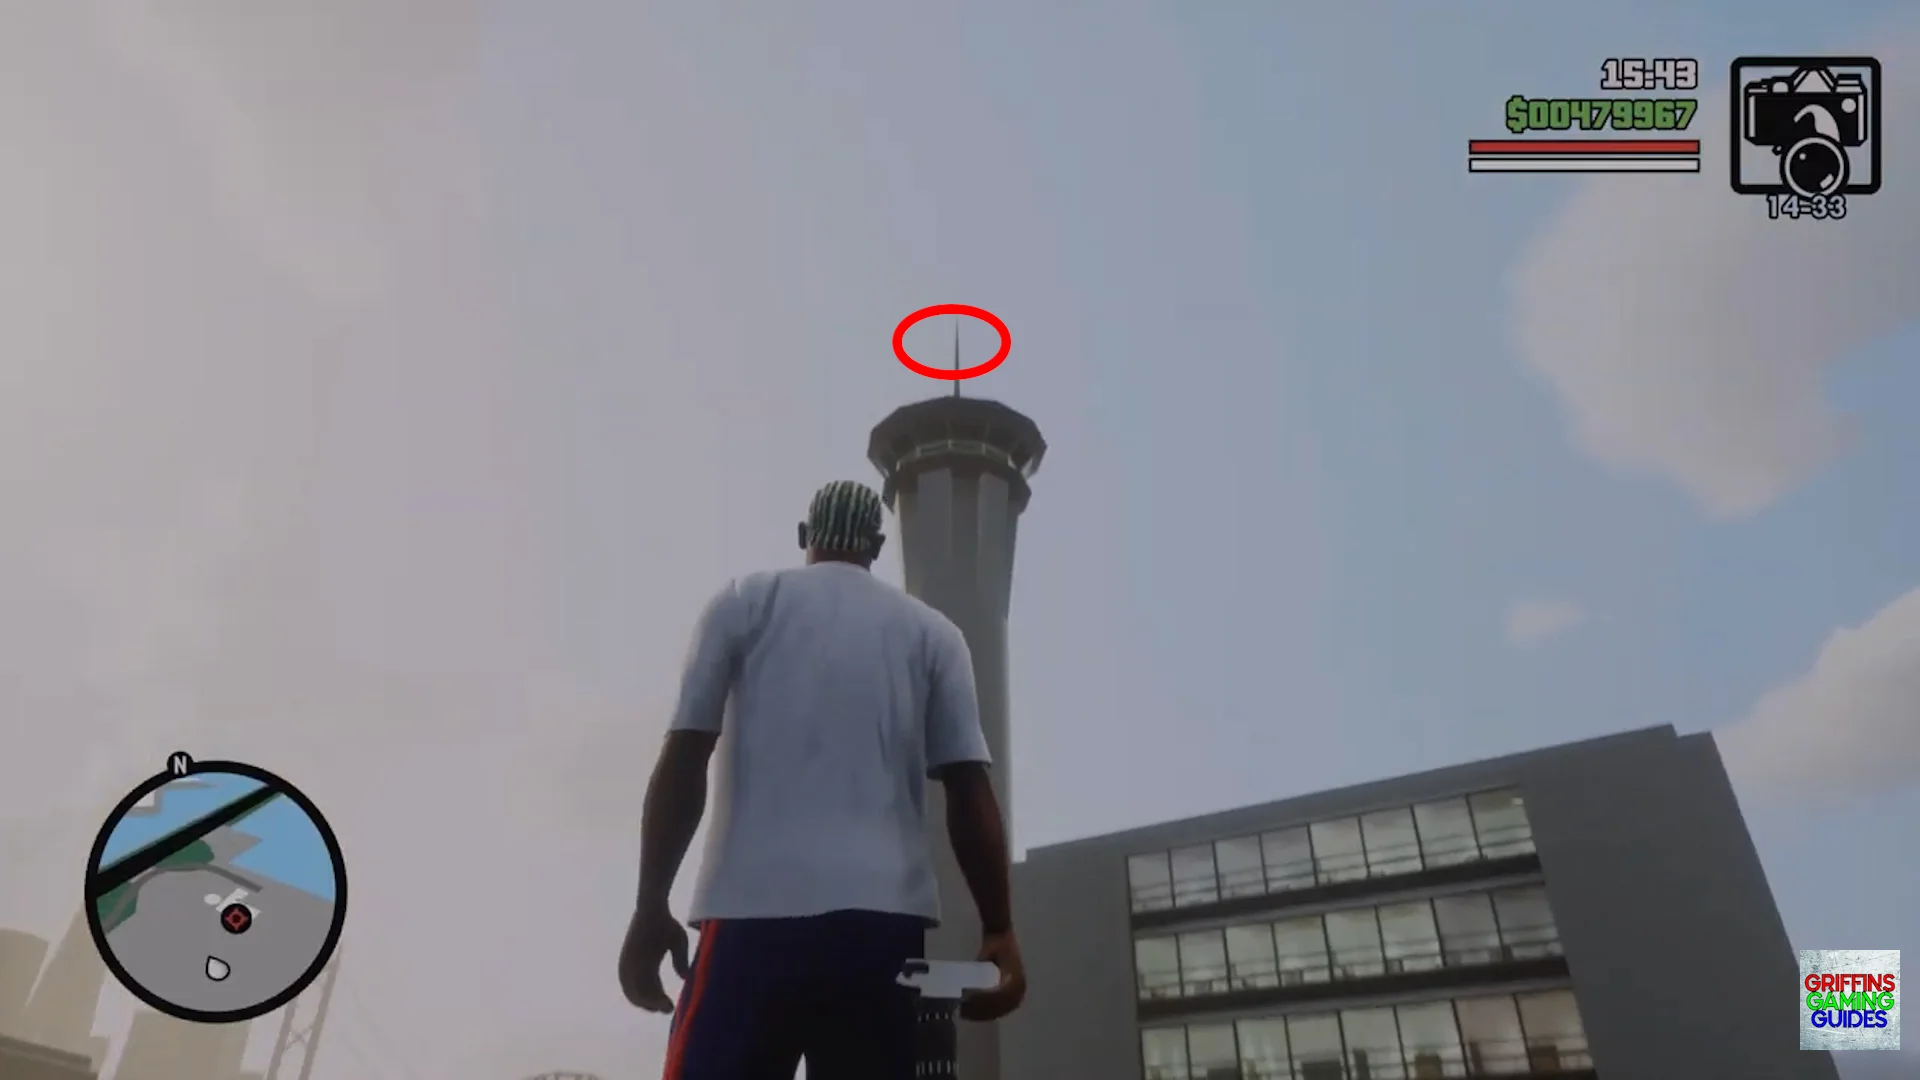
Snapshot 3
Location: Easter Bay Airport.
This snapshot is on the top of the control tower
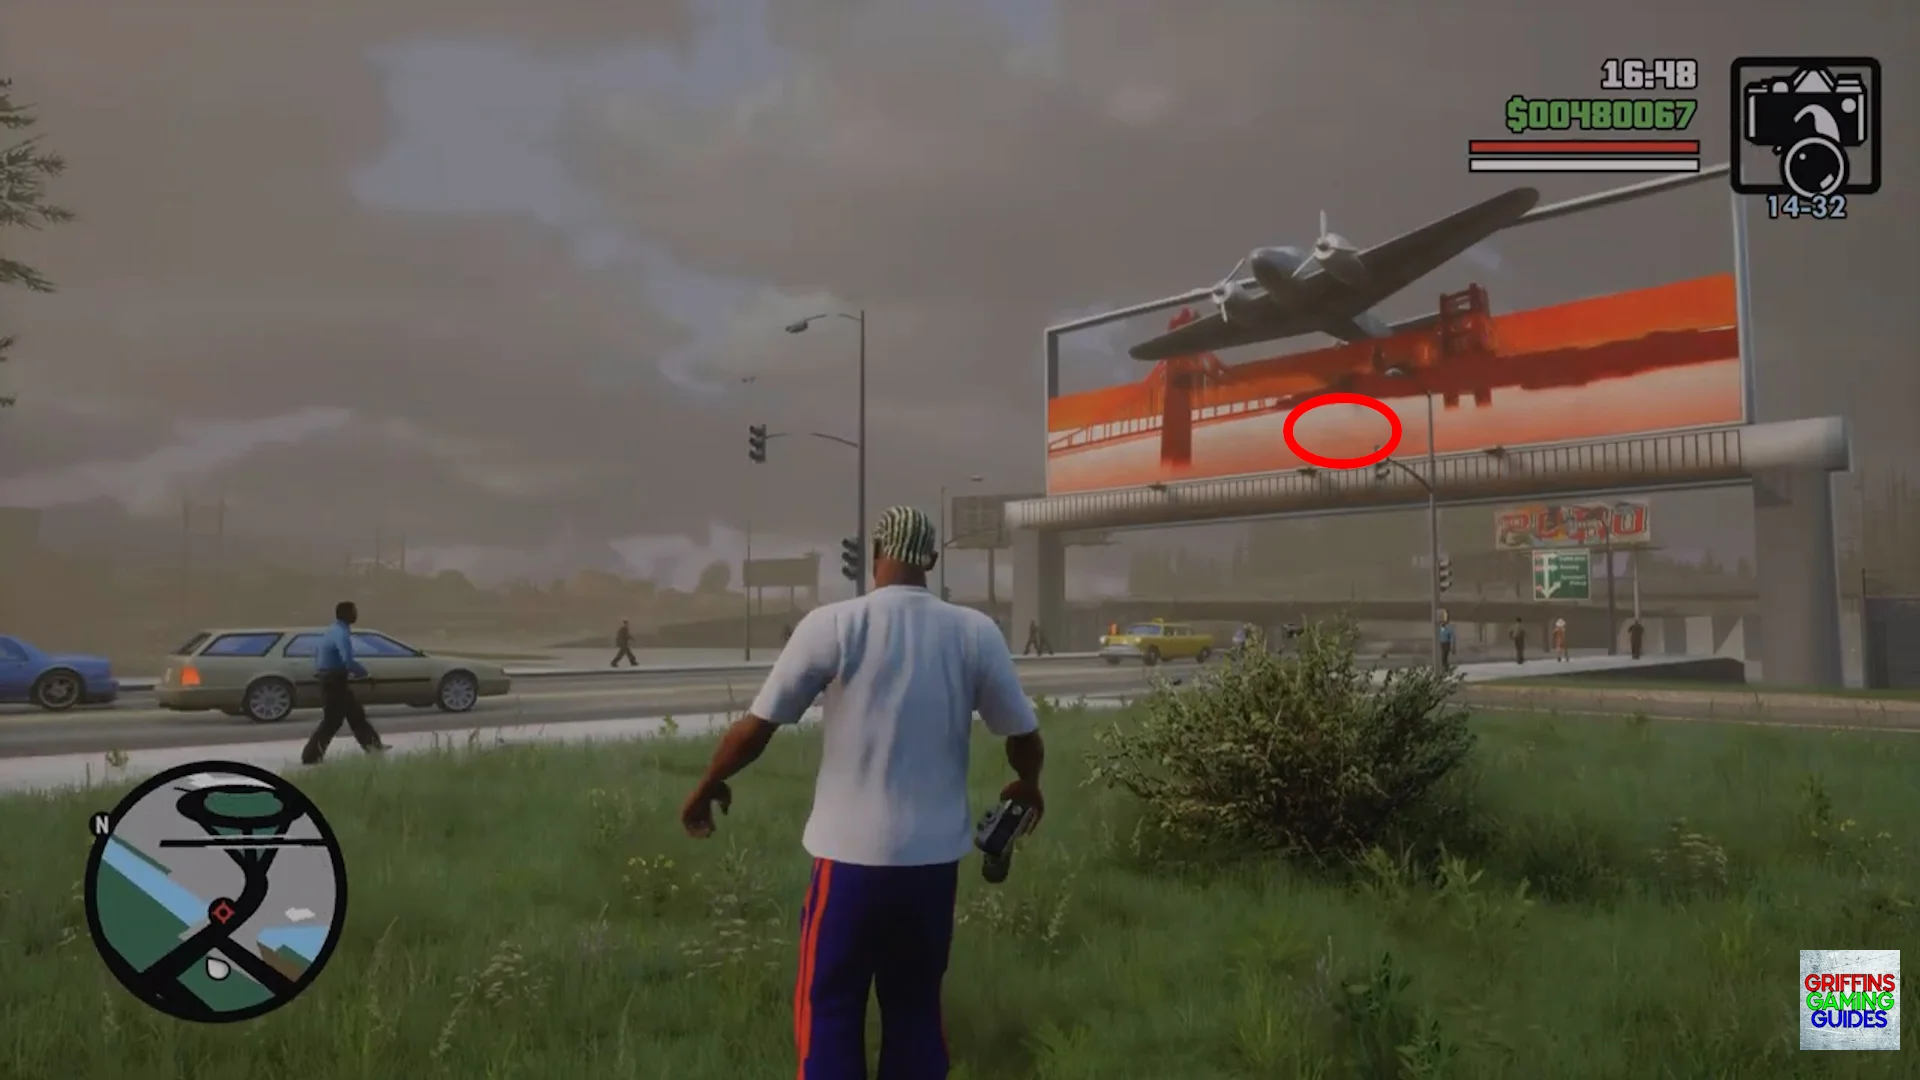
Snapshot 4
Location: Easter Bay Airport.
Look at the large billboard with the 3d plane coming through then aim just below the plane to find this snapshot.
Snapshot 5
Location: Easter Bay Airport.
Look over the South over the white wall from the Northern road high above the building to find this snapshot.
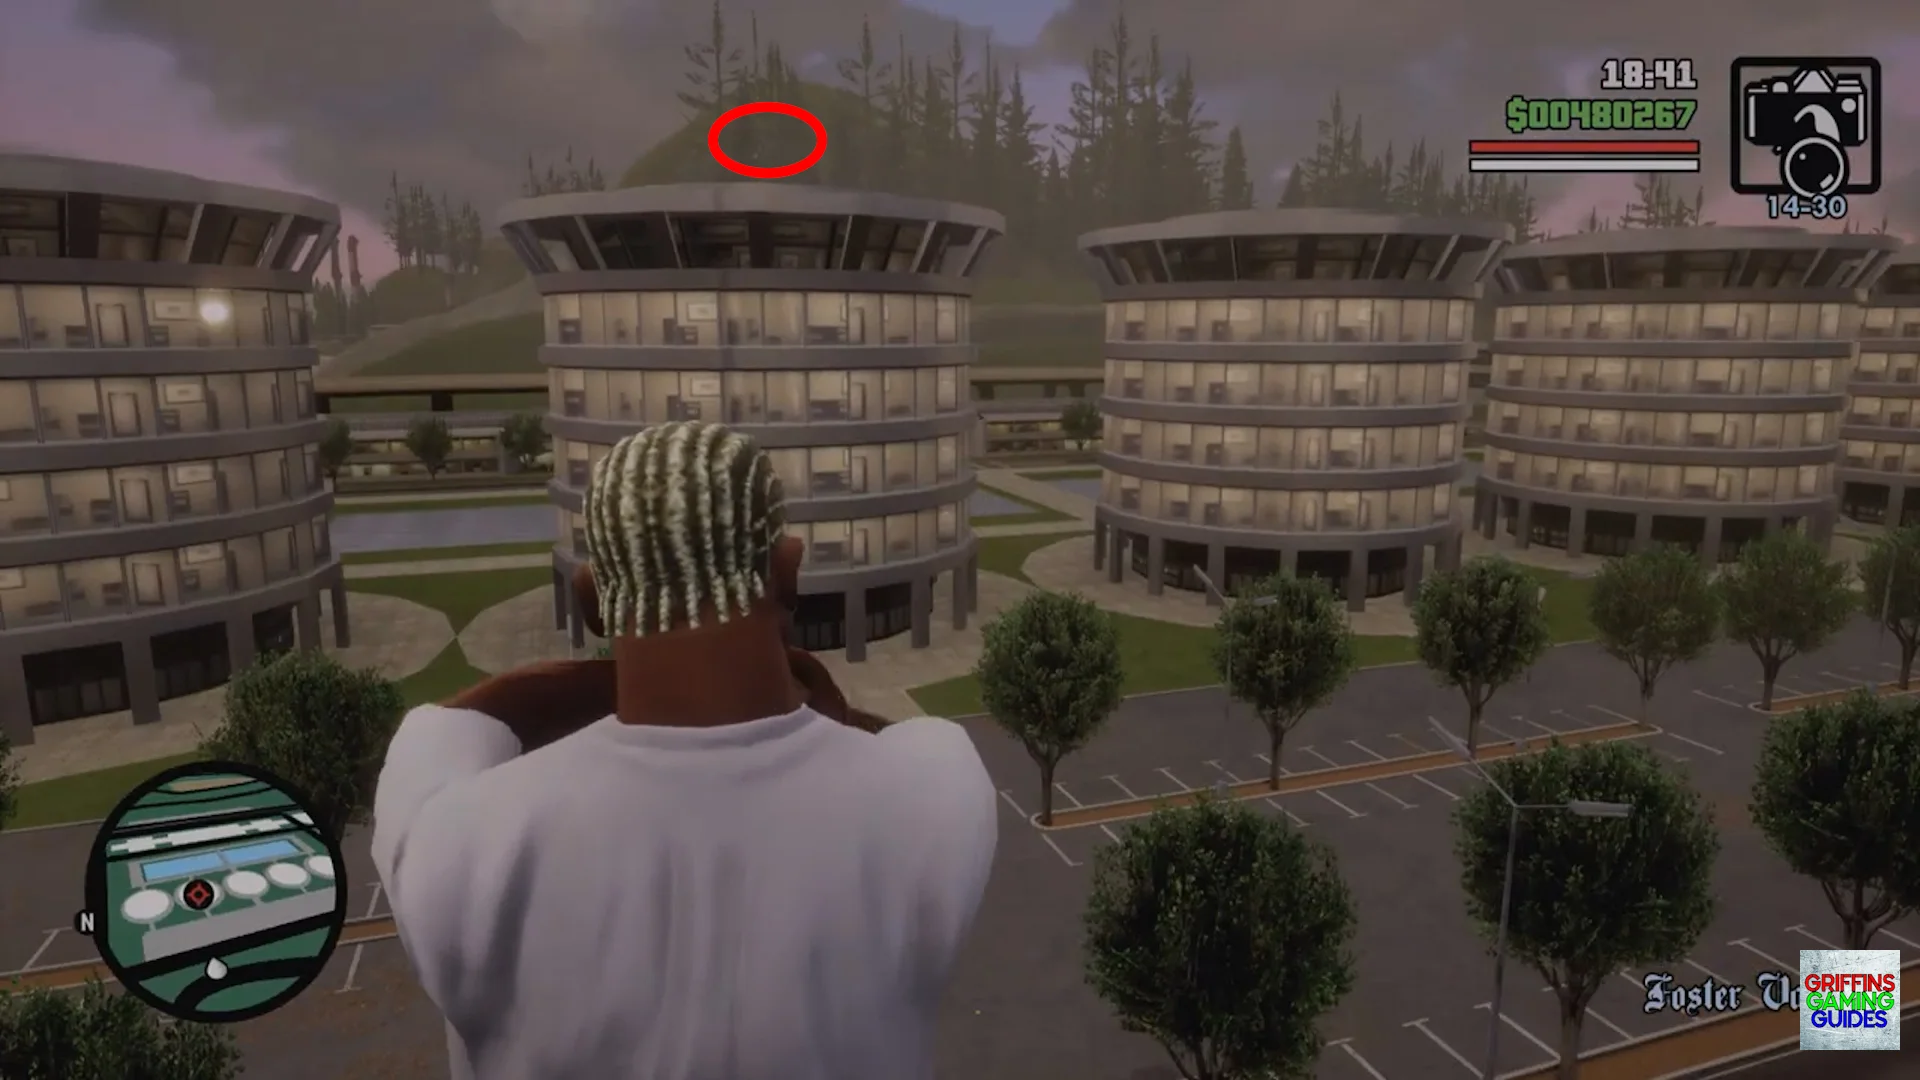
Snapshot 6
Location: Foster Valley.
You will need to go high up the hill to the West of the cylindrical office buildings then look just above the second office building from the North to find this snapshot.
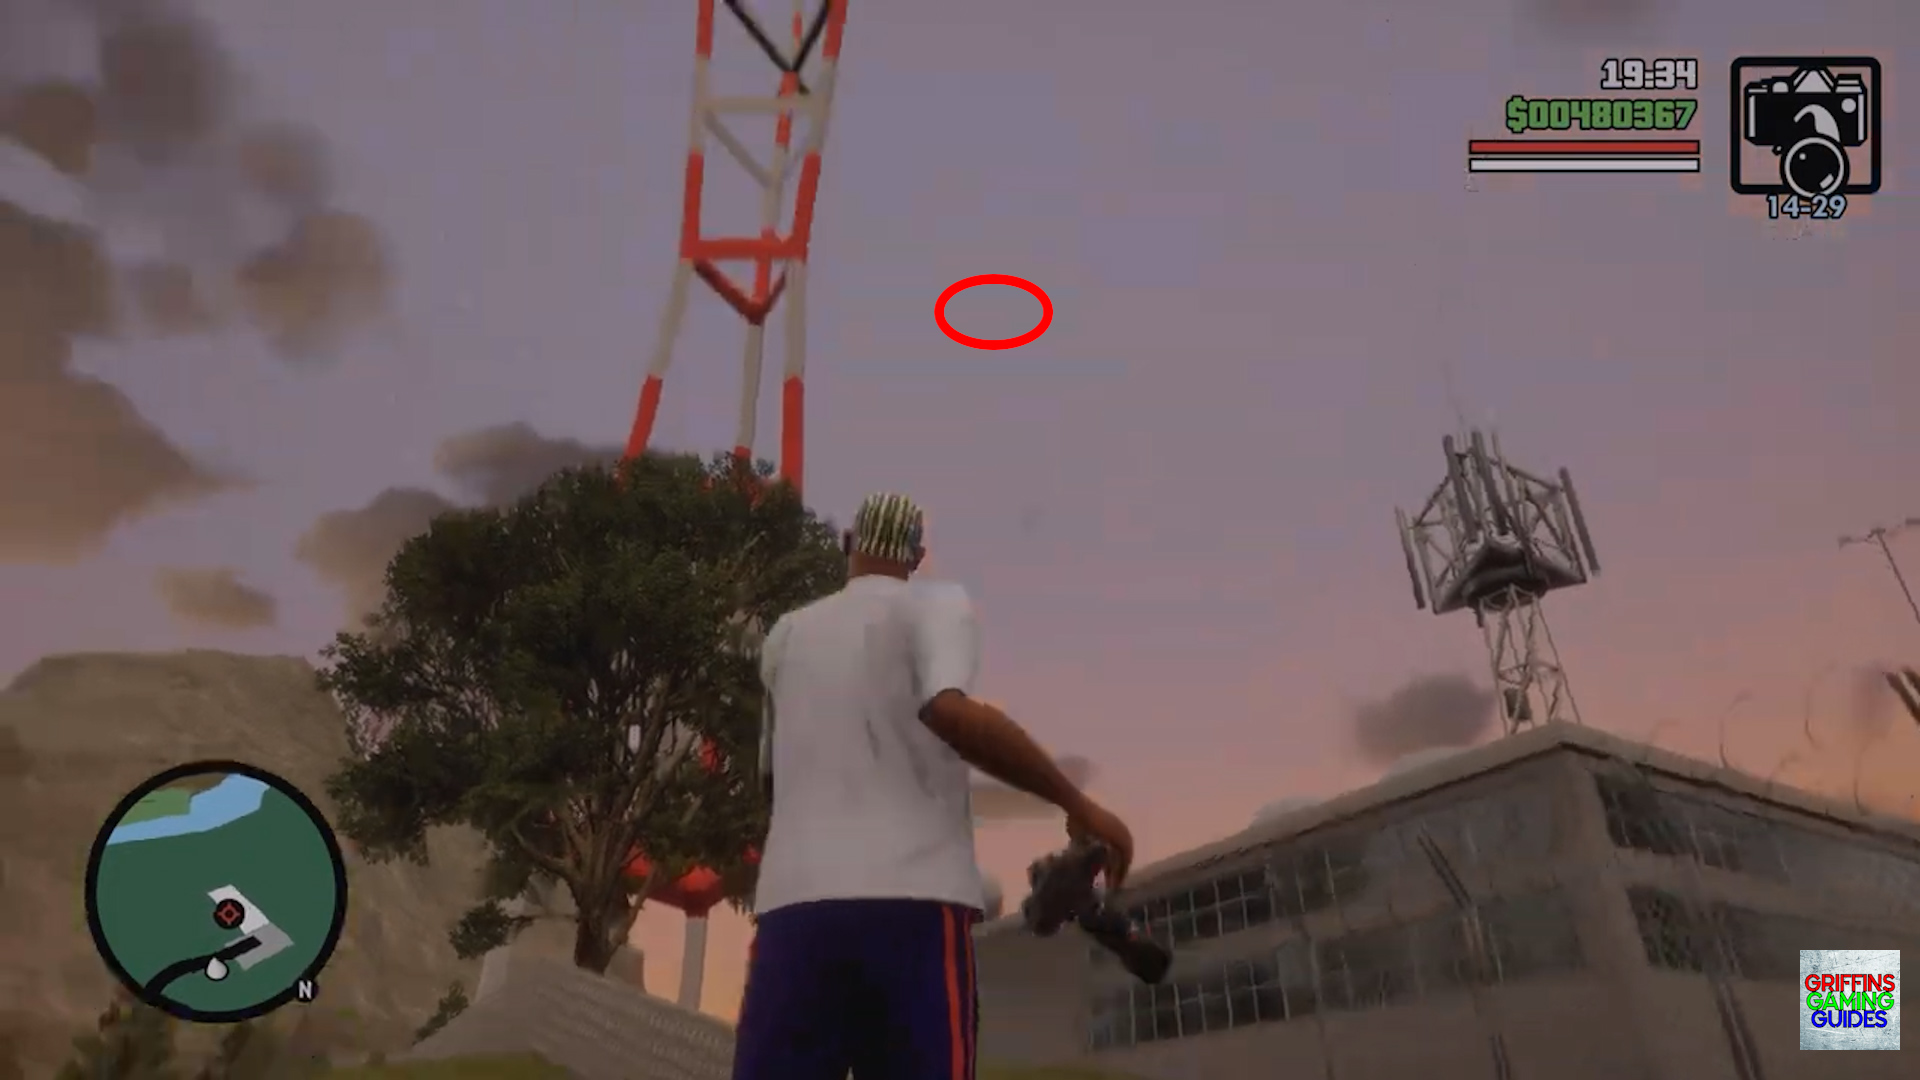
Snapshot 7
Location: Missionary Hill.
Look South West high above the building to the right of the white and red tower.
Snapshot 8
Location: Missionary Hill.
Stand on the Northern side of the bridge then look above the supports to find this snapshot.
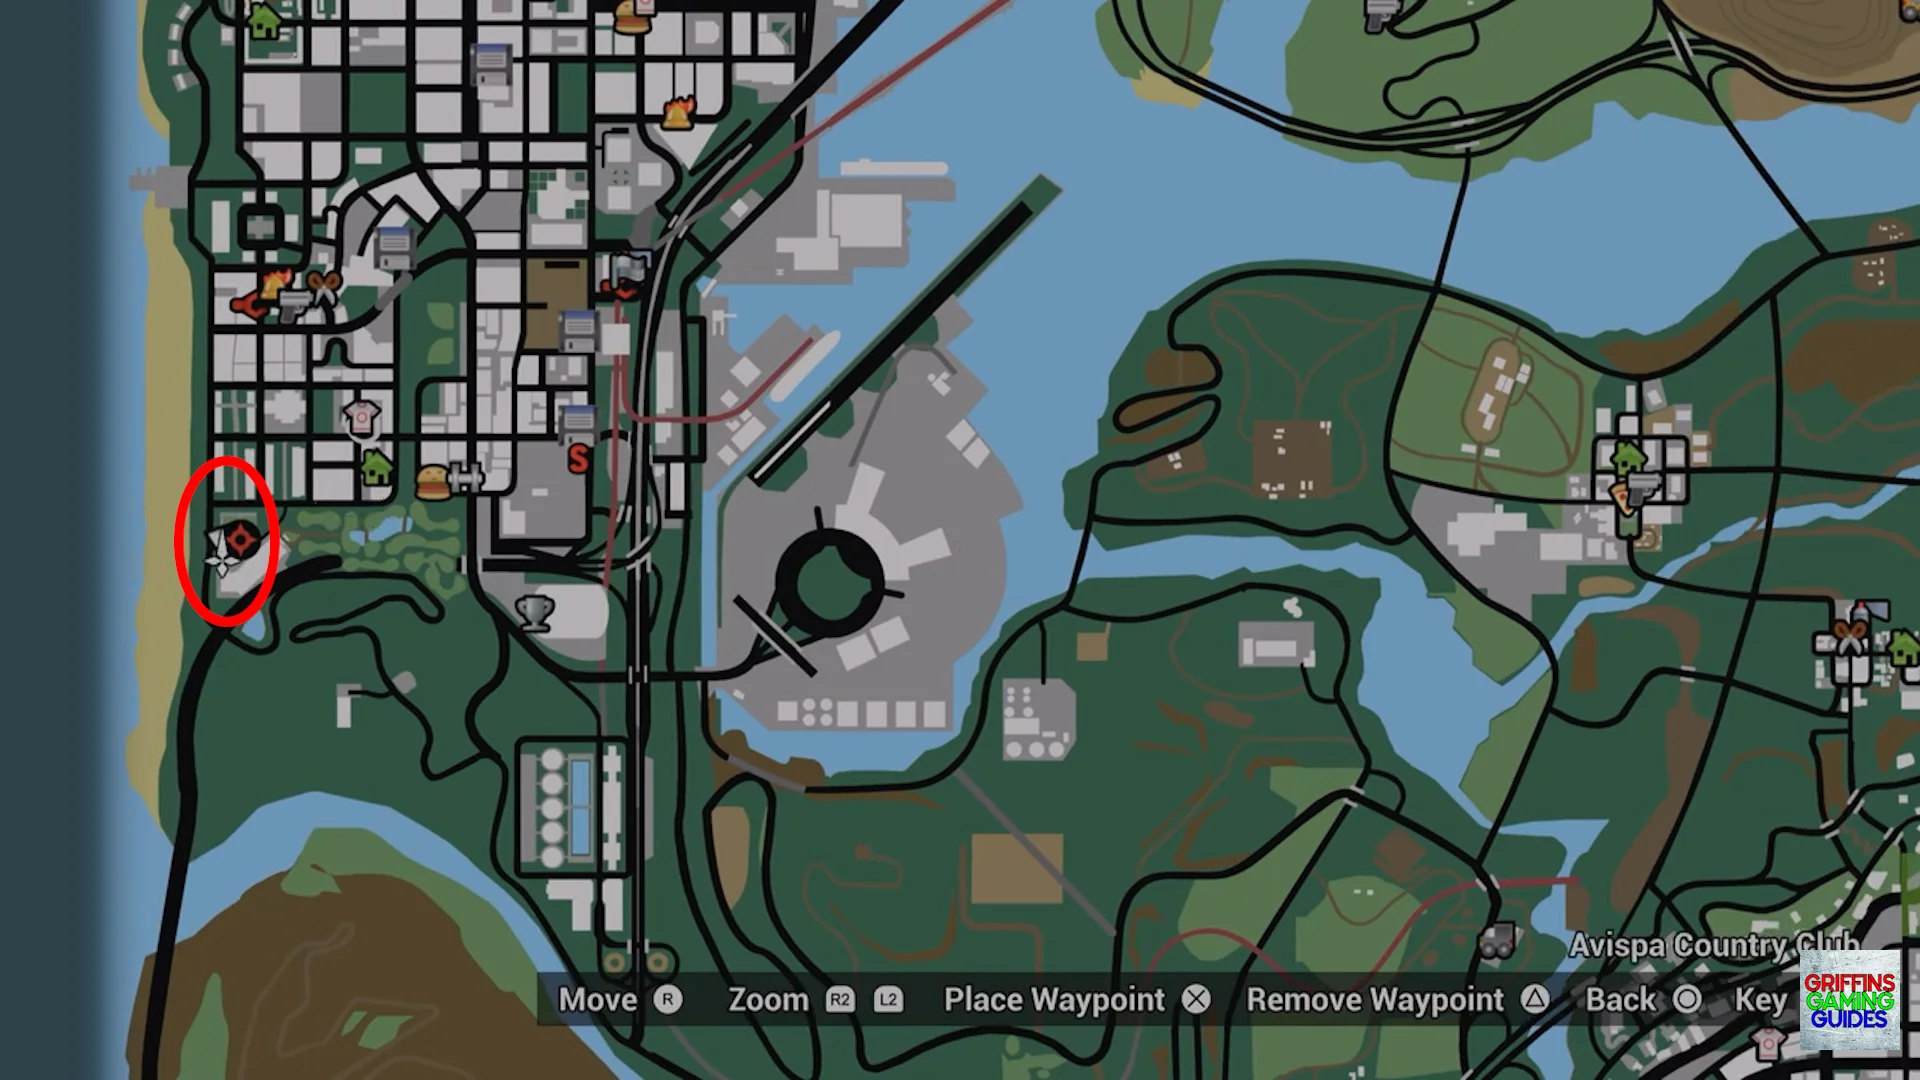
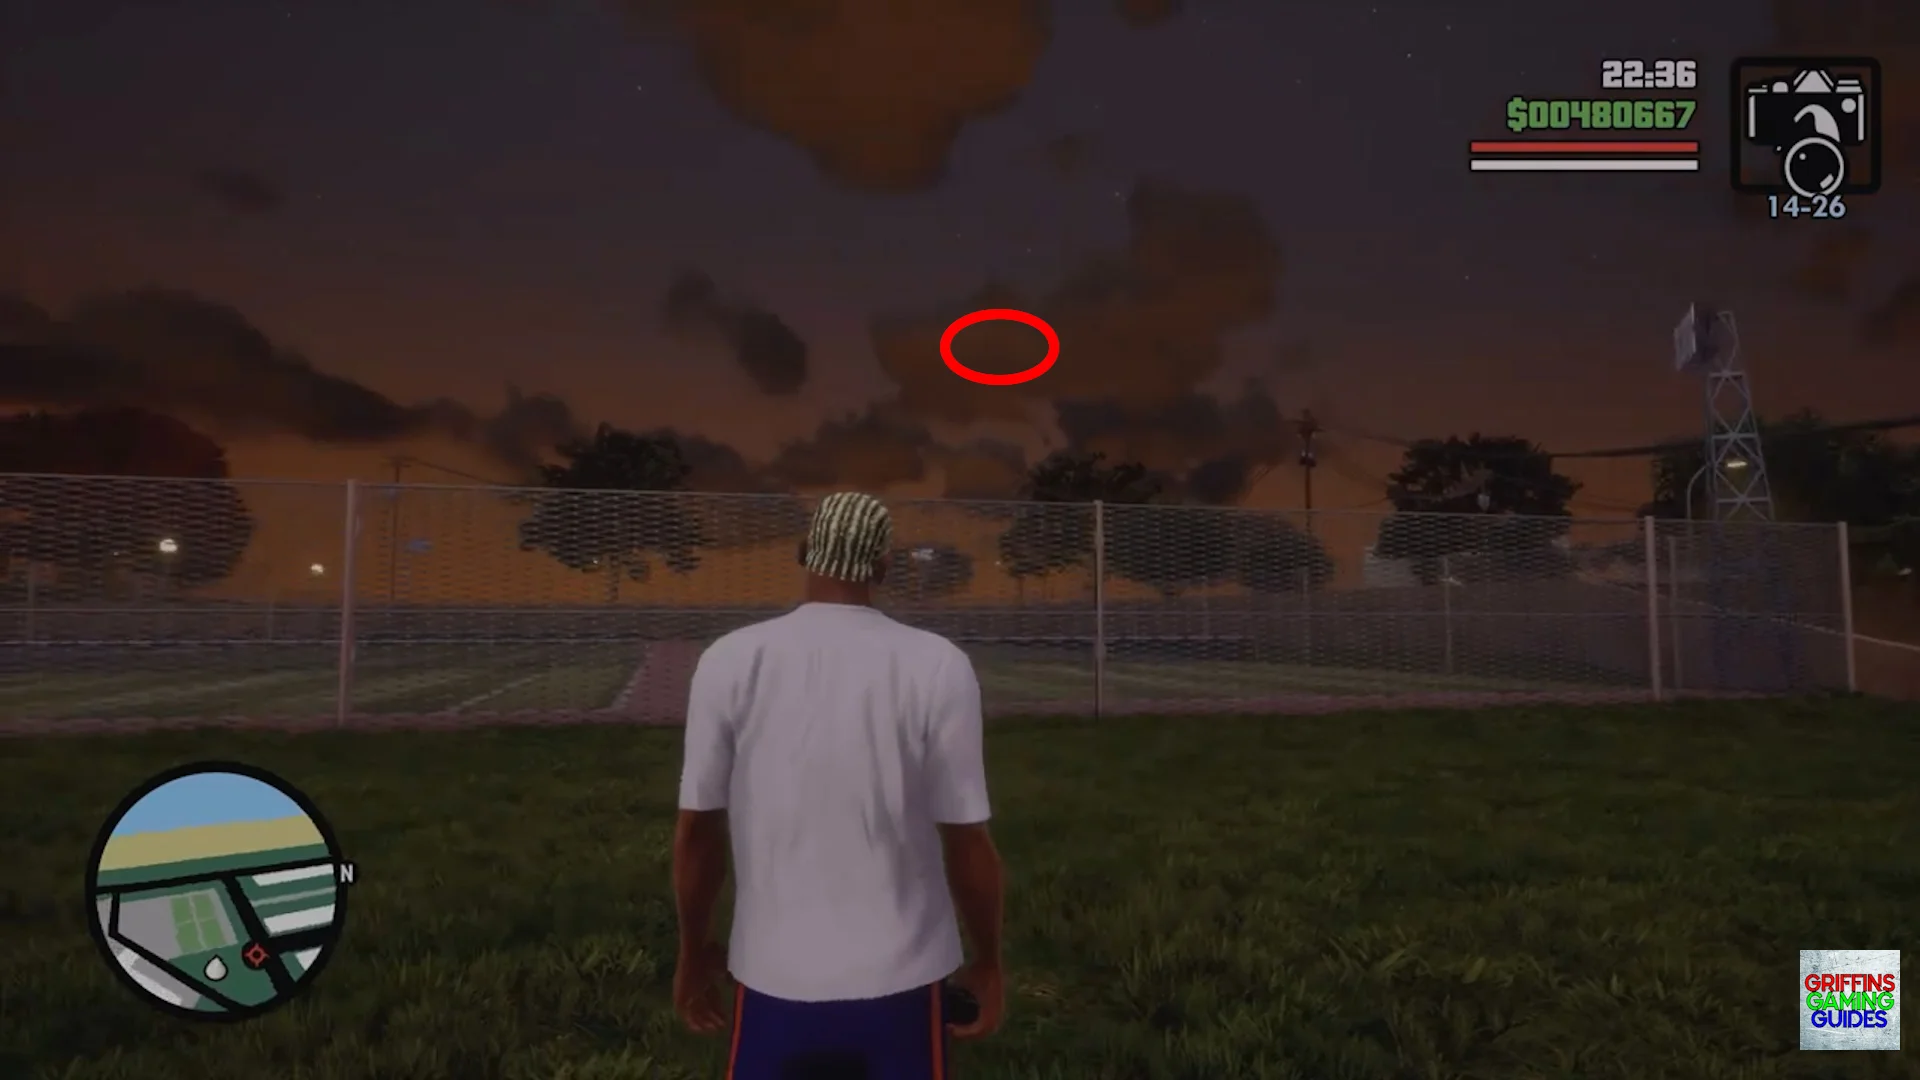
Snapshot 9
Location: Avispa Country Club.
Look to the tall building at the South of the marker below. You will need to angle yourself correctly to be able to get the snapshot behind the tall tree.
Snapshot 10
Location: Avispa Country Club.
Look above the sports field to find this snapshot.
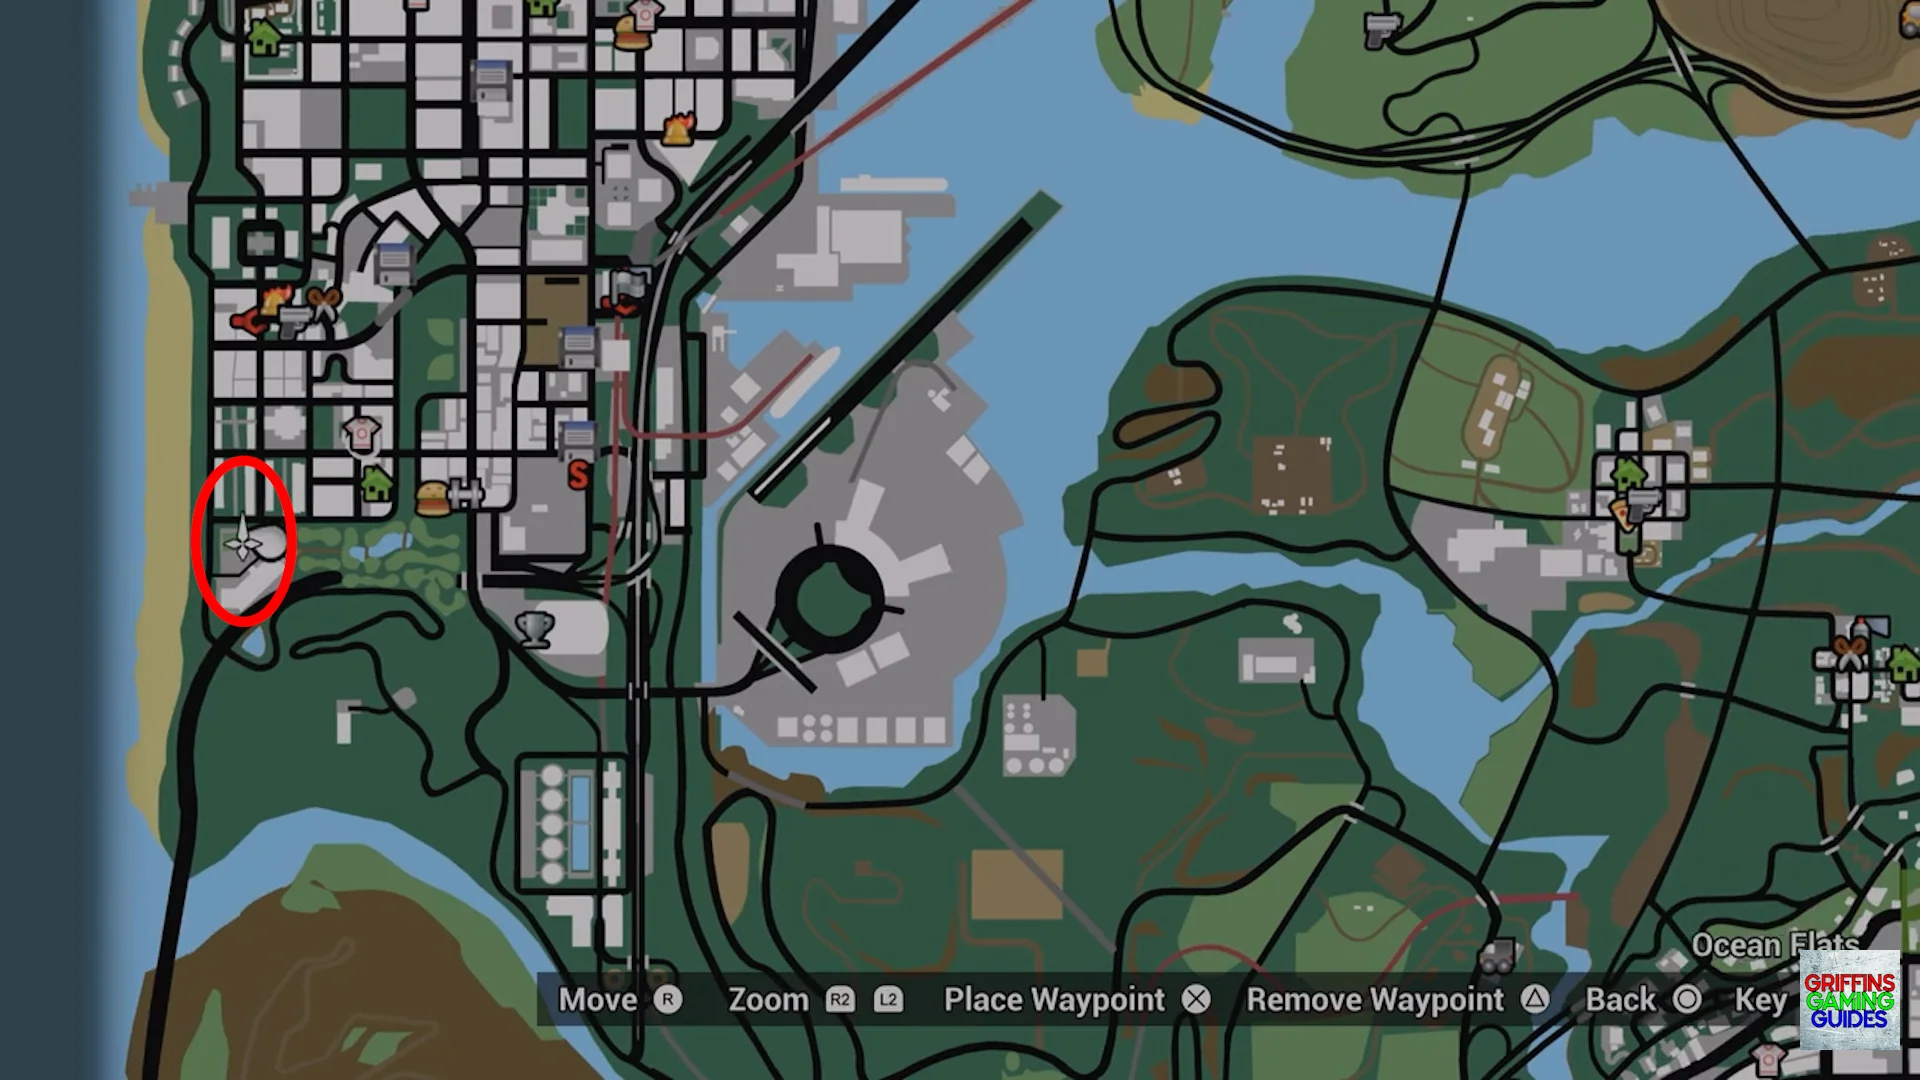
Snapshot 11
Location: Ocean Flats.
Look West above the grey and green cross section building to find this snapshot.
Snapshot 12
Location: Ocean Flats.
From Snapshot 11, walk South then turn around so the grey and green building is now on your left then look up to your right to find the snapshot to the right of the telegraph pole.
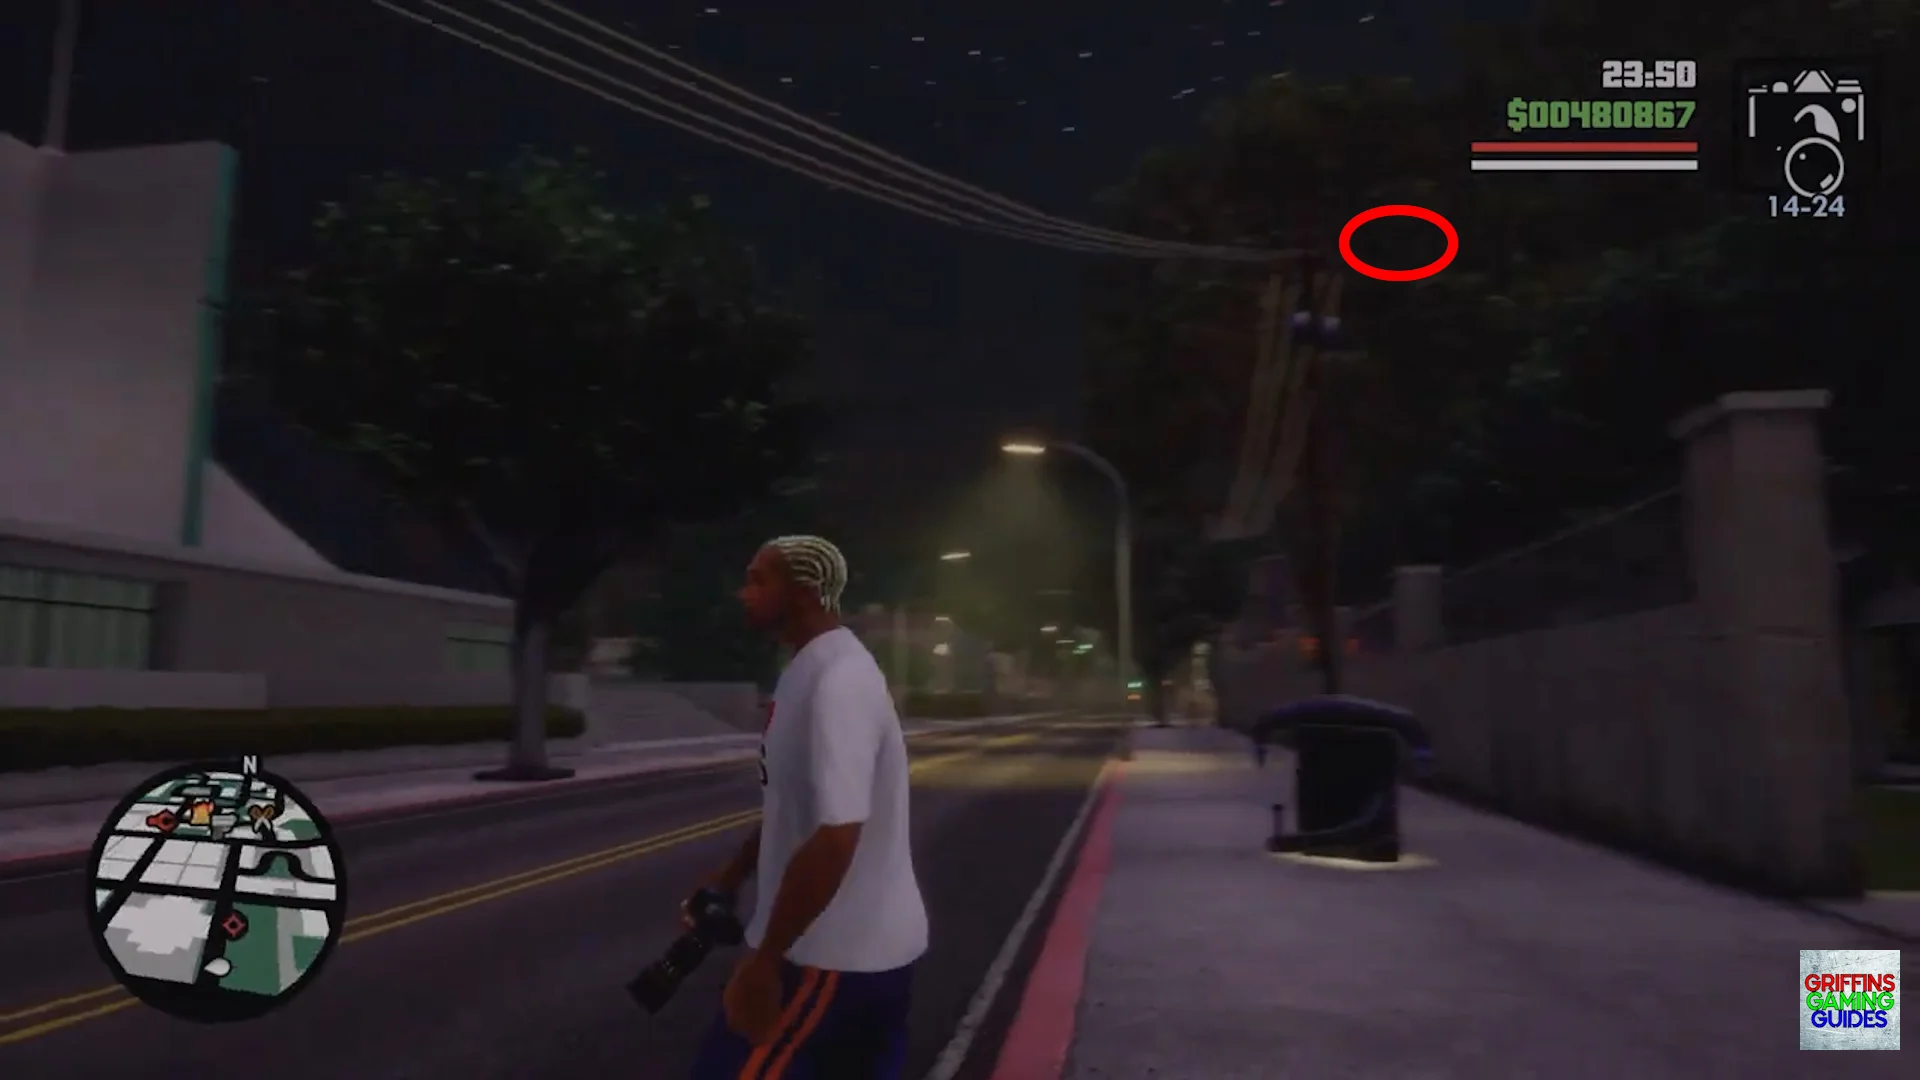
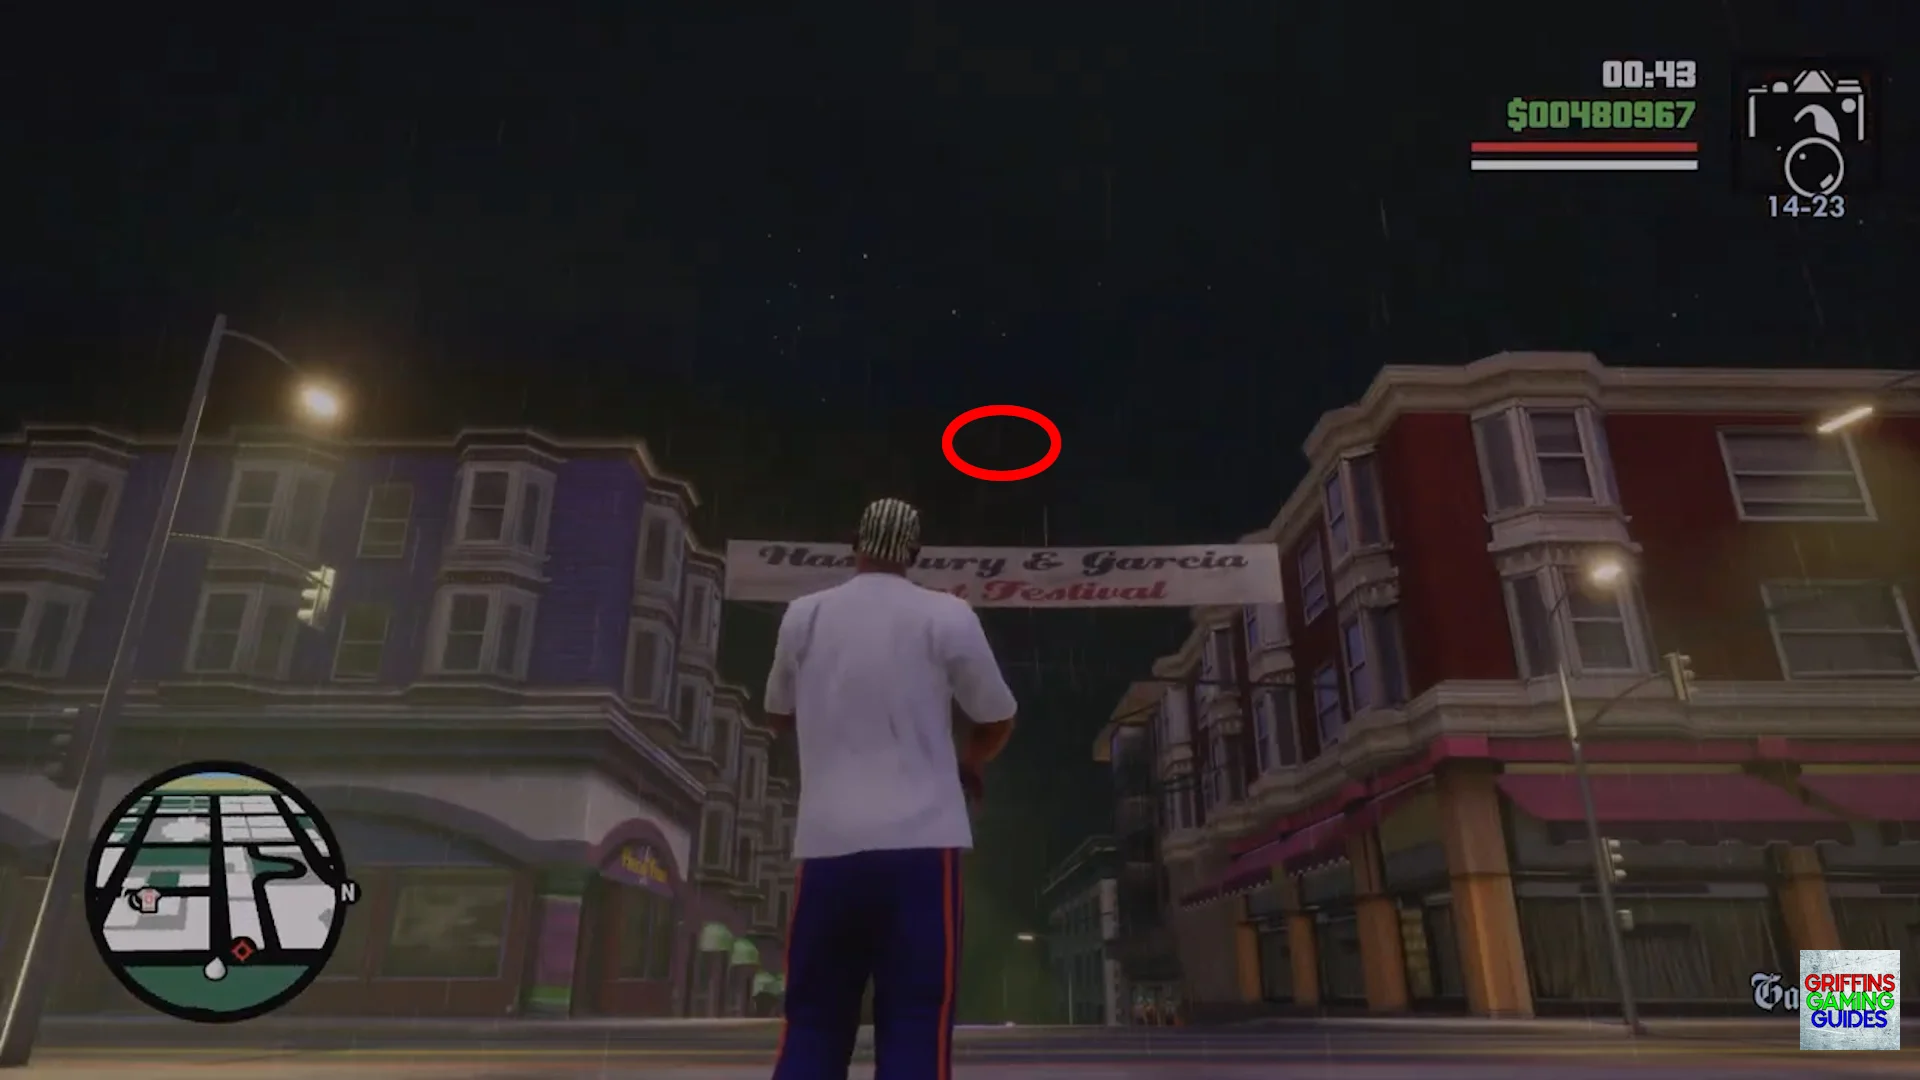
Snapshot 13
Location: Garcia.
Aim your camera above the Hashbury & Garcia Joint Festival banner to find this snapshot.
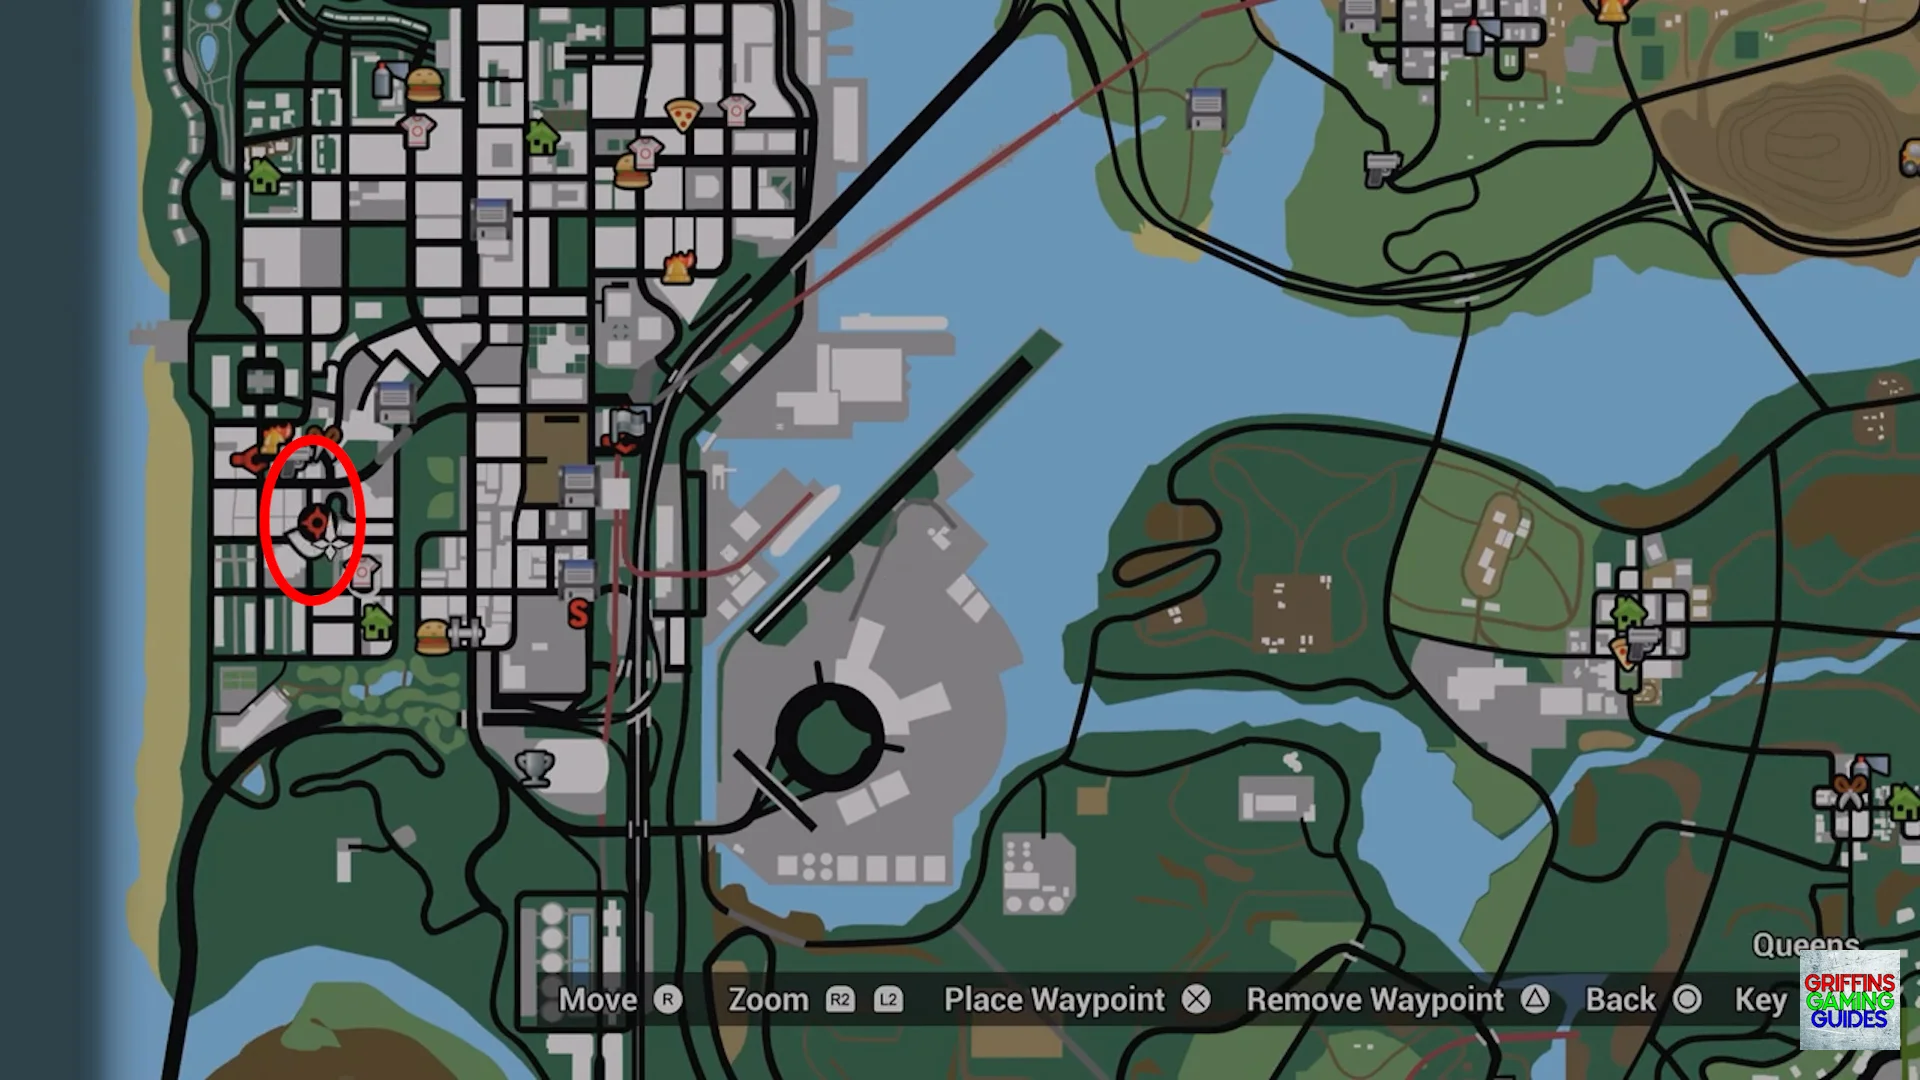
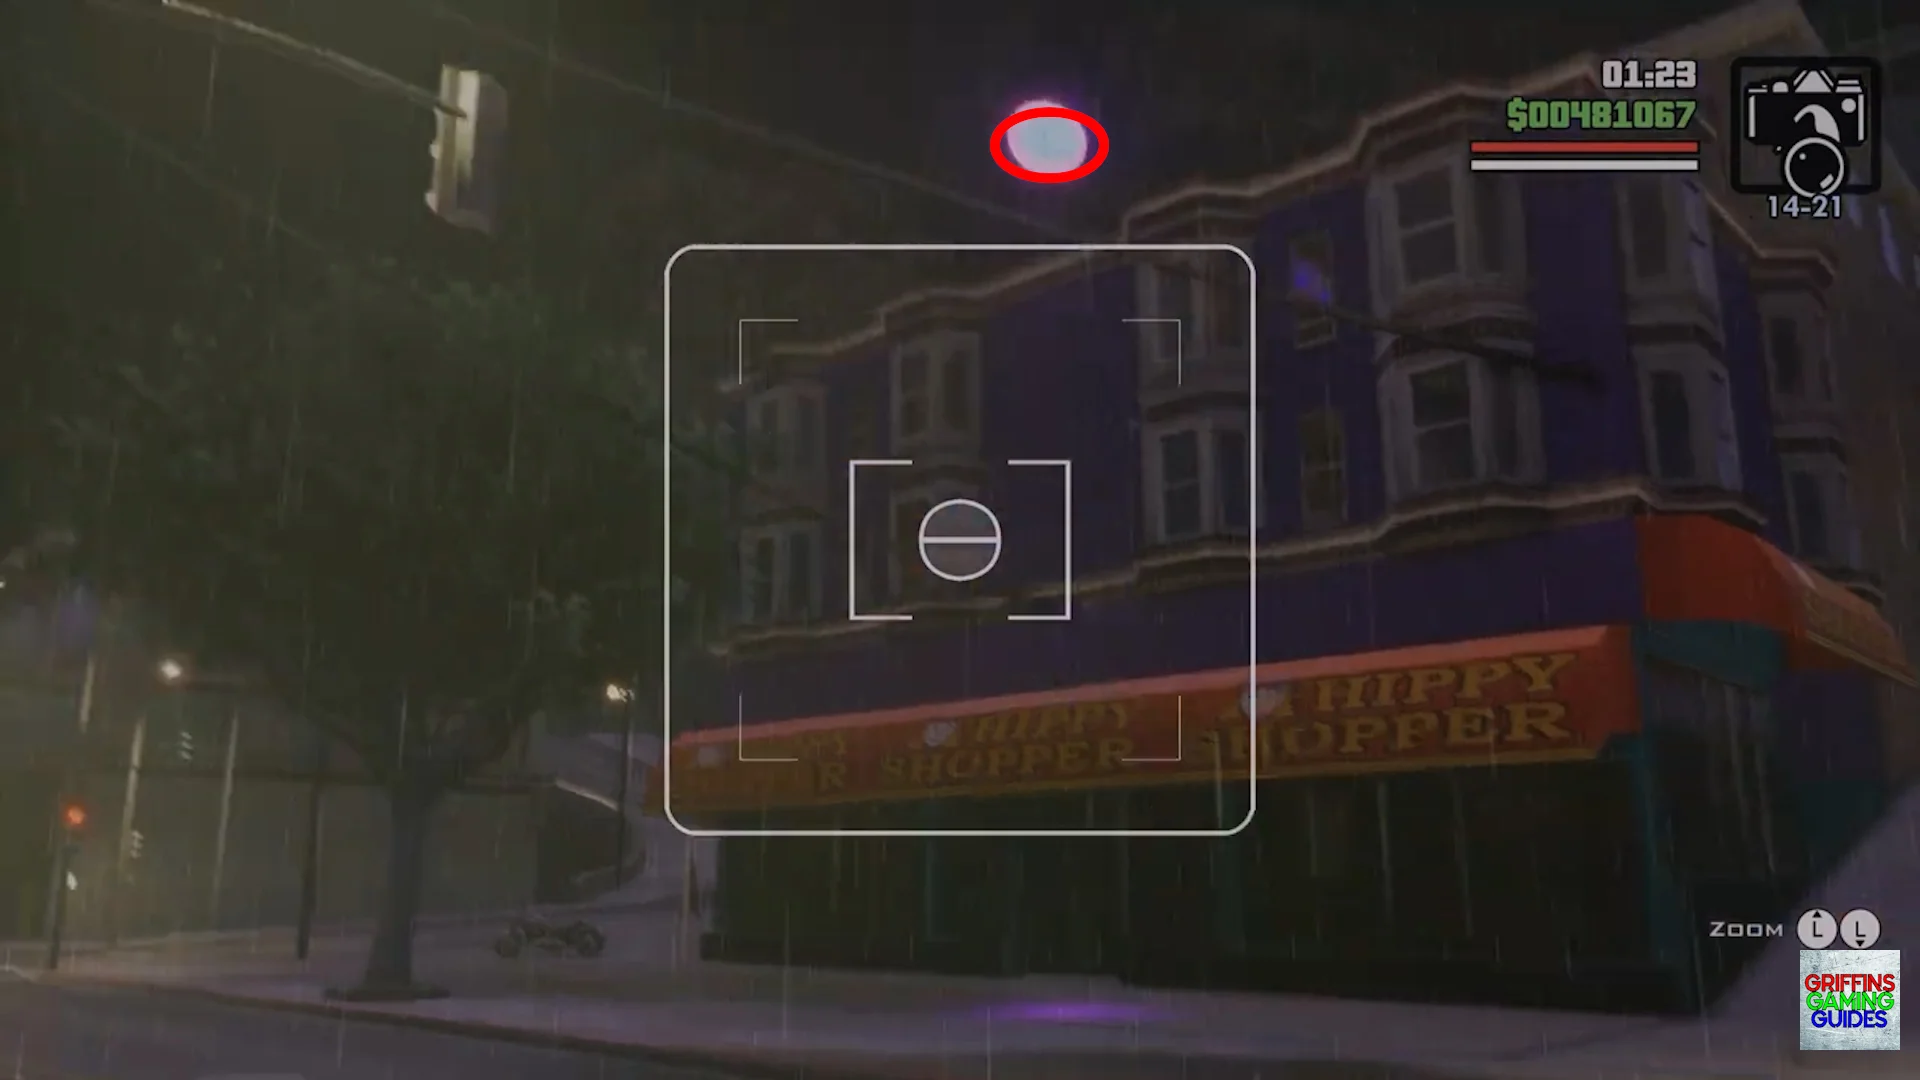
Snapshot 14
Location: Queens.
Look above the roof of the Hippy Shopper store to find this snapshot.
Snapshot 15
Location: Queens.
This snapshot is found on the right side of the Queens cinema building above the sign listing the current movies.
Snapshot 16
Location: City Hall.
Look above the stairs of the Western building in the district to find this snapshot.
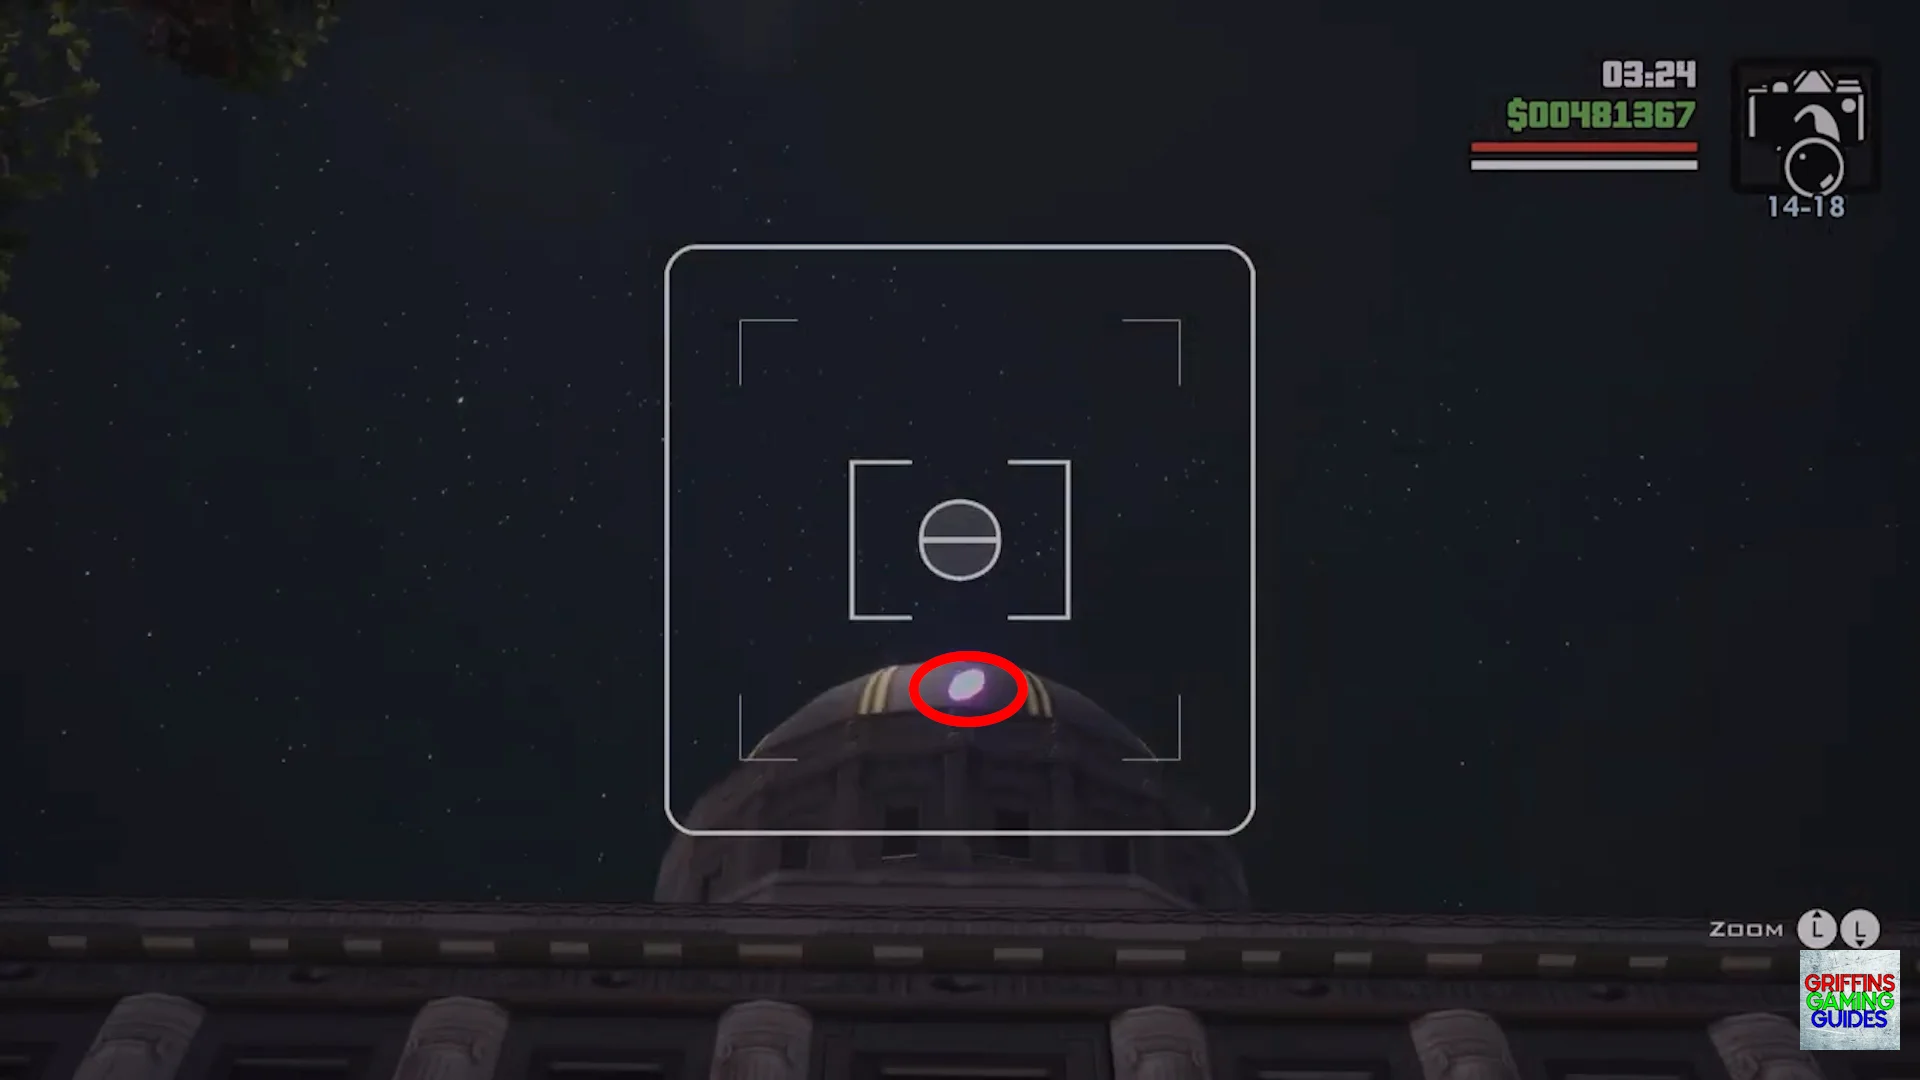
Snapshot 17
Location: City Hall.
Stand on the West side of the large building with a dome on its roof then look to the lower section of the dome to find this snapshot.
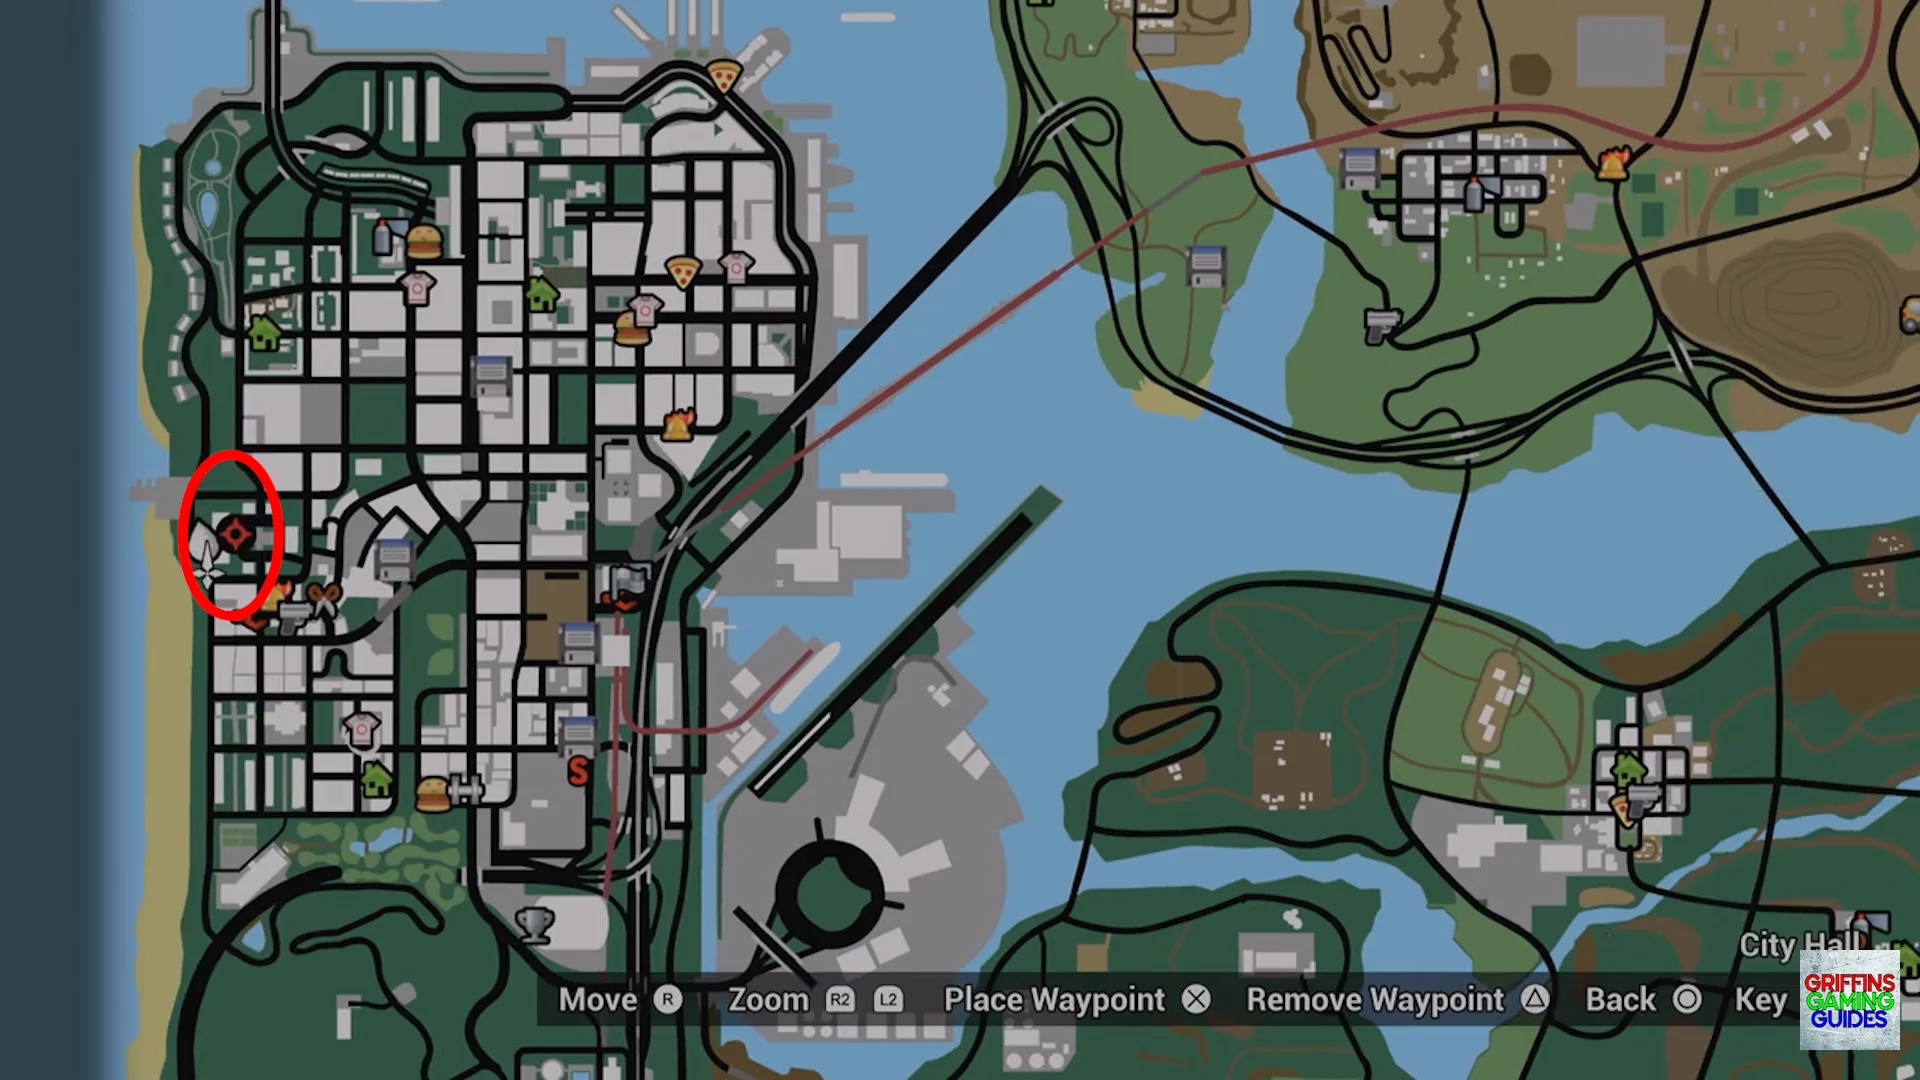
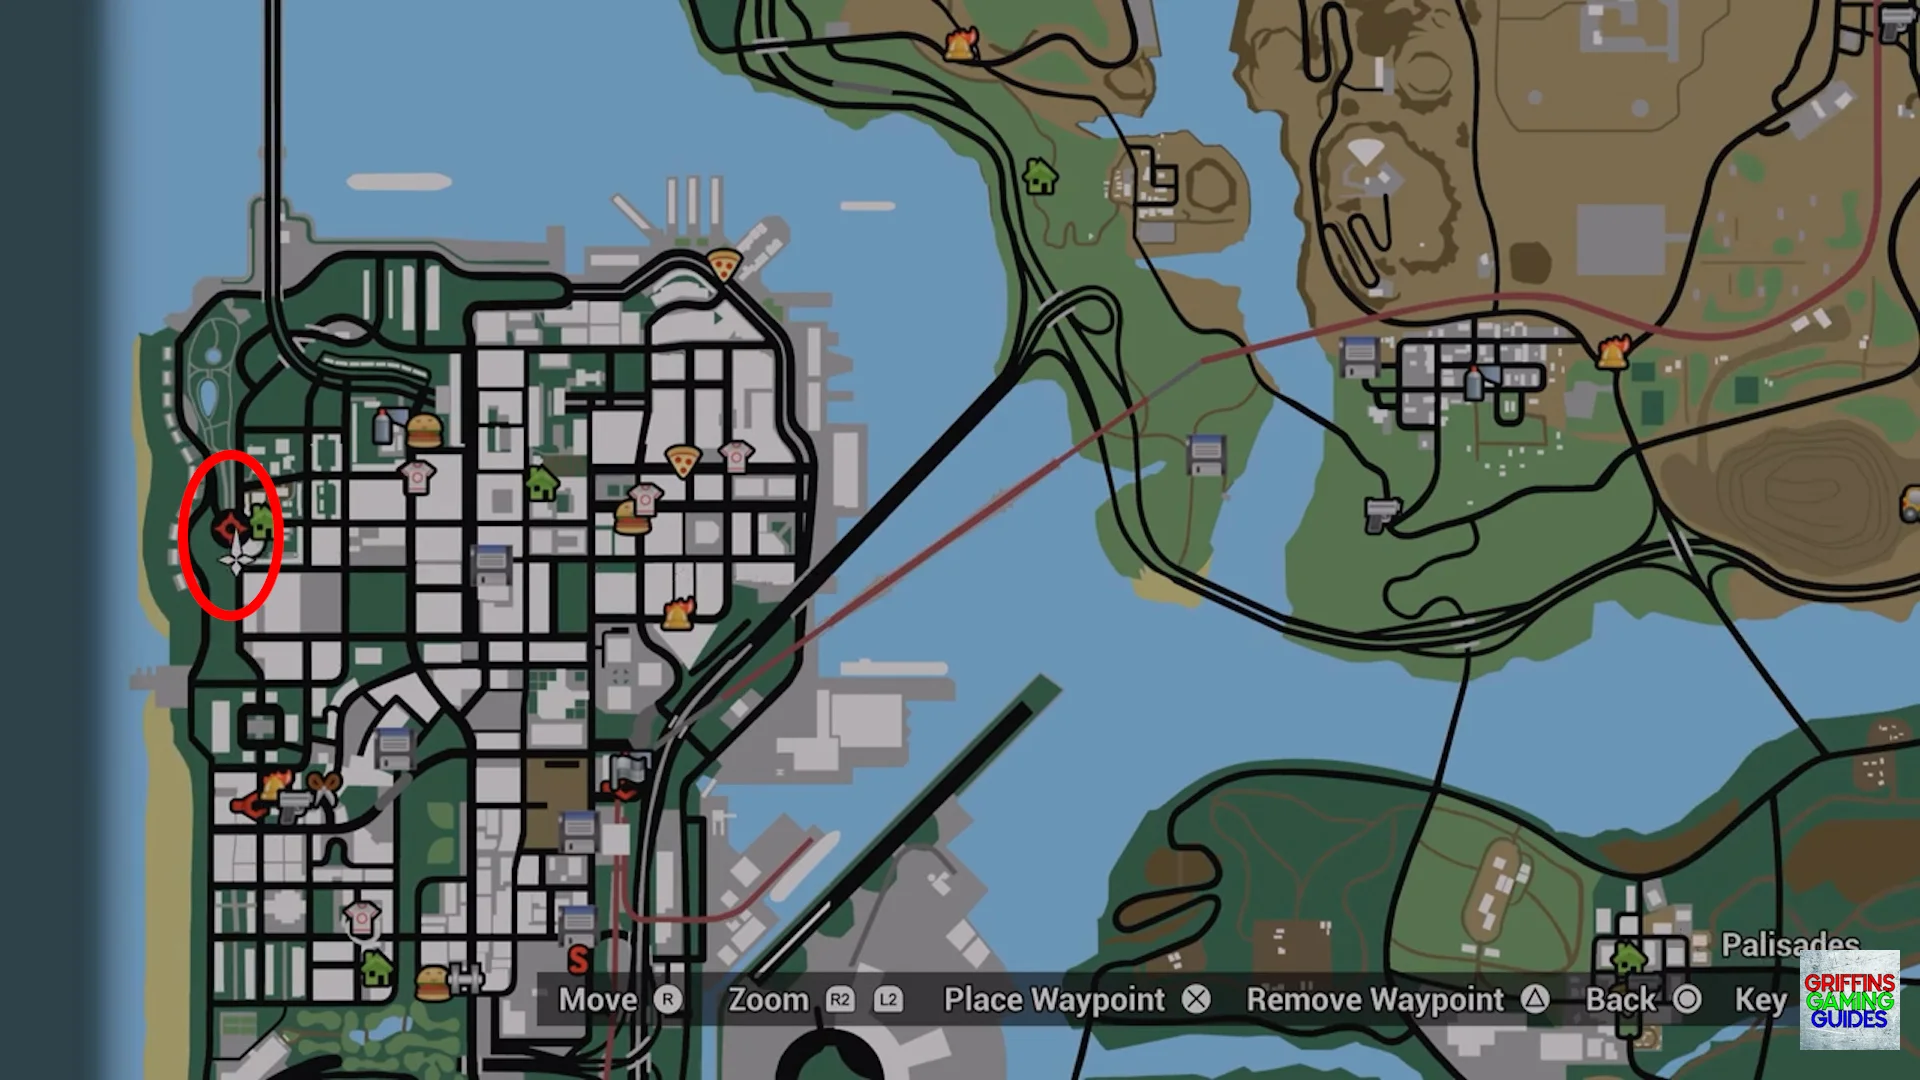
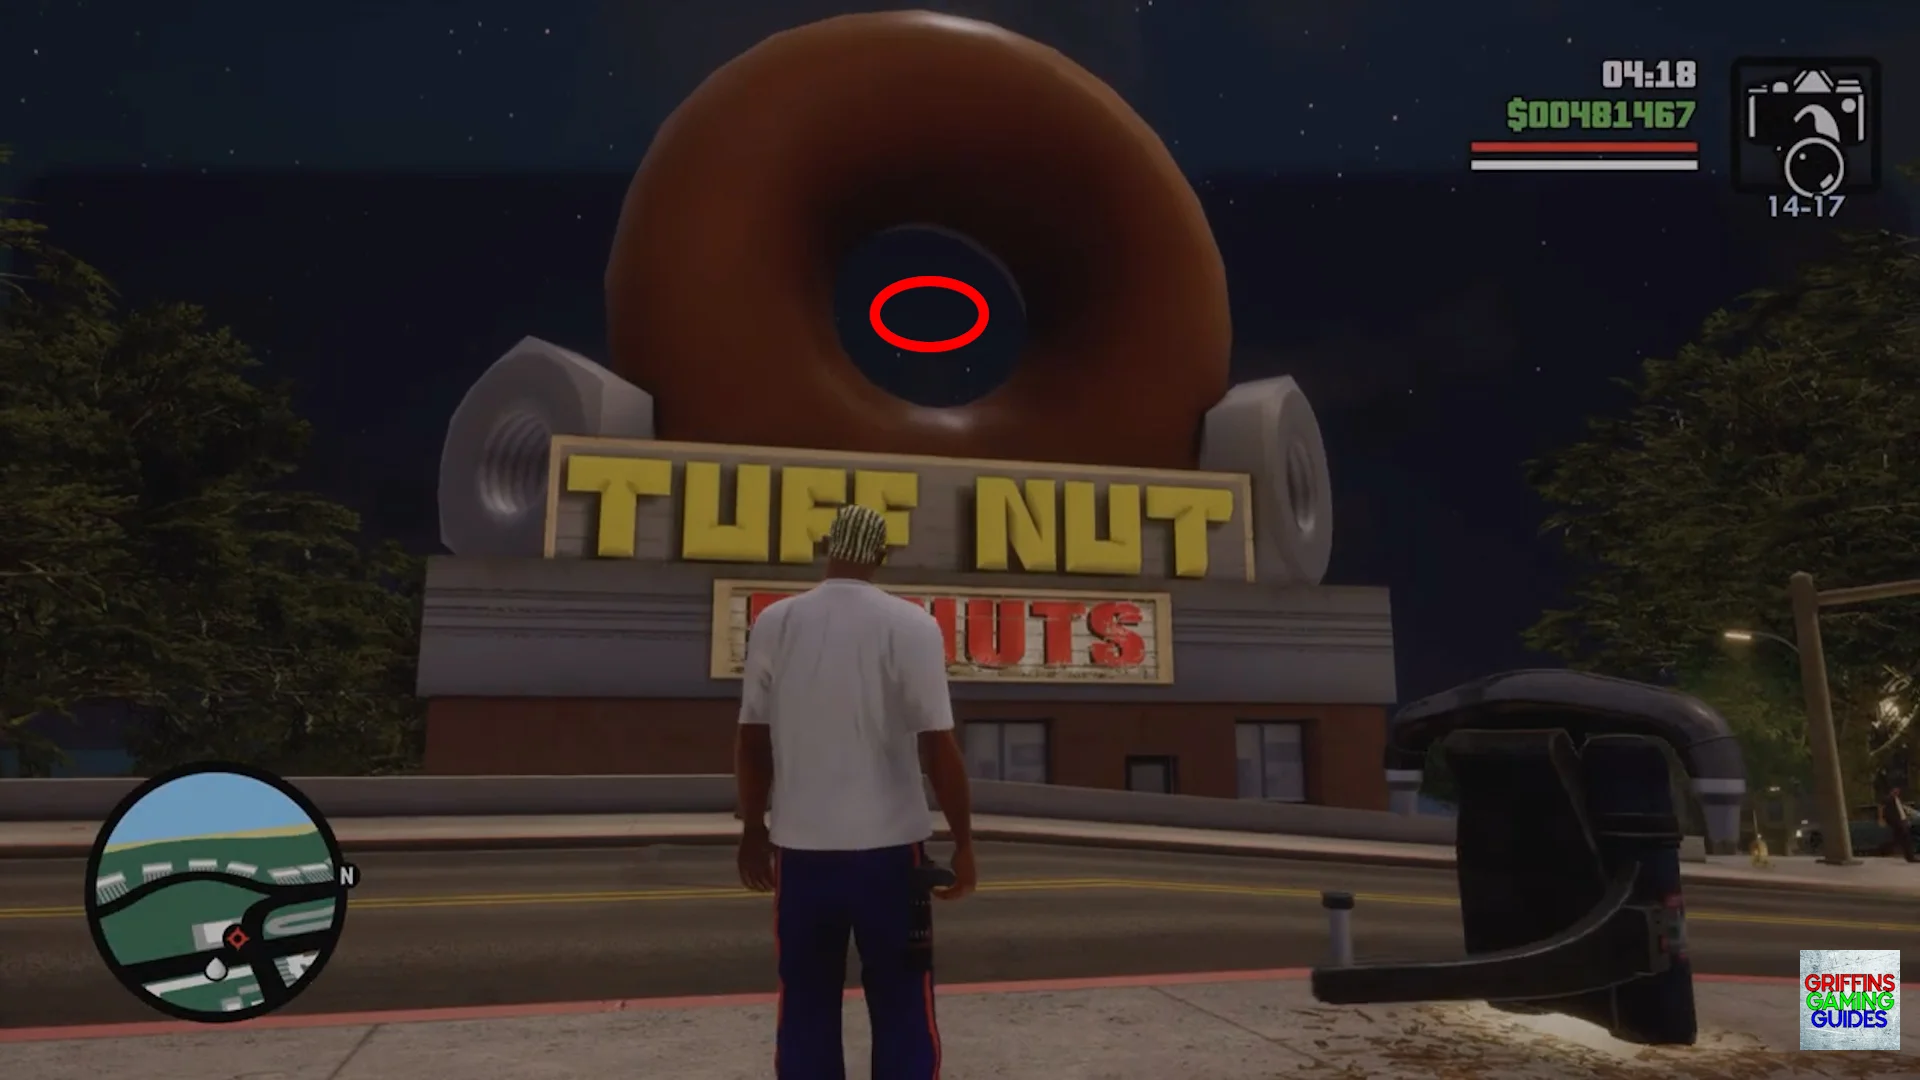
Snapshot 18
Location: Palisades.
Aim your camera in the centre of the Tuff Nut Donuts donut to find this snapshot.
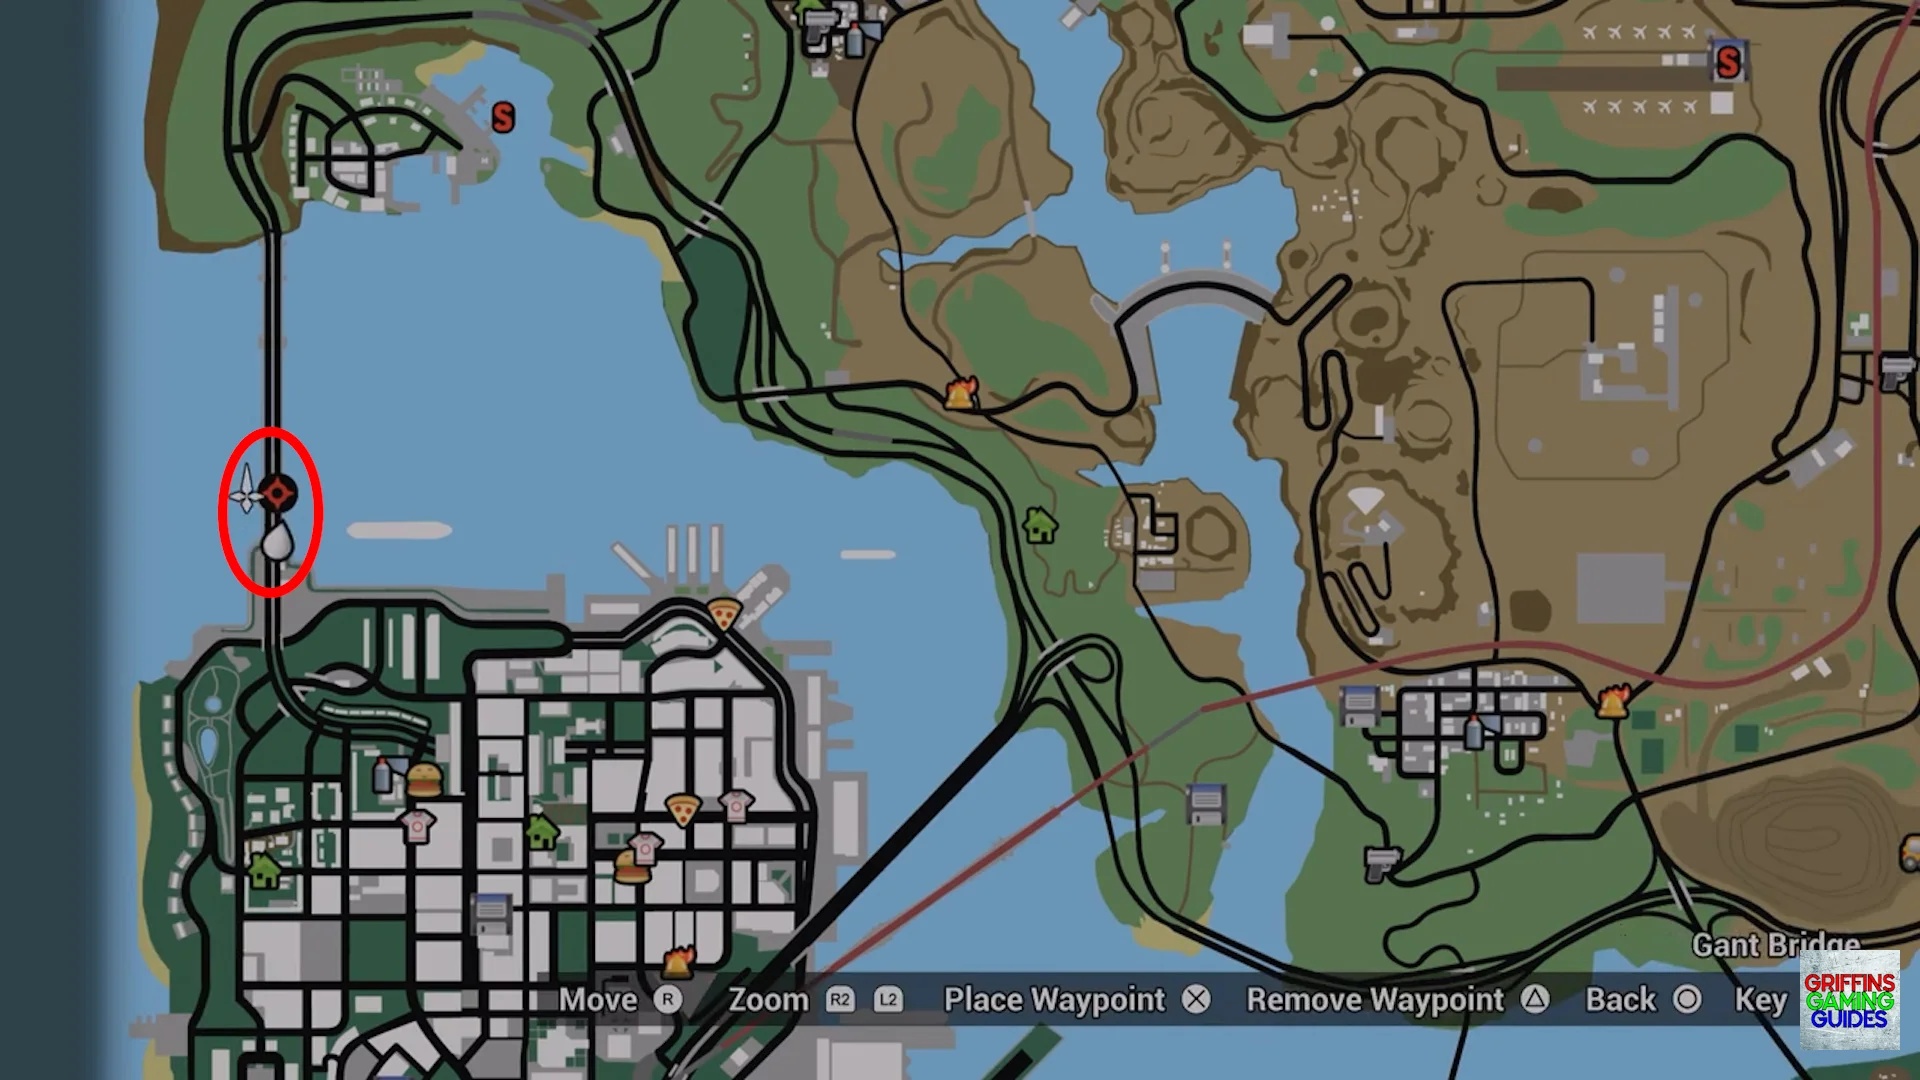
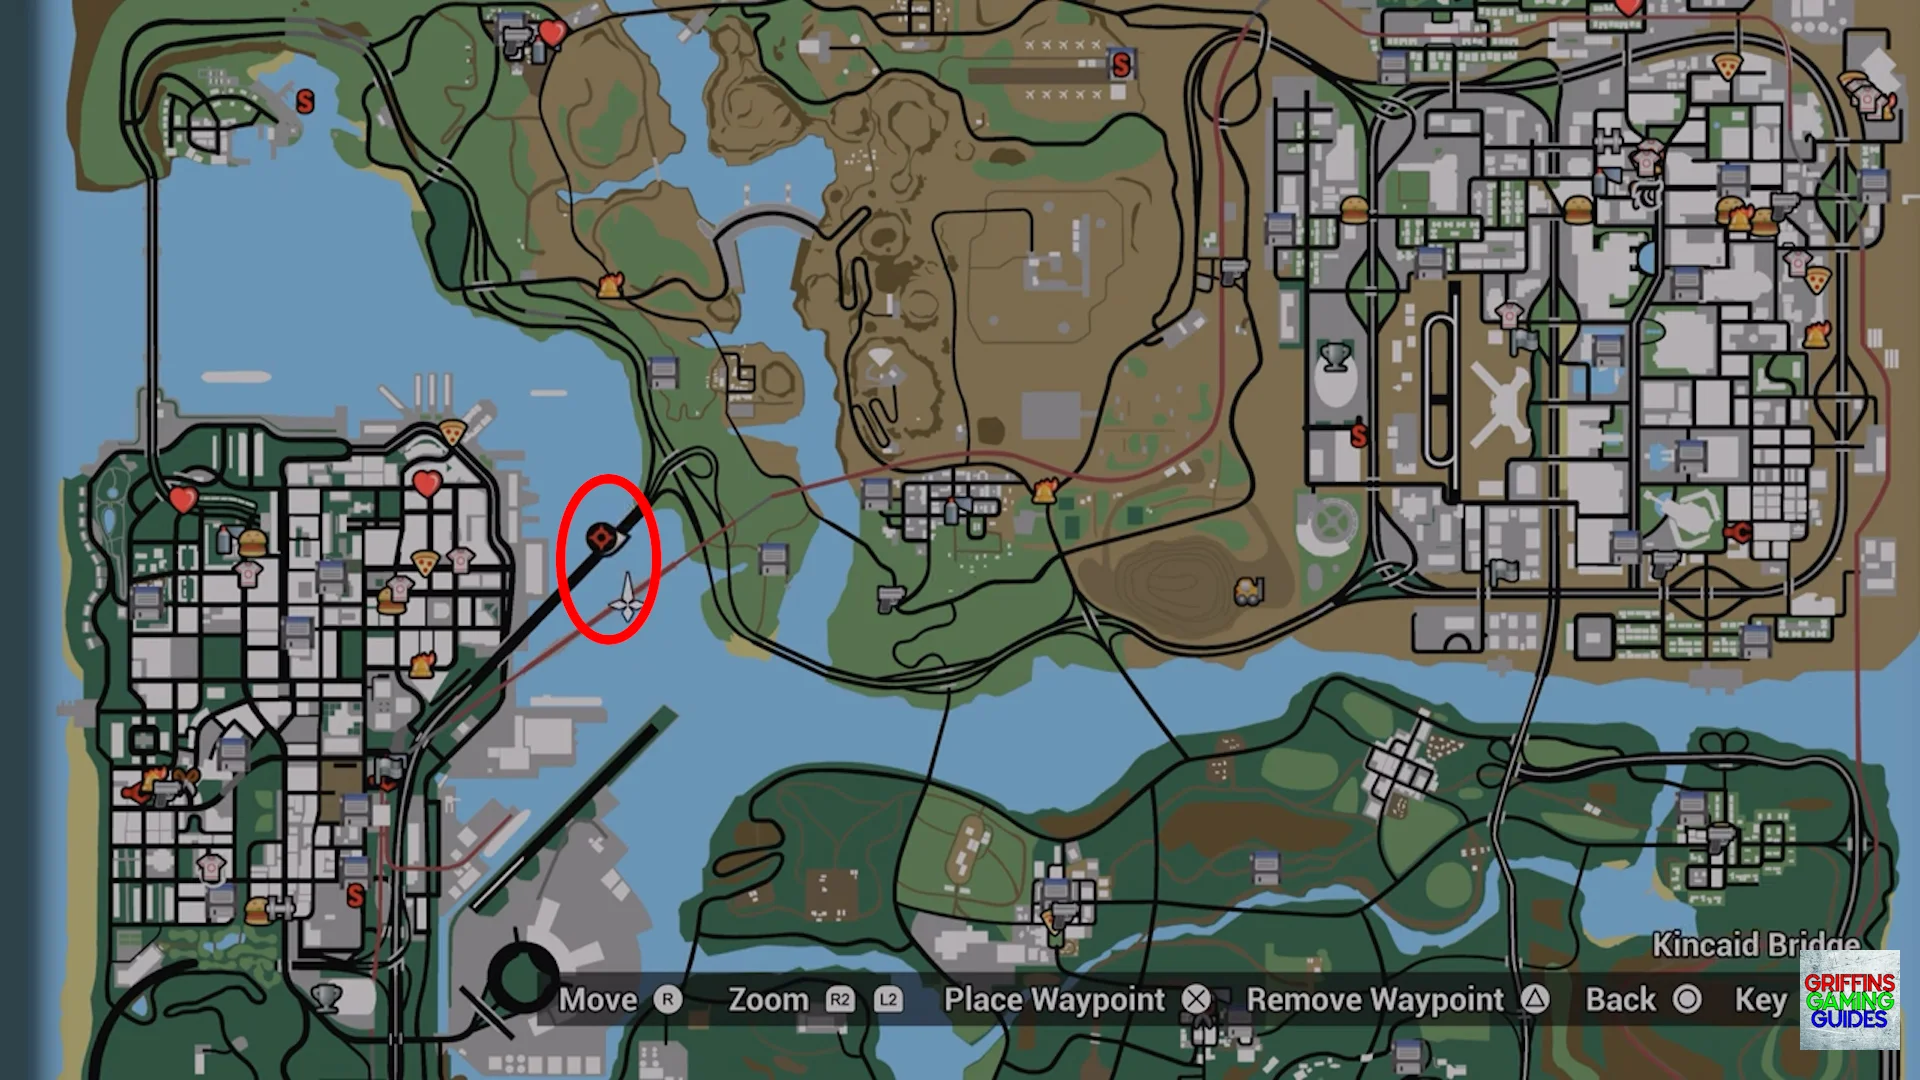
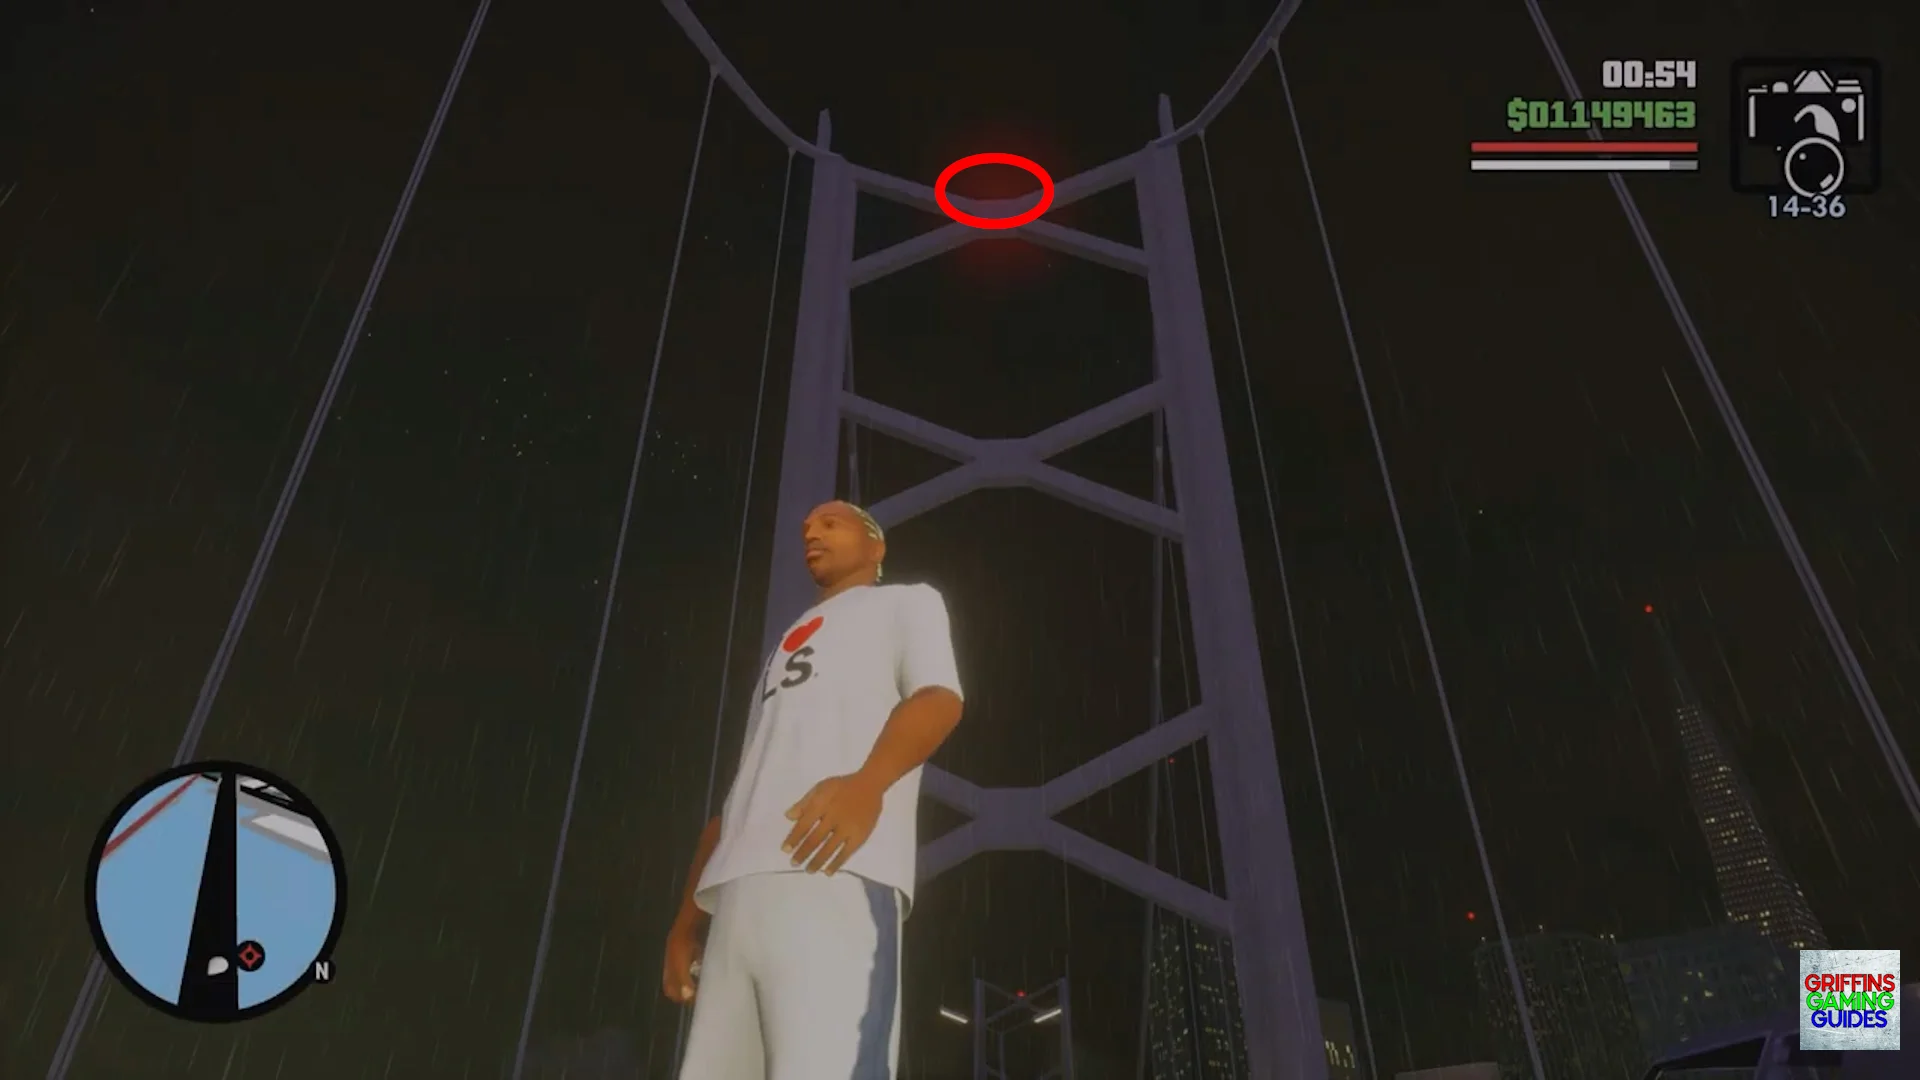
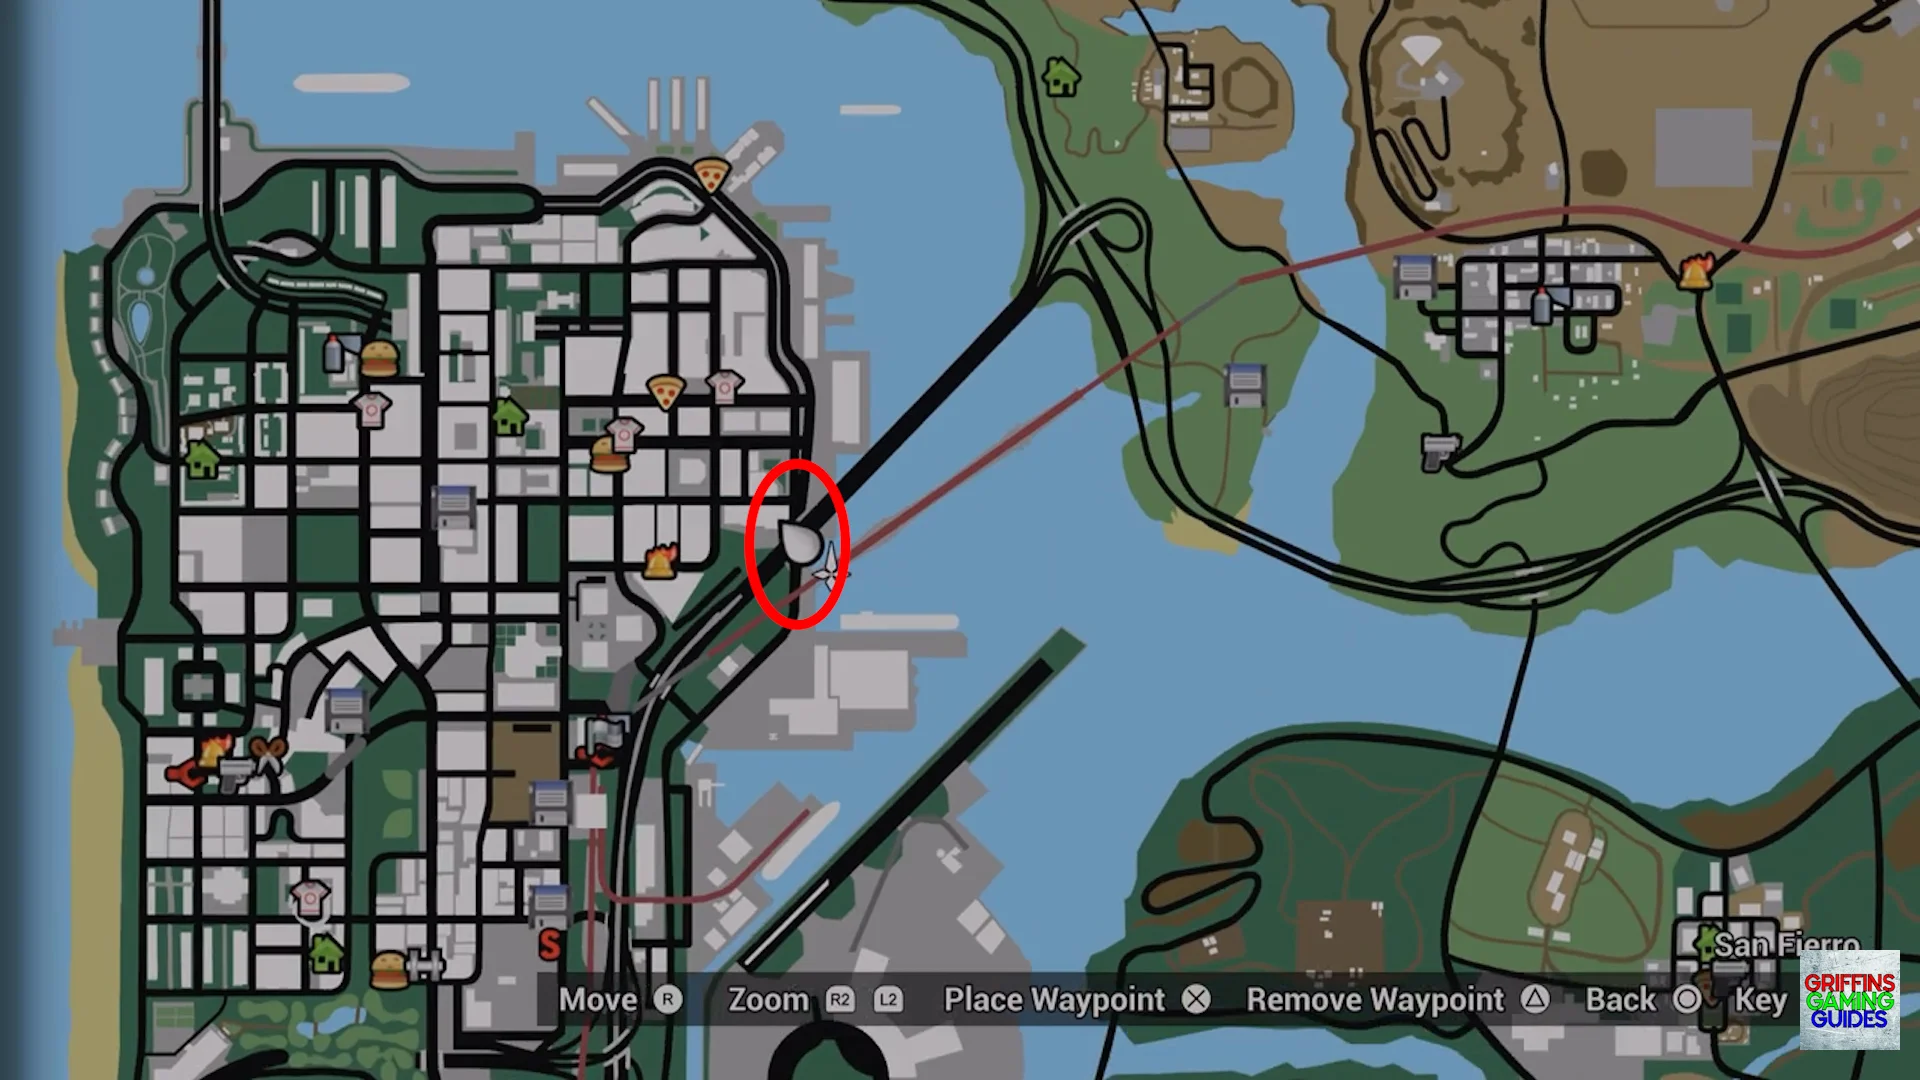
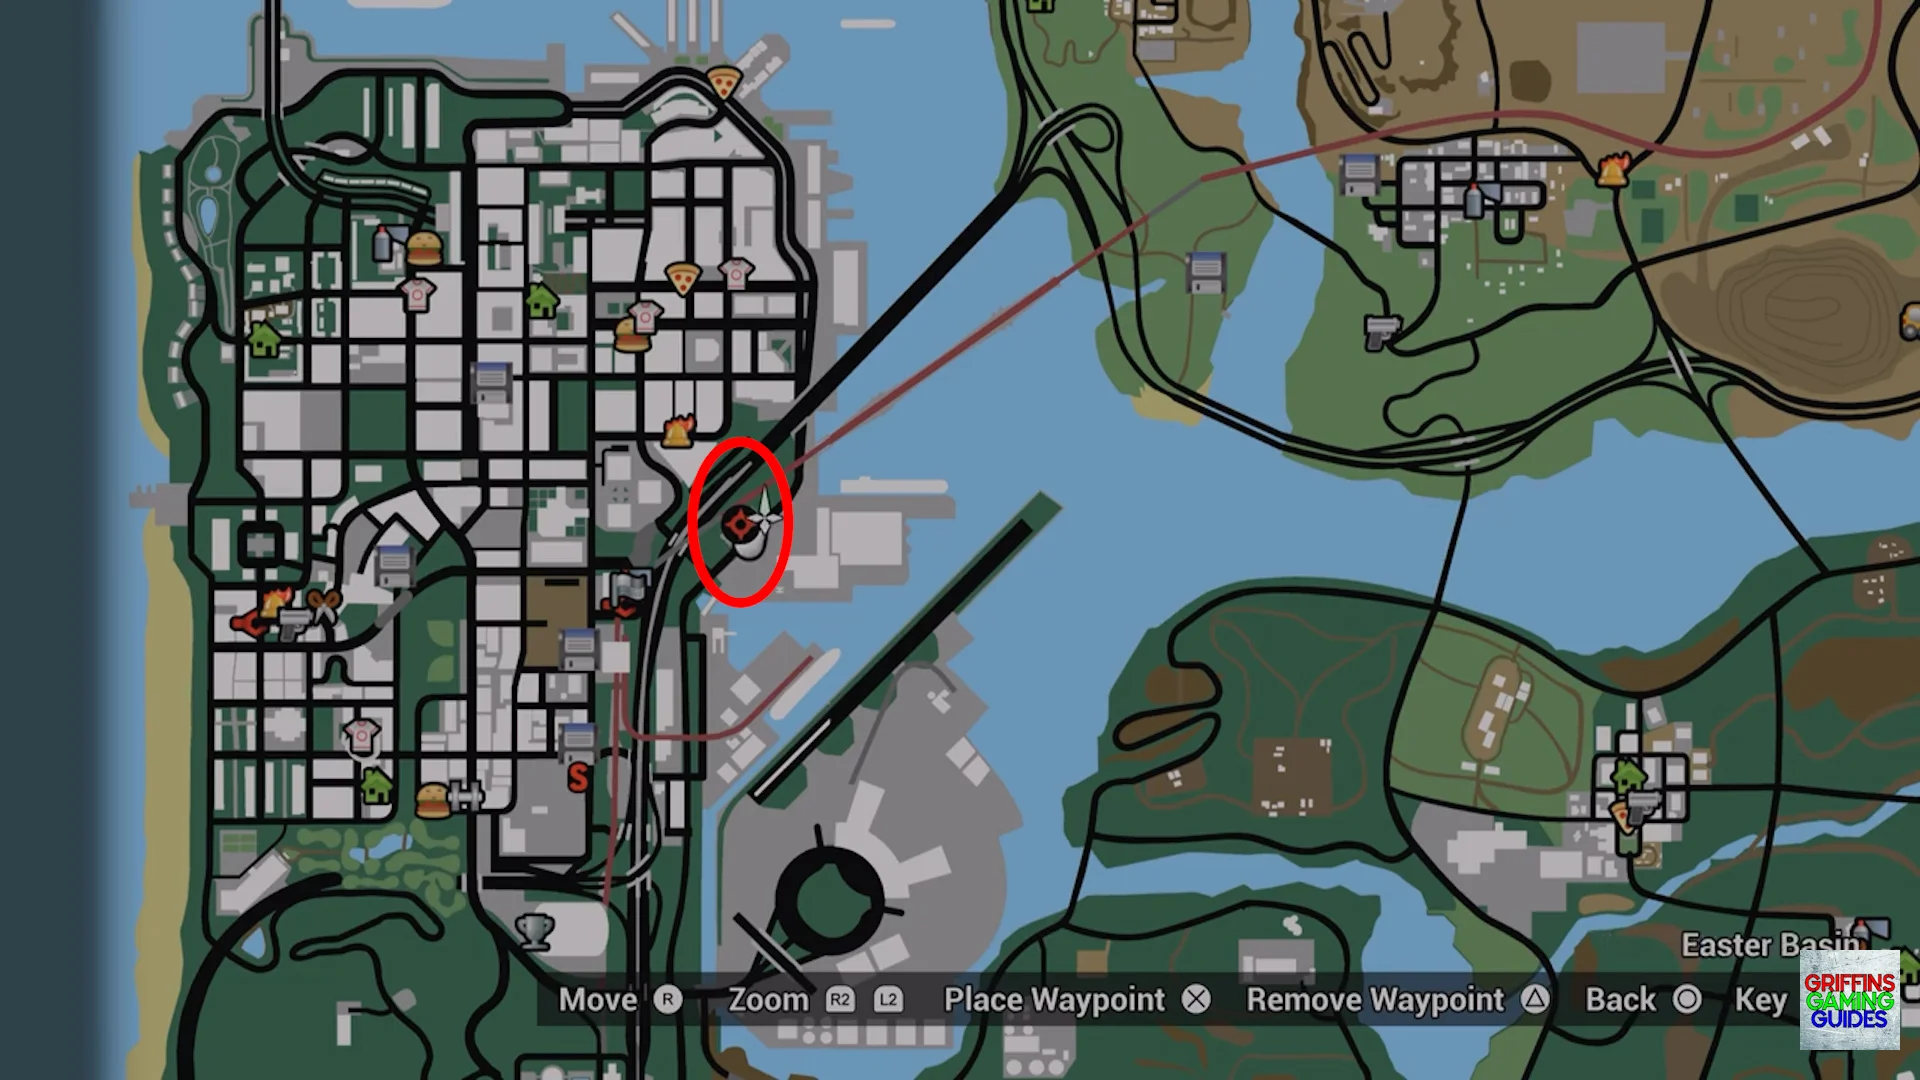
Snapshot 19
Location: Gant Bridge.
Face North along the bridge then look up to the base of the 2nd square strut to find this snapshot.
Snapshot 20
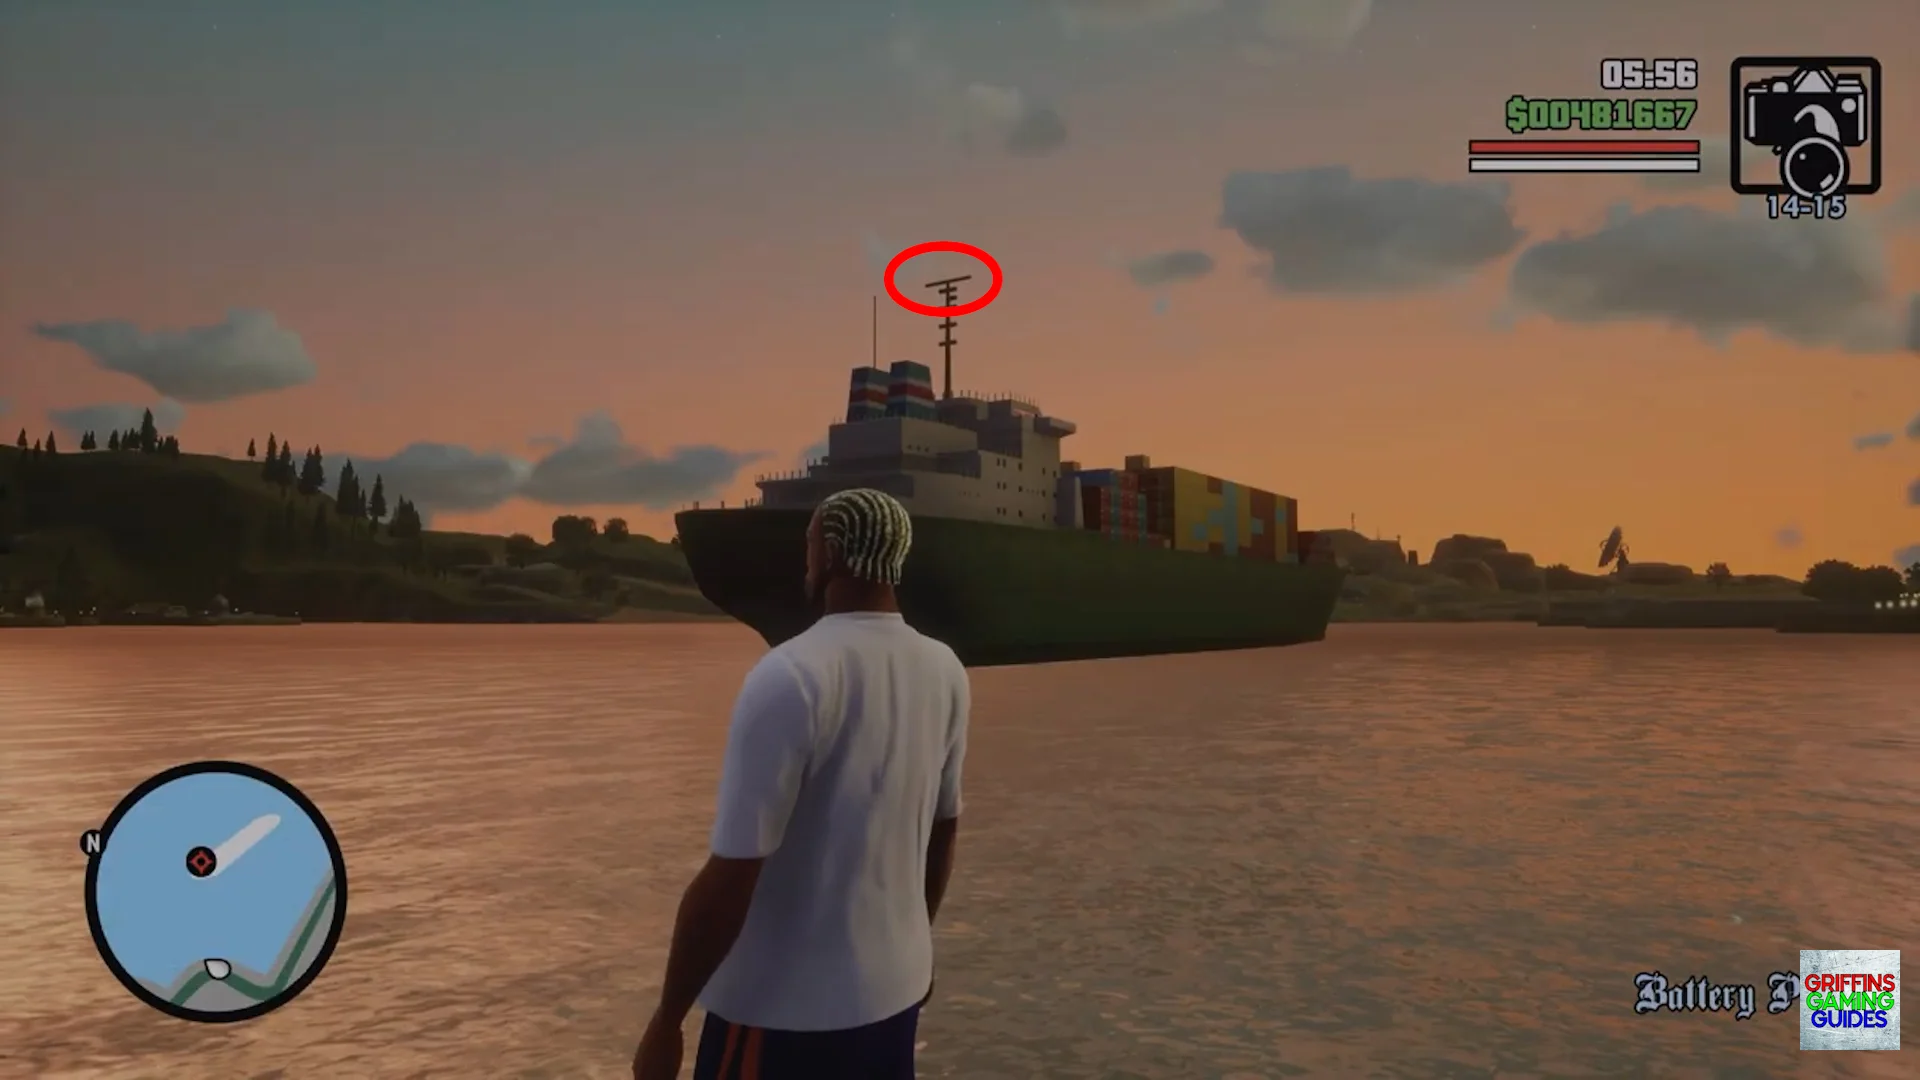
Location: San Fierro Bay.
Stand on the edge of the water and look North East to find a cargo ship. Look on the back mast of the cargo ship to find this snapshot.
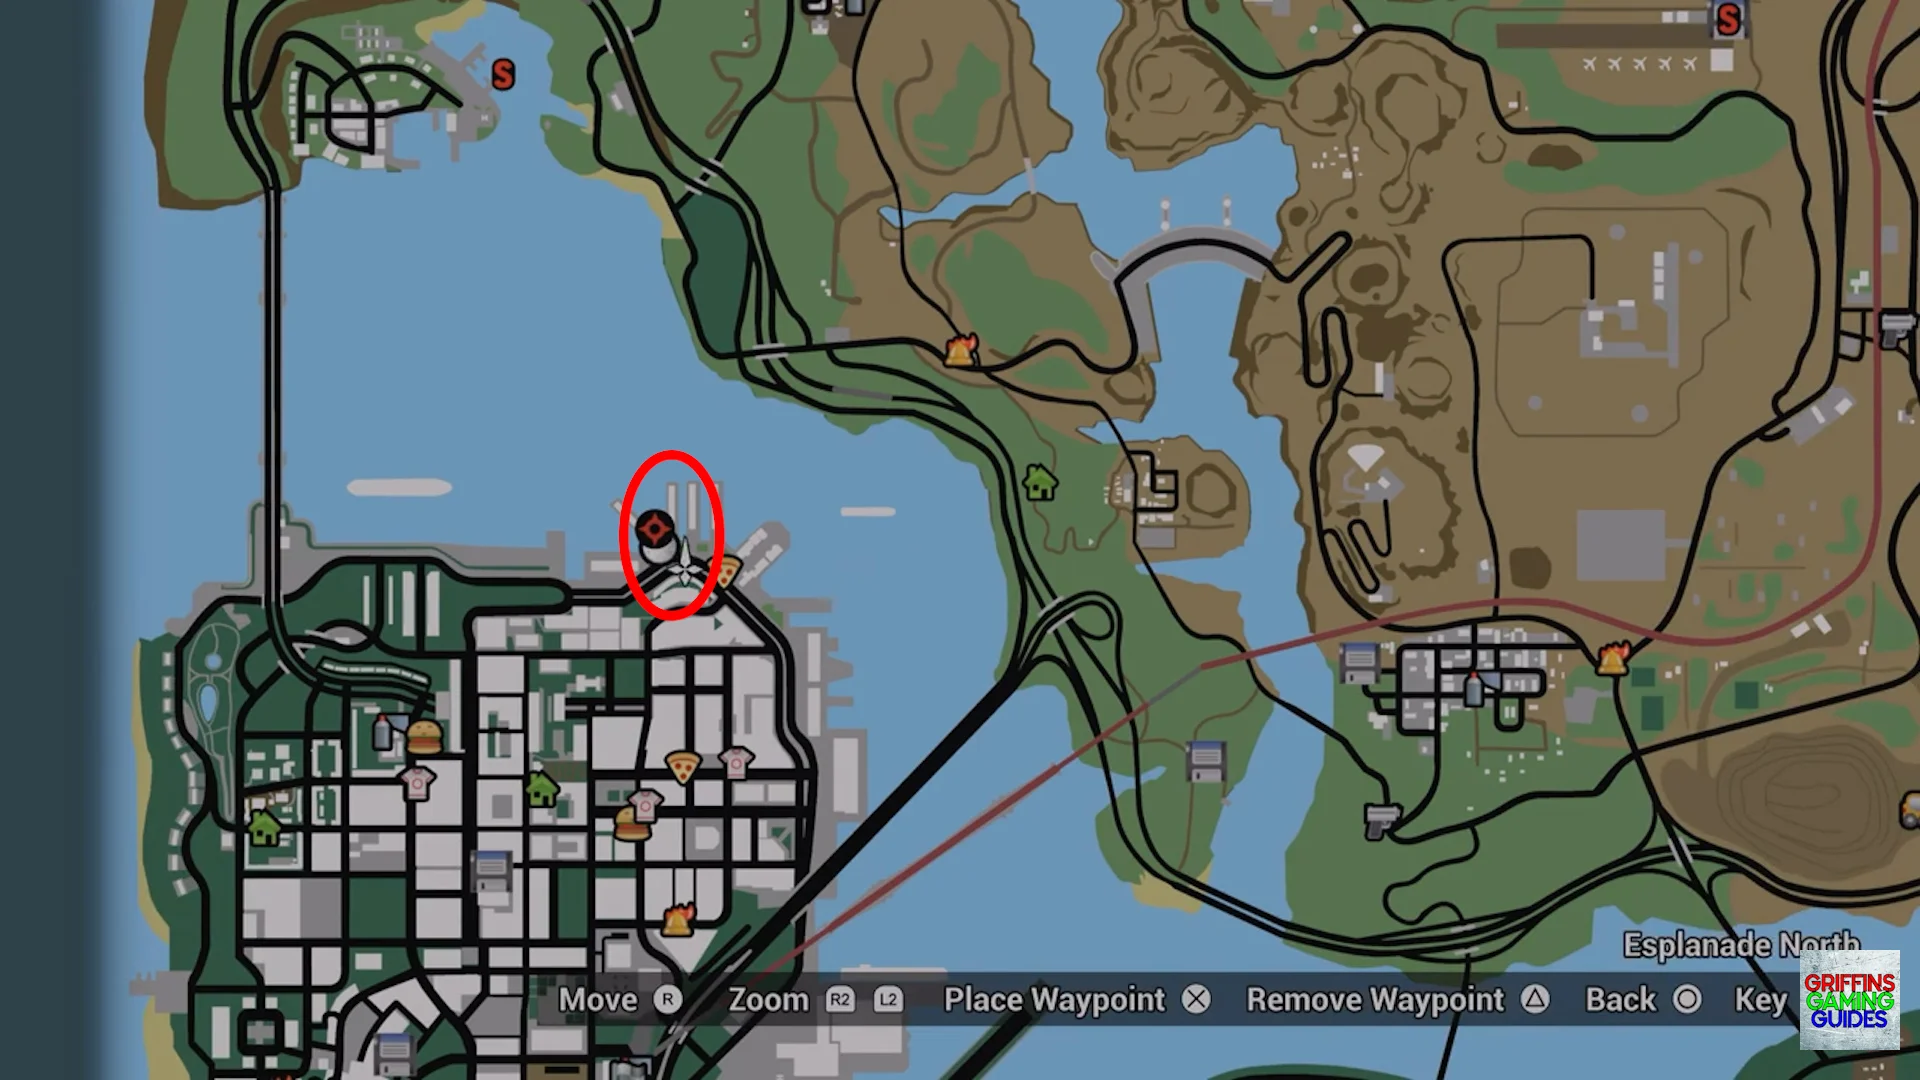
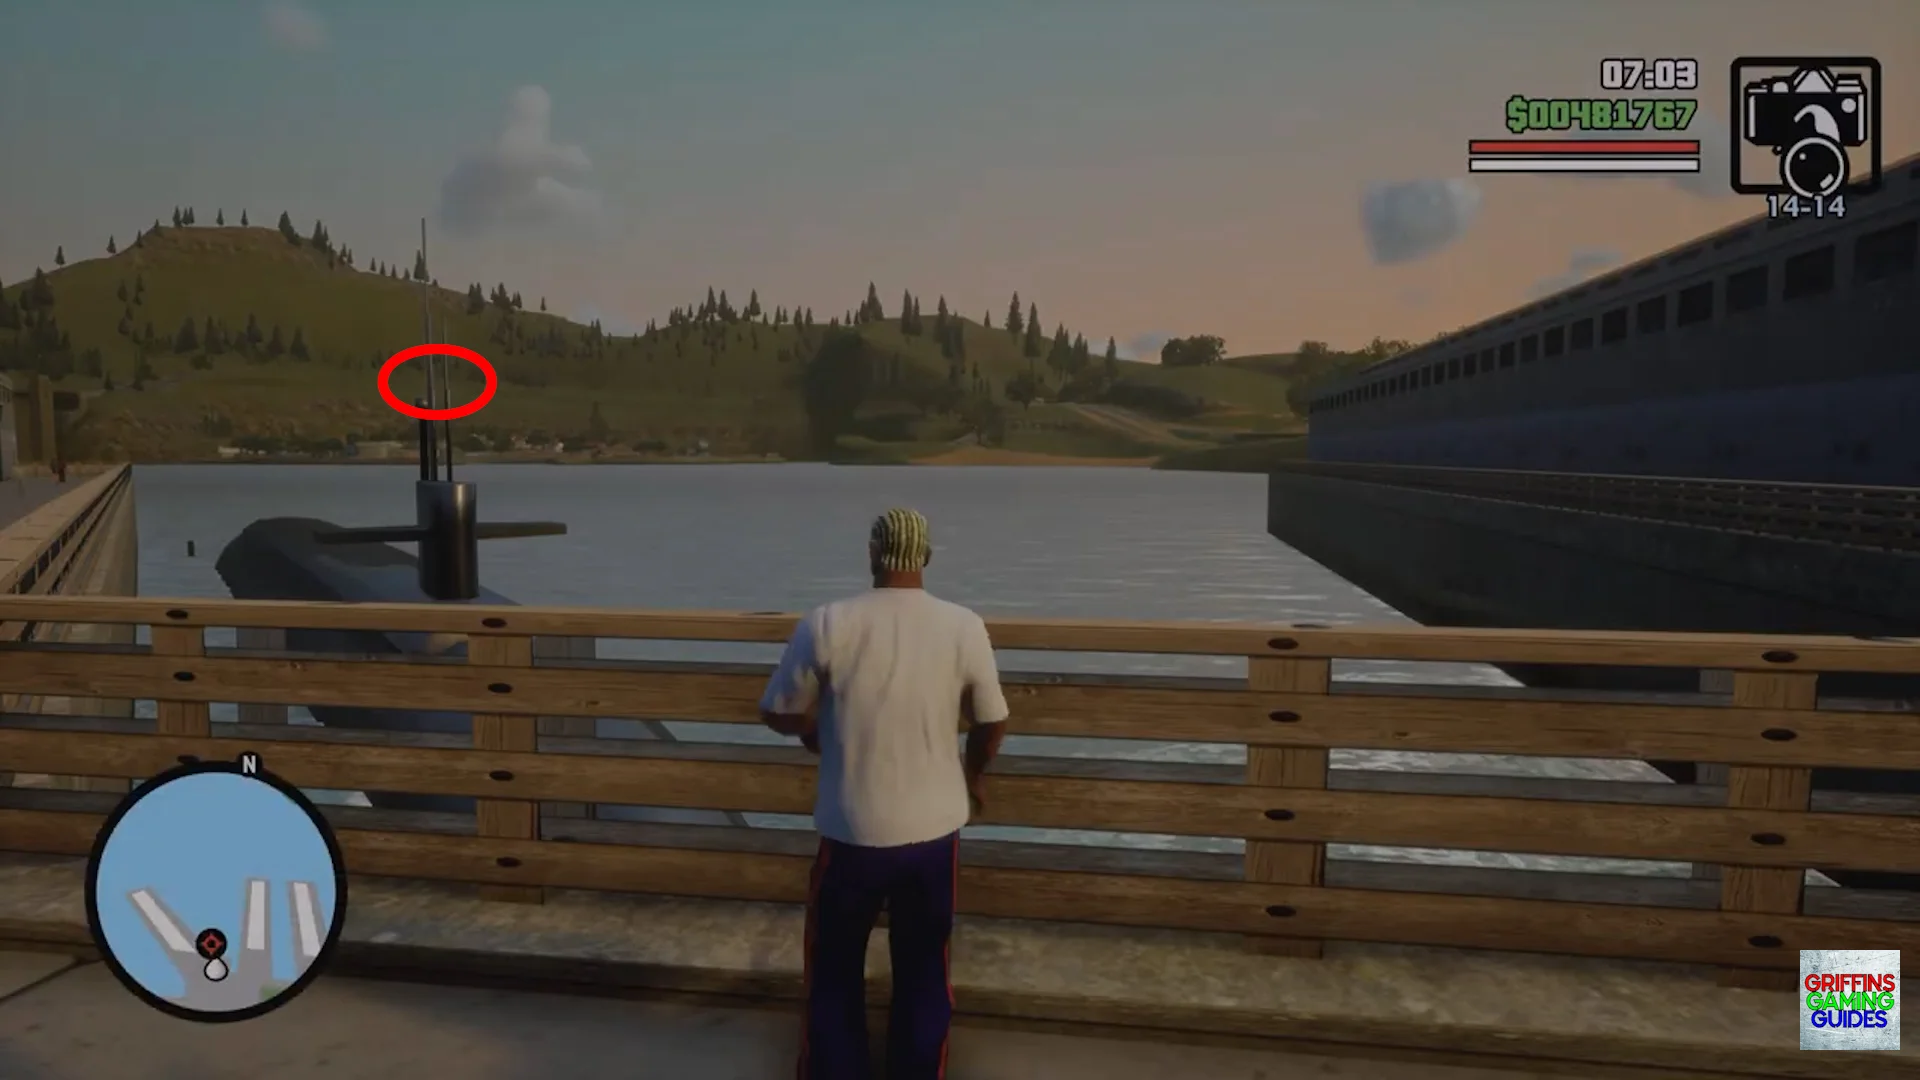
Snapshot 21
Location: Esplanade North.
Stand behind the fence at the waters edge on the left of the dock then look to the roof of the submarine to find this snapshot.
Snapshot 22
Location: Esplanade North.
Aim your camera at the Pier 69 sign to find this snapshot.
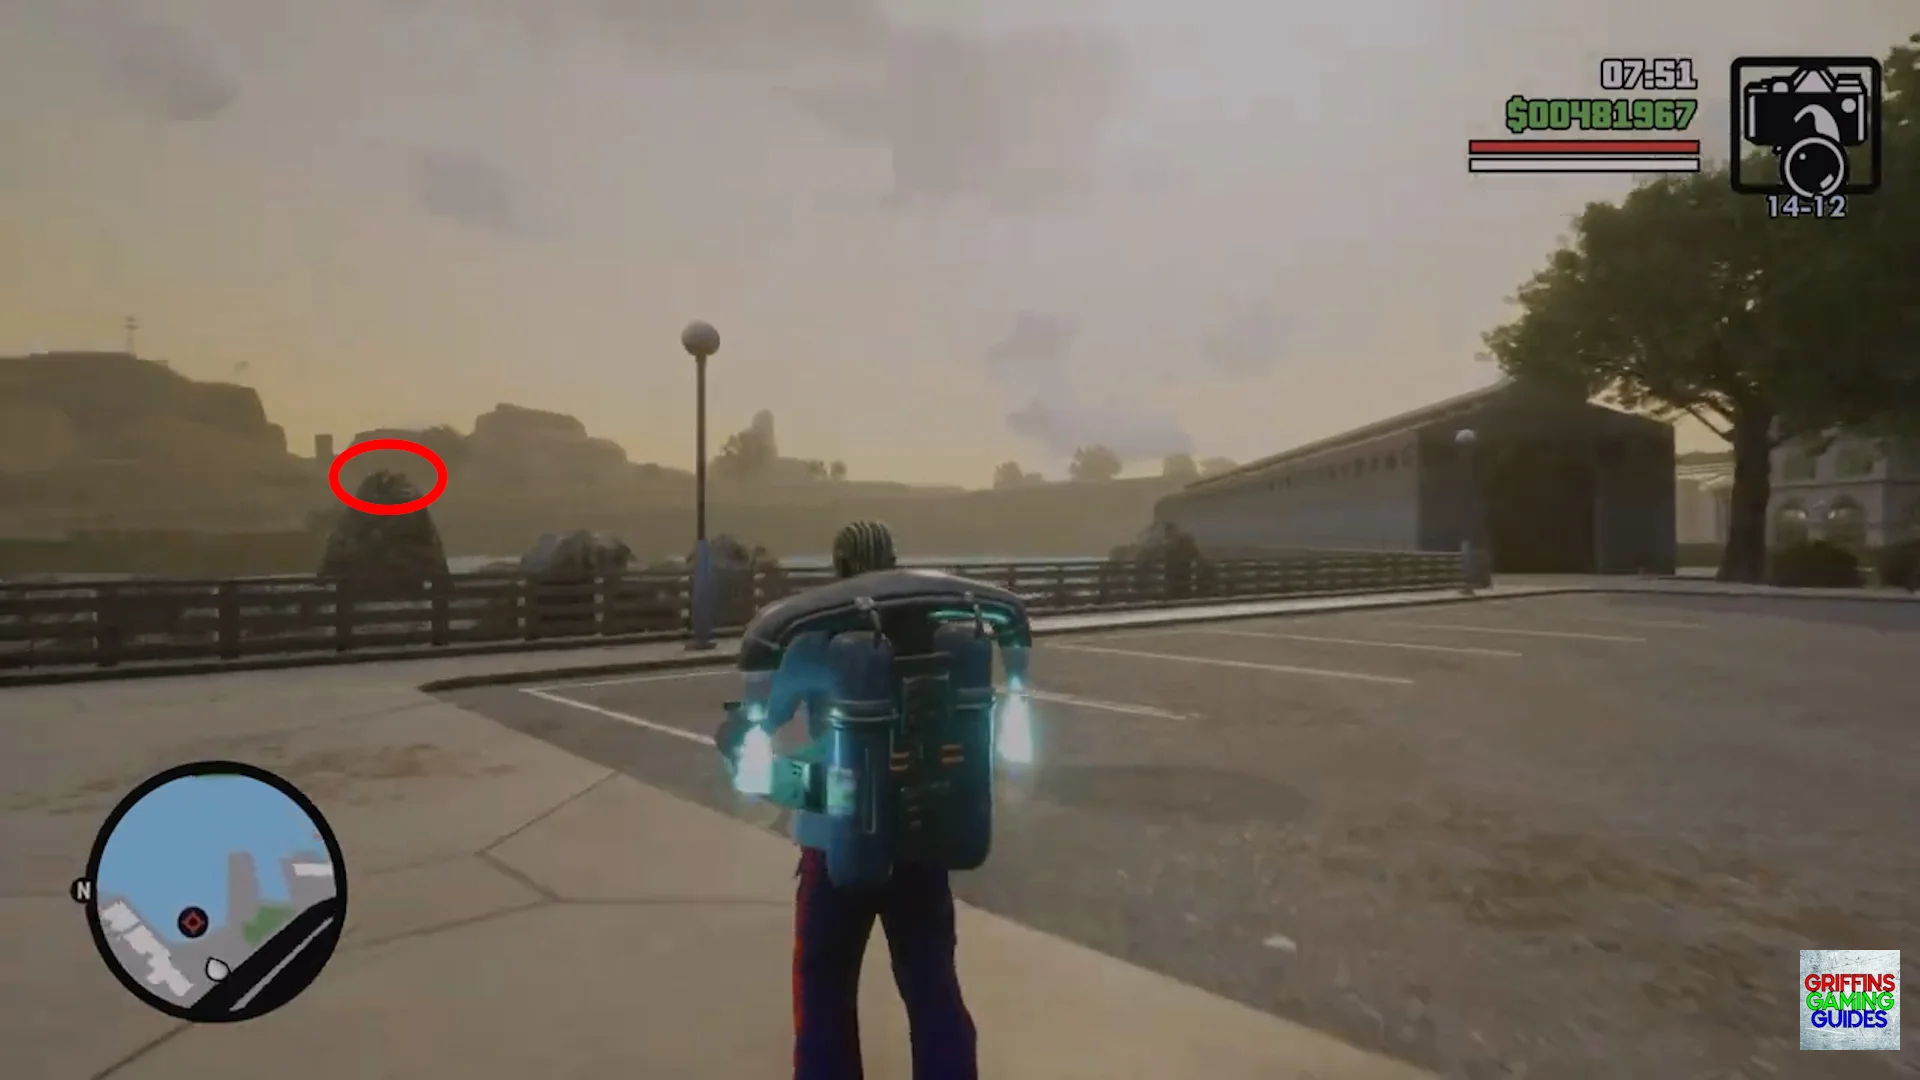
Snapshot 23
Location: Esplanade North.
Go East from the Pier 69 sign where you found Snapshot 22 then look out to the water to find a rock formation. Aim your camera at the large rock to find this snapshot.
Snapshot 24
Location: Esplanade East.
Stand West of the clocktower then look high to the clock face to find this snapshot.
Snapshot 25
Location: Garver Bridge.
Head to the North Eastern end of Garver Bridge then aim your camera at the highest point in the middle of the bridge where the red flashing light is to find this snapshot
Snapshot 26
Location: Downtown.
Stand on the South West section of the Garver Bridge in front of the first set of vertical struts then turn around and look up to find this snapshot.
Snapshot 27
Location: Easter Basin.
Look above the sign stating the prices for the Xoomer gas station to find this snapshot.
Snapshot 28
Location: Easter Basin.
You will need to be fast to get this snapshot as you need to enter the restricted zone from the Western entrance then race North until you are level with the ship’s bridge. Entering this restricted area will instantly give you a 5 star wanted level so ensure you have a save backed up in case you are killed or worse, close the game down. Aim your camera in front of the bridge, take the shot then quickly get out of there and to the nearby pay ‘n’ spray to lose your wanted level.
Snapshot 29
Location: Easter Basin.
Stand on the North Eastern side of the road jus tin front of the checkpoint with the raised barrier. Look high above the naval hangar in front of you to find this snapshot.
Snapshot 30
Location: Doherty.
Stand slightly East of the D. Flour Bakery facing West then look over to your right and slightly up to find 2 silos. This snapshot will be in front of the 2 silos.
Snapshot 31
Location: Cranberry Station.
Stand in the middle of Cranberry Station and face North then look to the roof to find this snapshot.
Snapshot 32
Location: Downtown.
Stand in the middle of the construction yard then look North to see a yellow crane. Aim your camera just above the control room of the crane up high to find this snapshot.
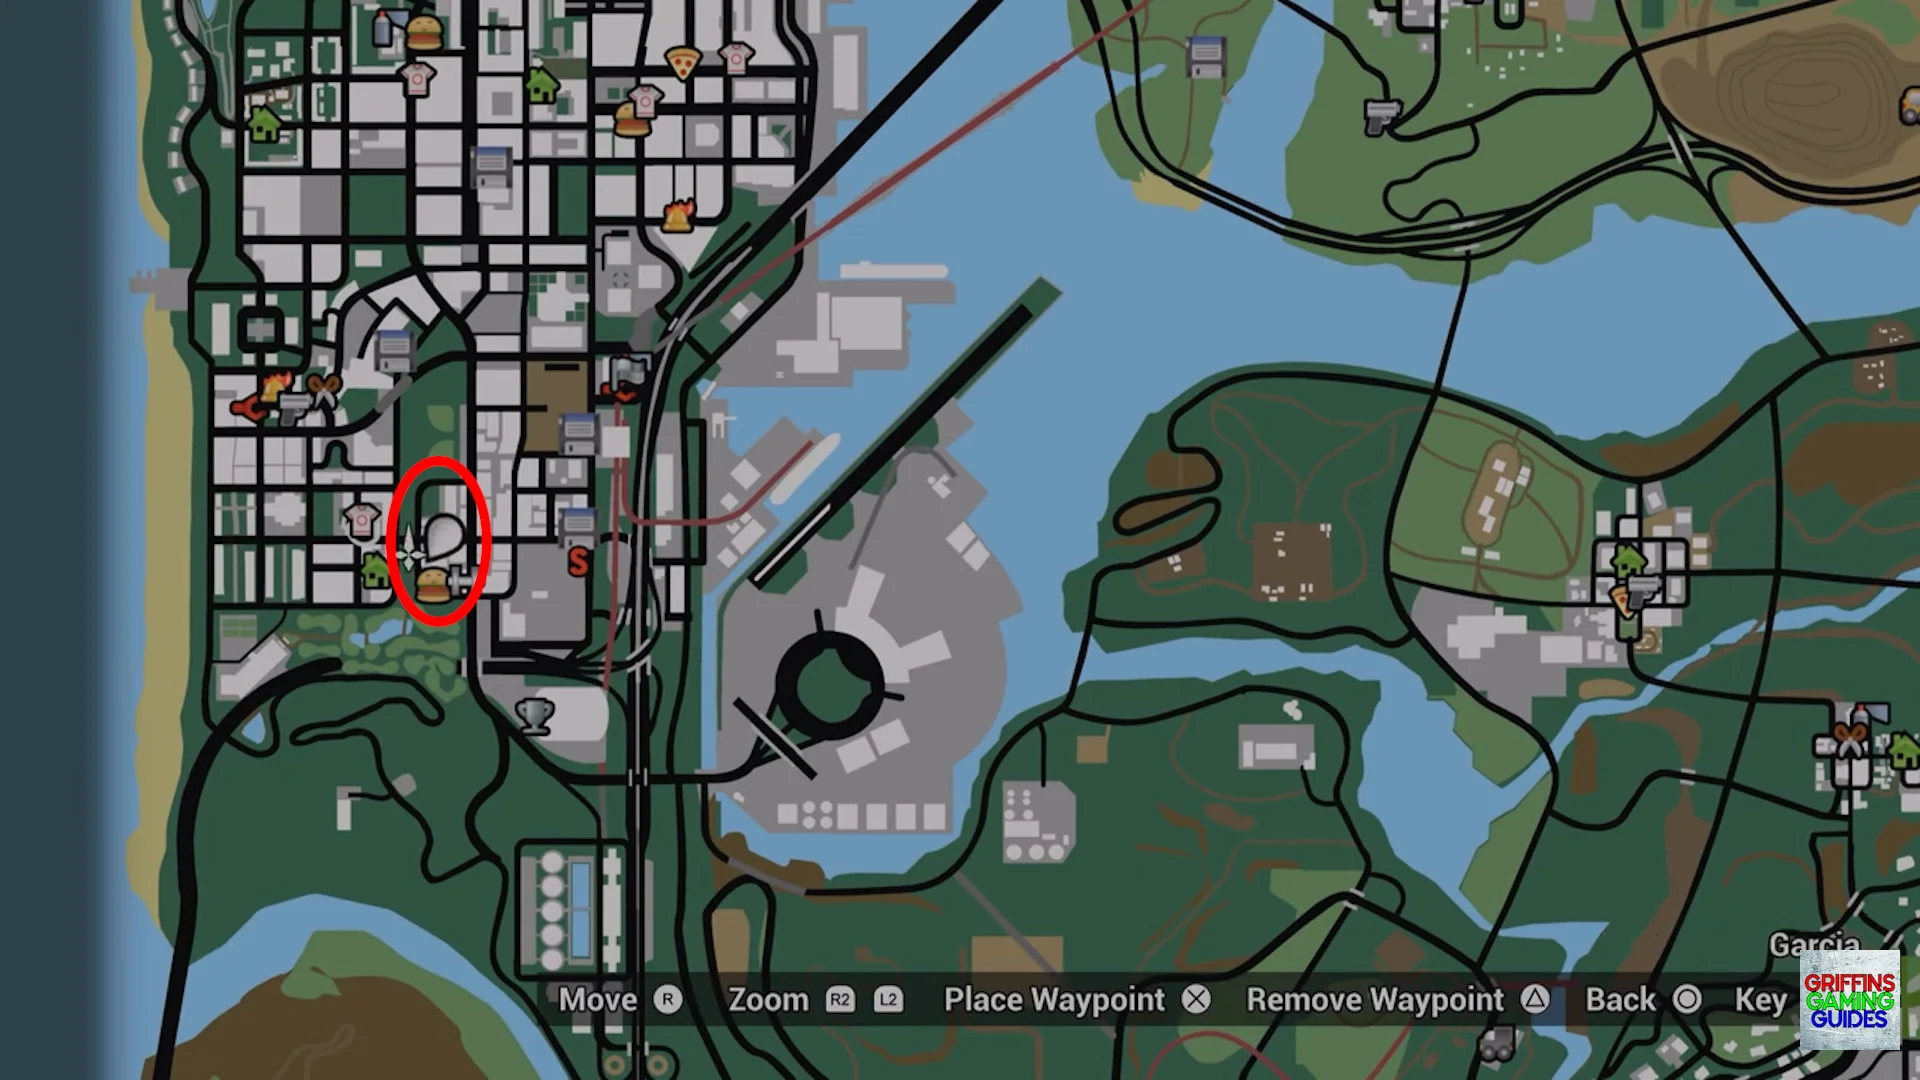
Snapshot 33
Location: Garcia.
Look to the Final Build Construction sign for this snapshot.
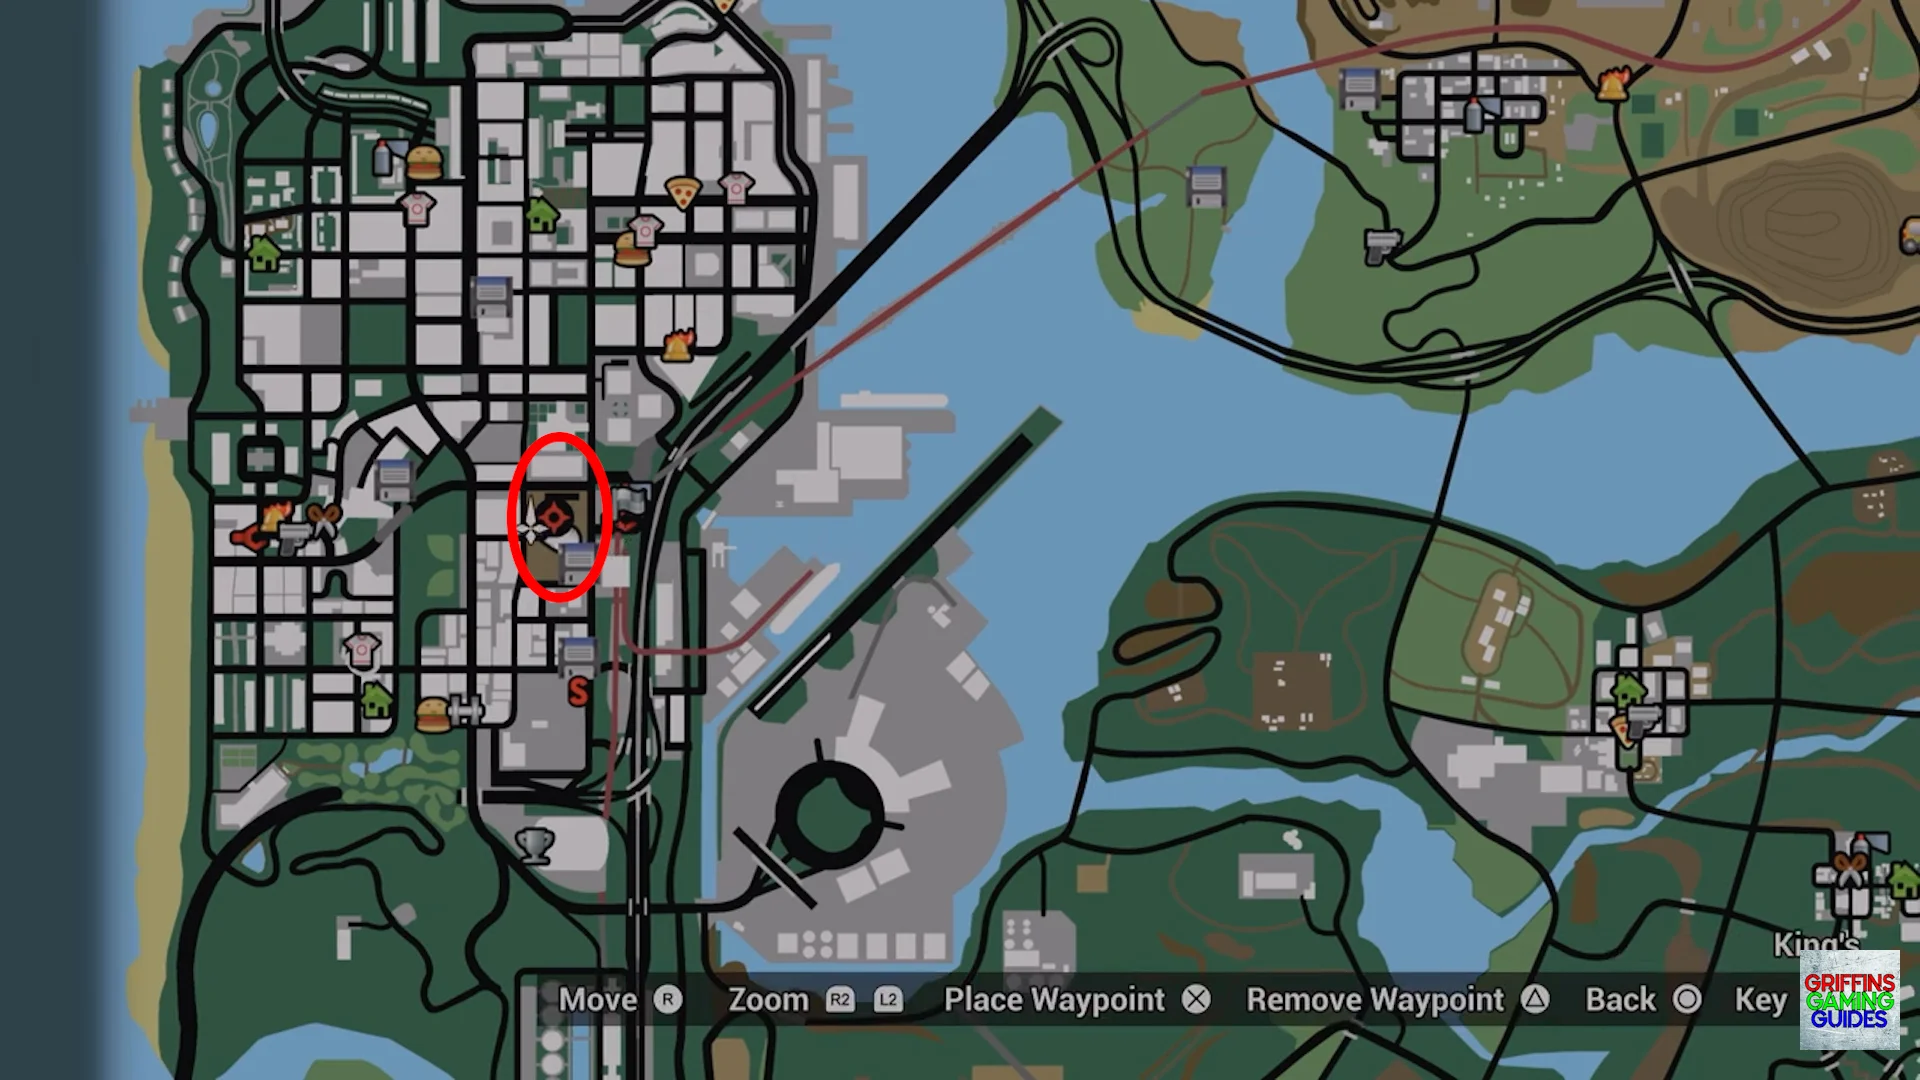
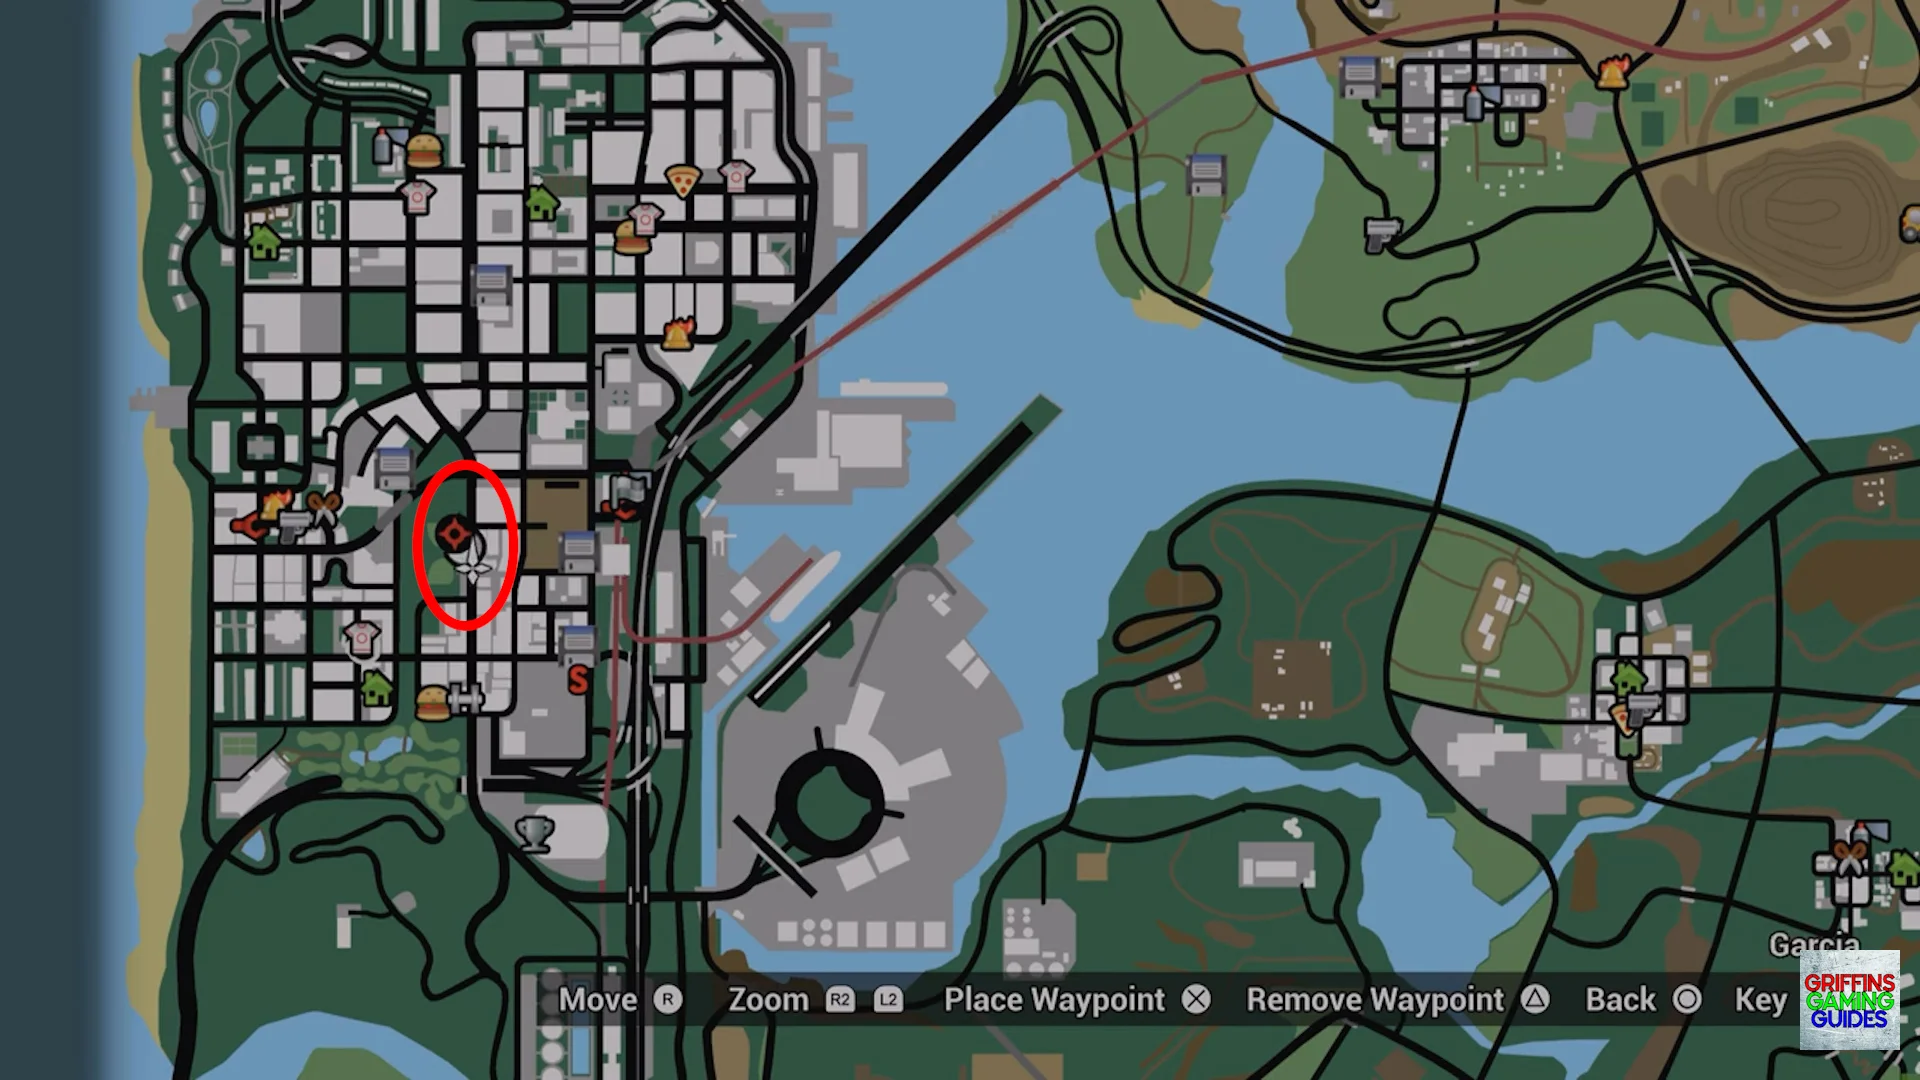
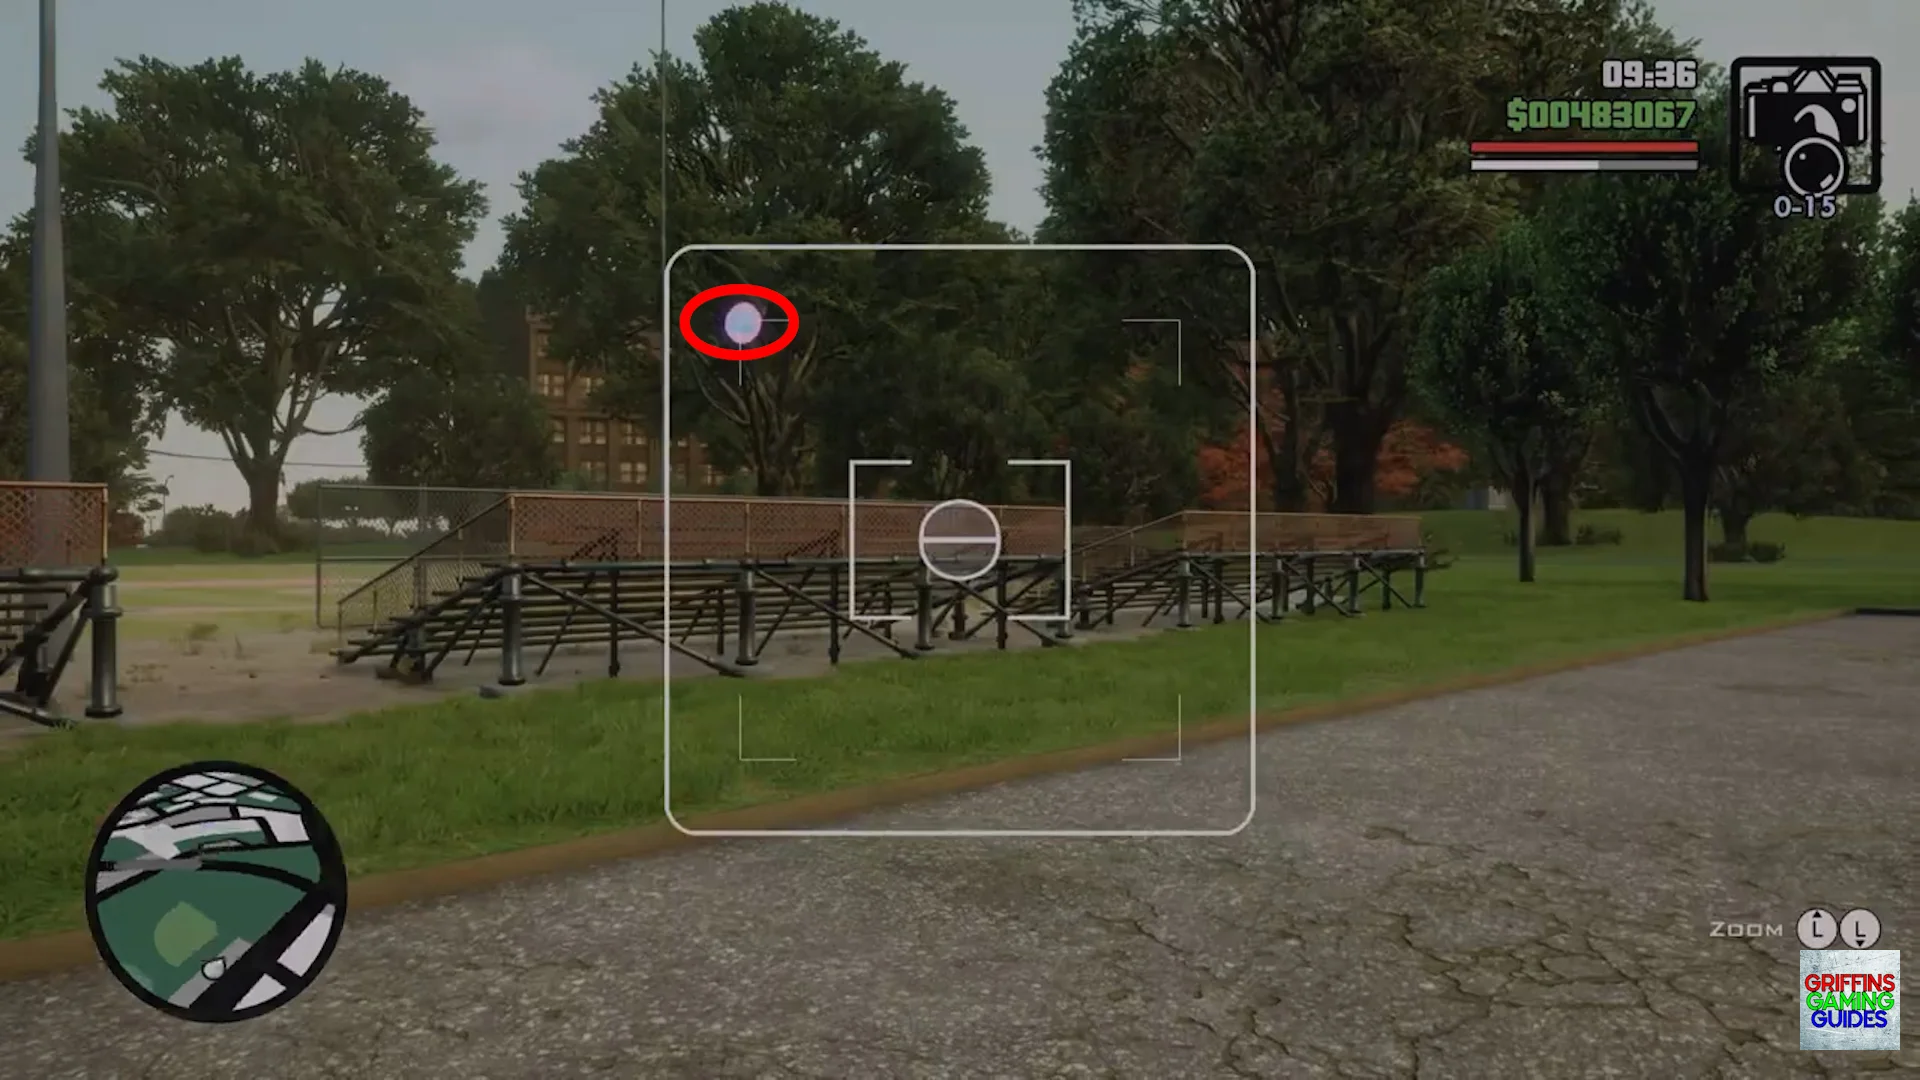
Snapshot 34
Location: Garcia.
Stand behind the seating on the side of the baseball court then aim your camera above the fence to find this snapshot.
Snapshot 35
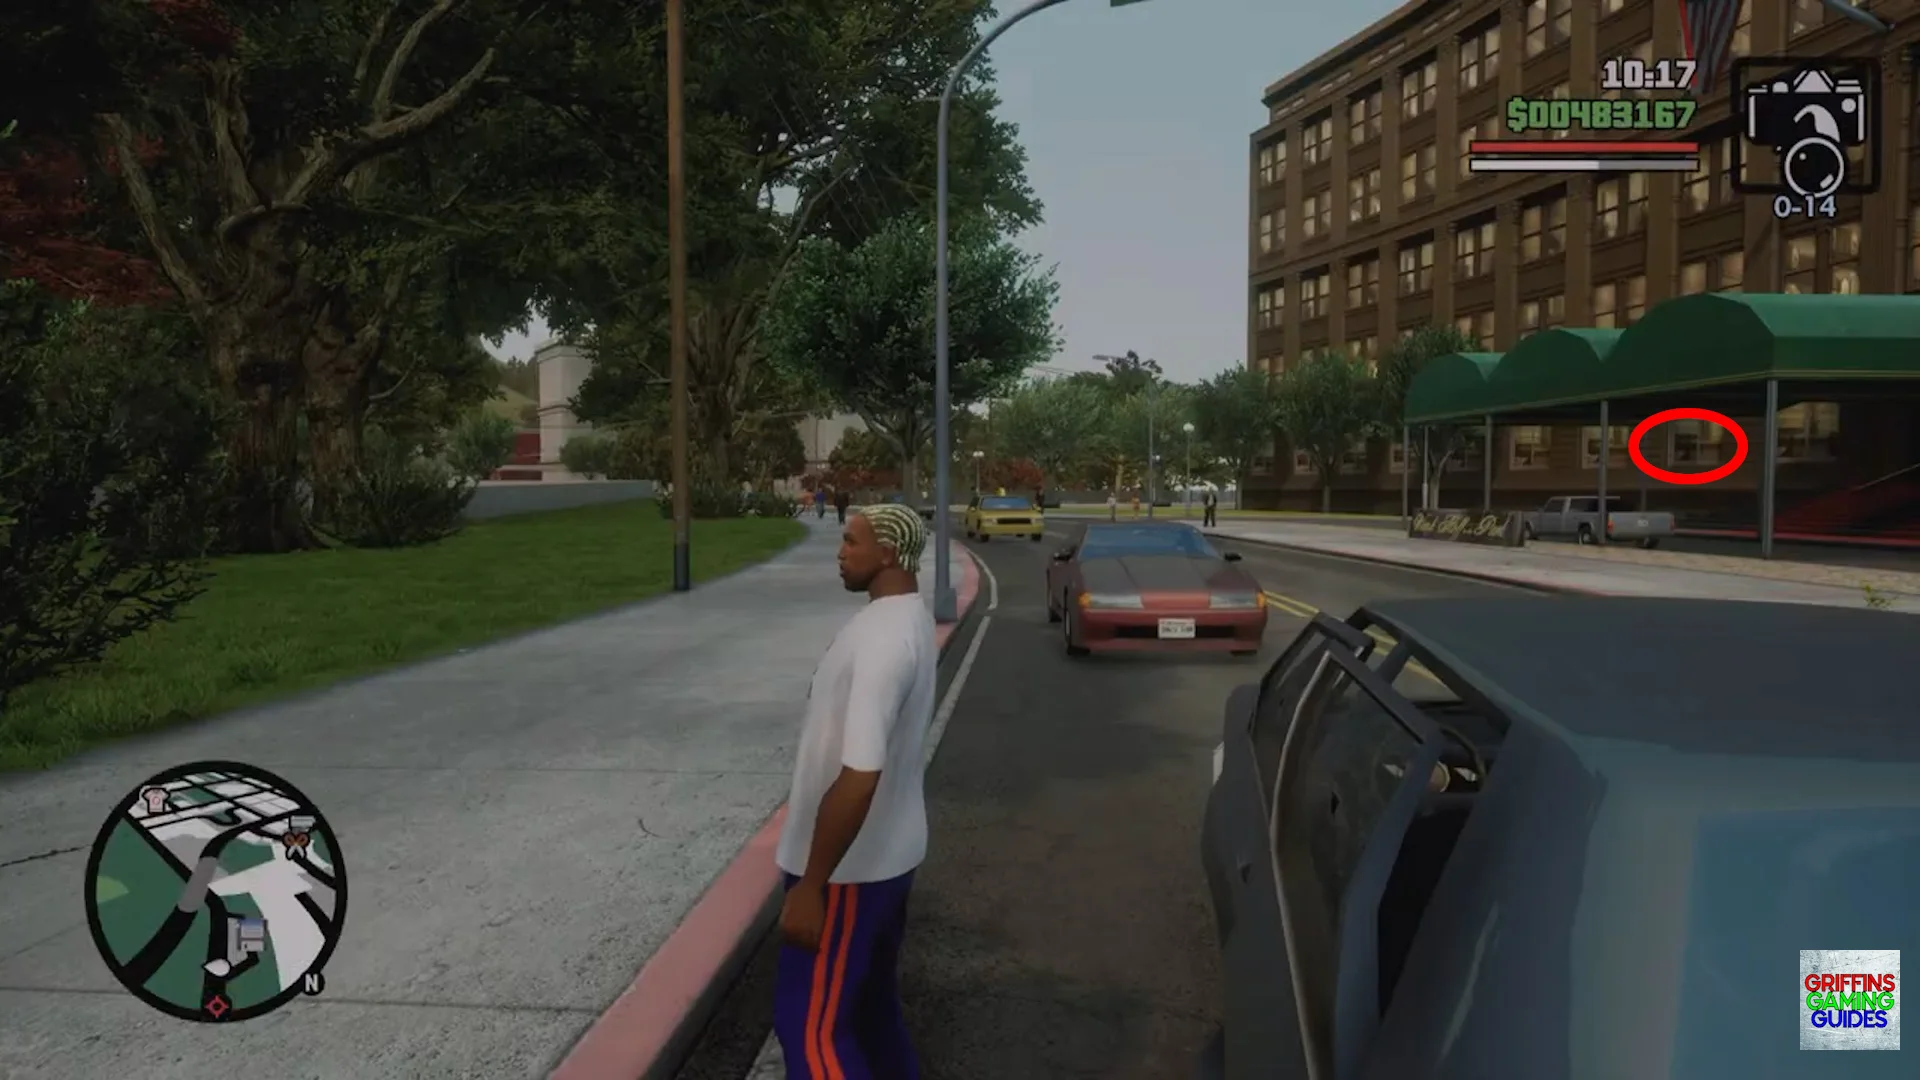
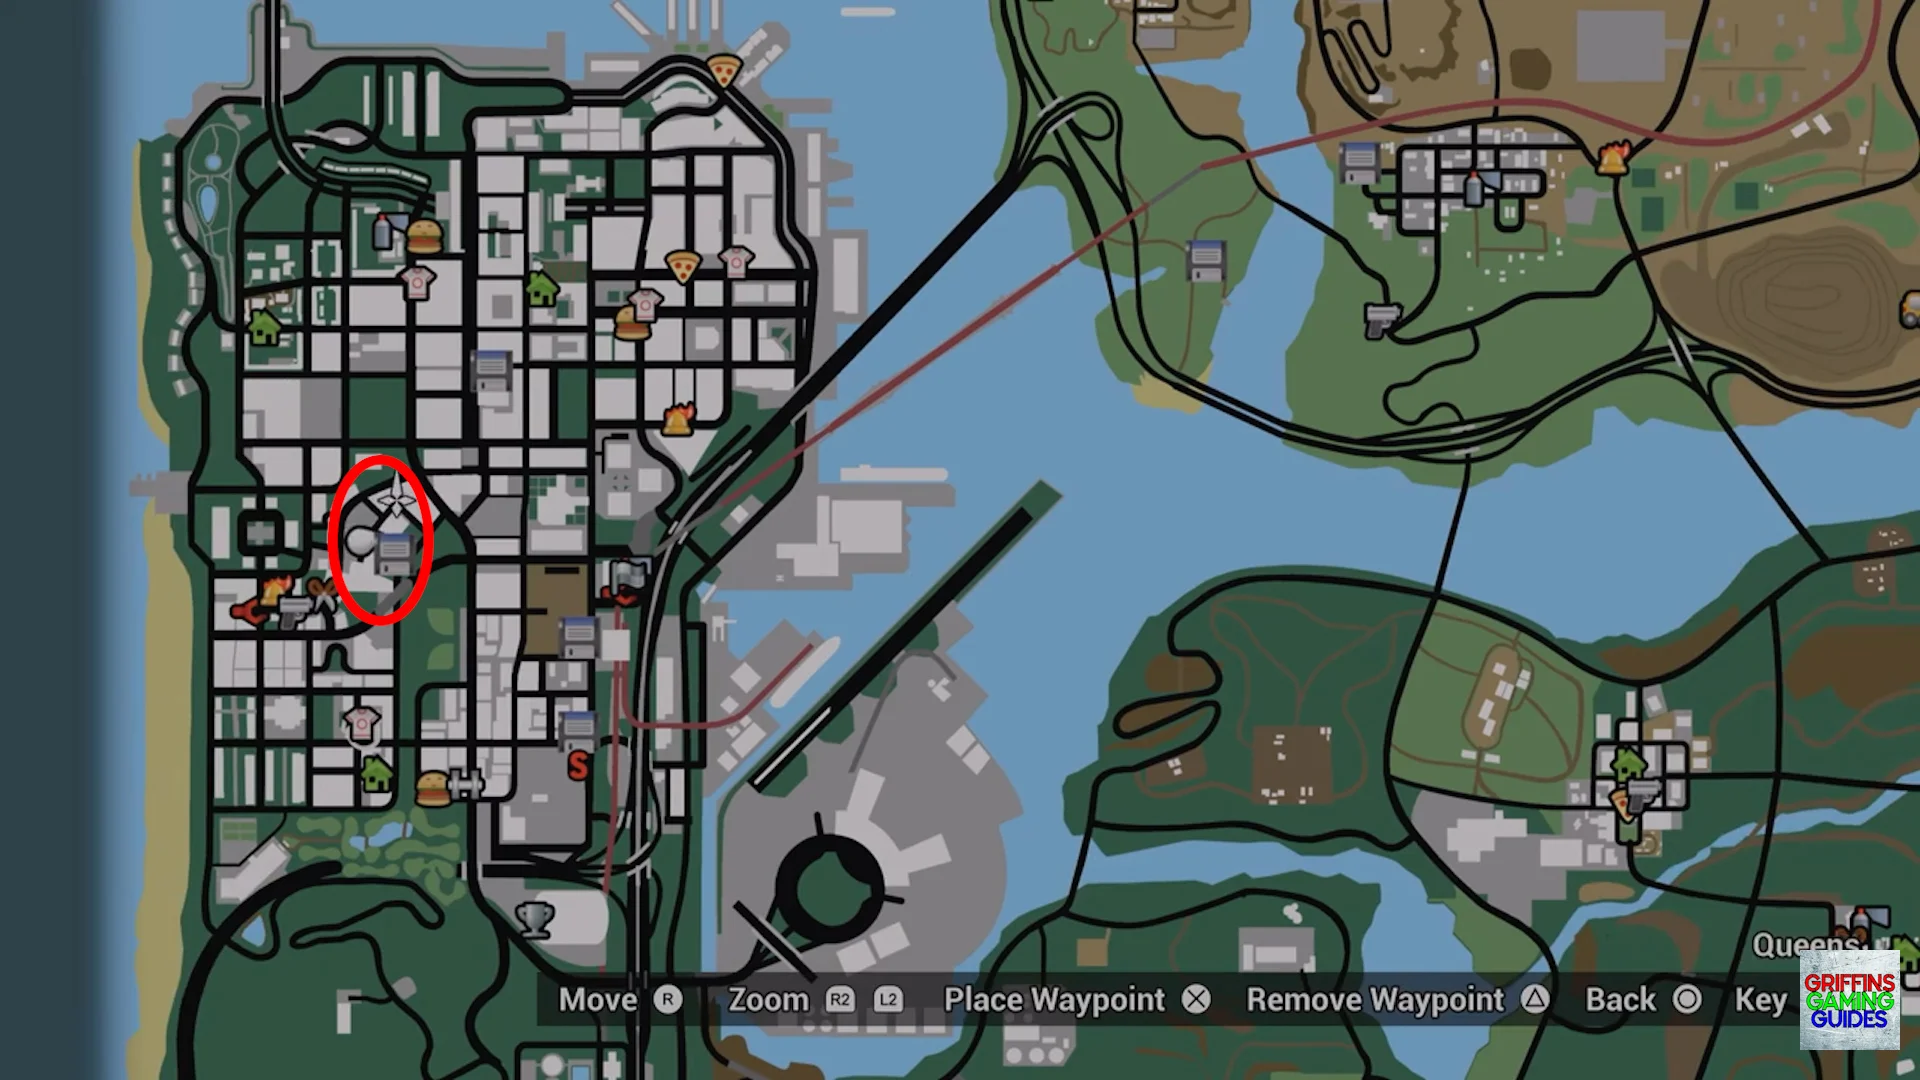
Location: King’s.
Look under the green awning of the Vank Hoff in the Park hotel to find this snapshot.
Snapshot 36
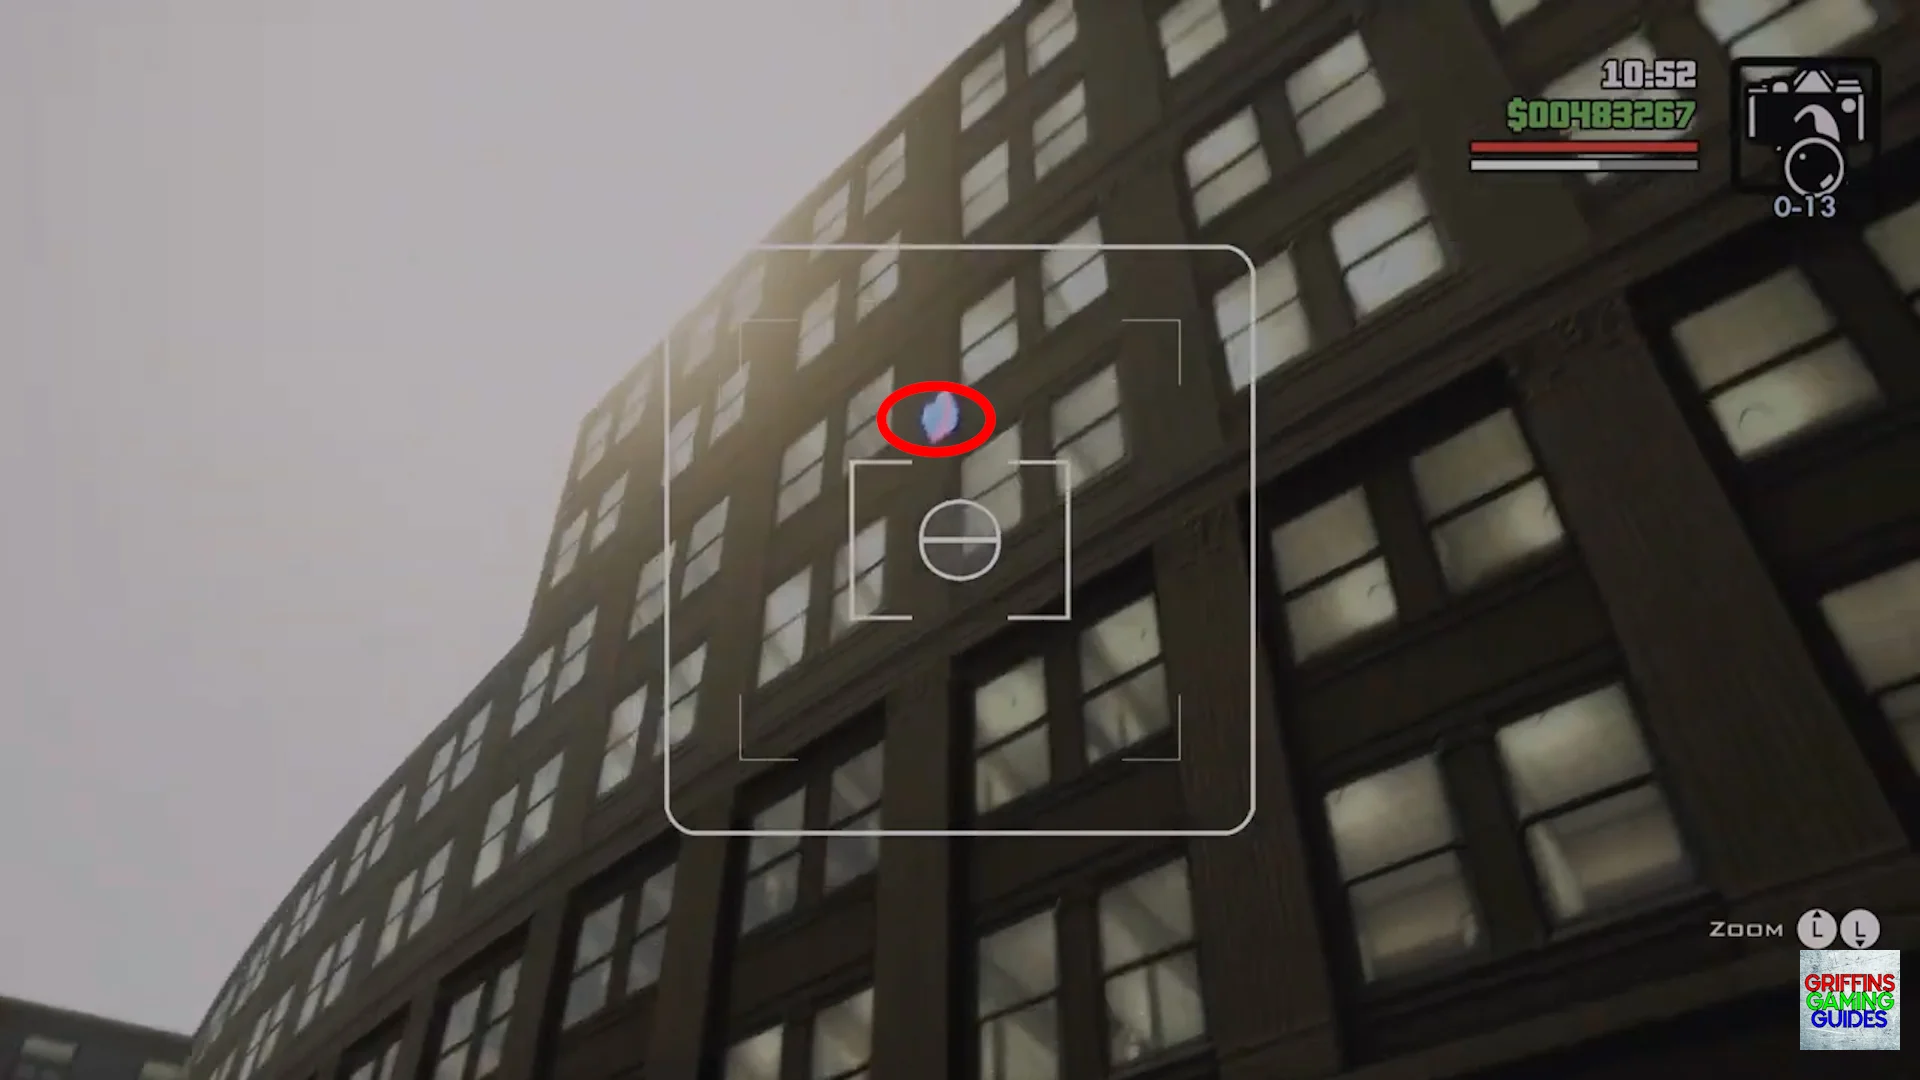
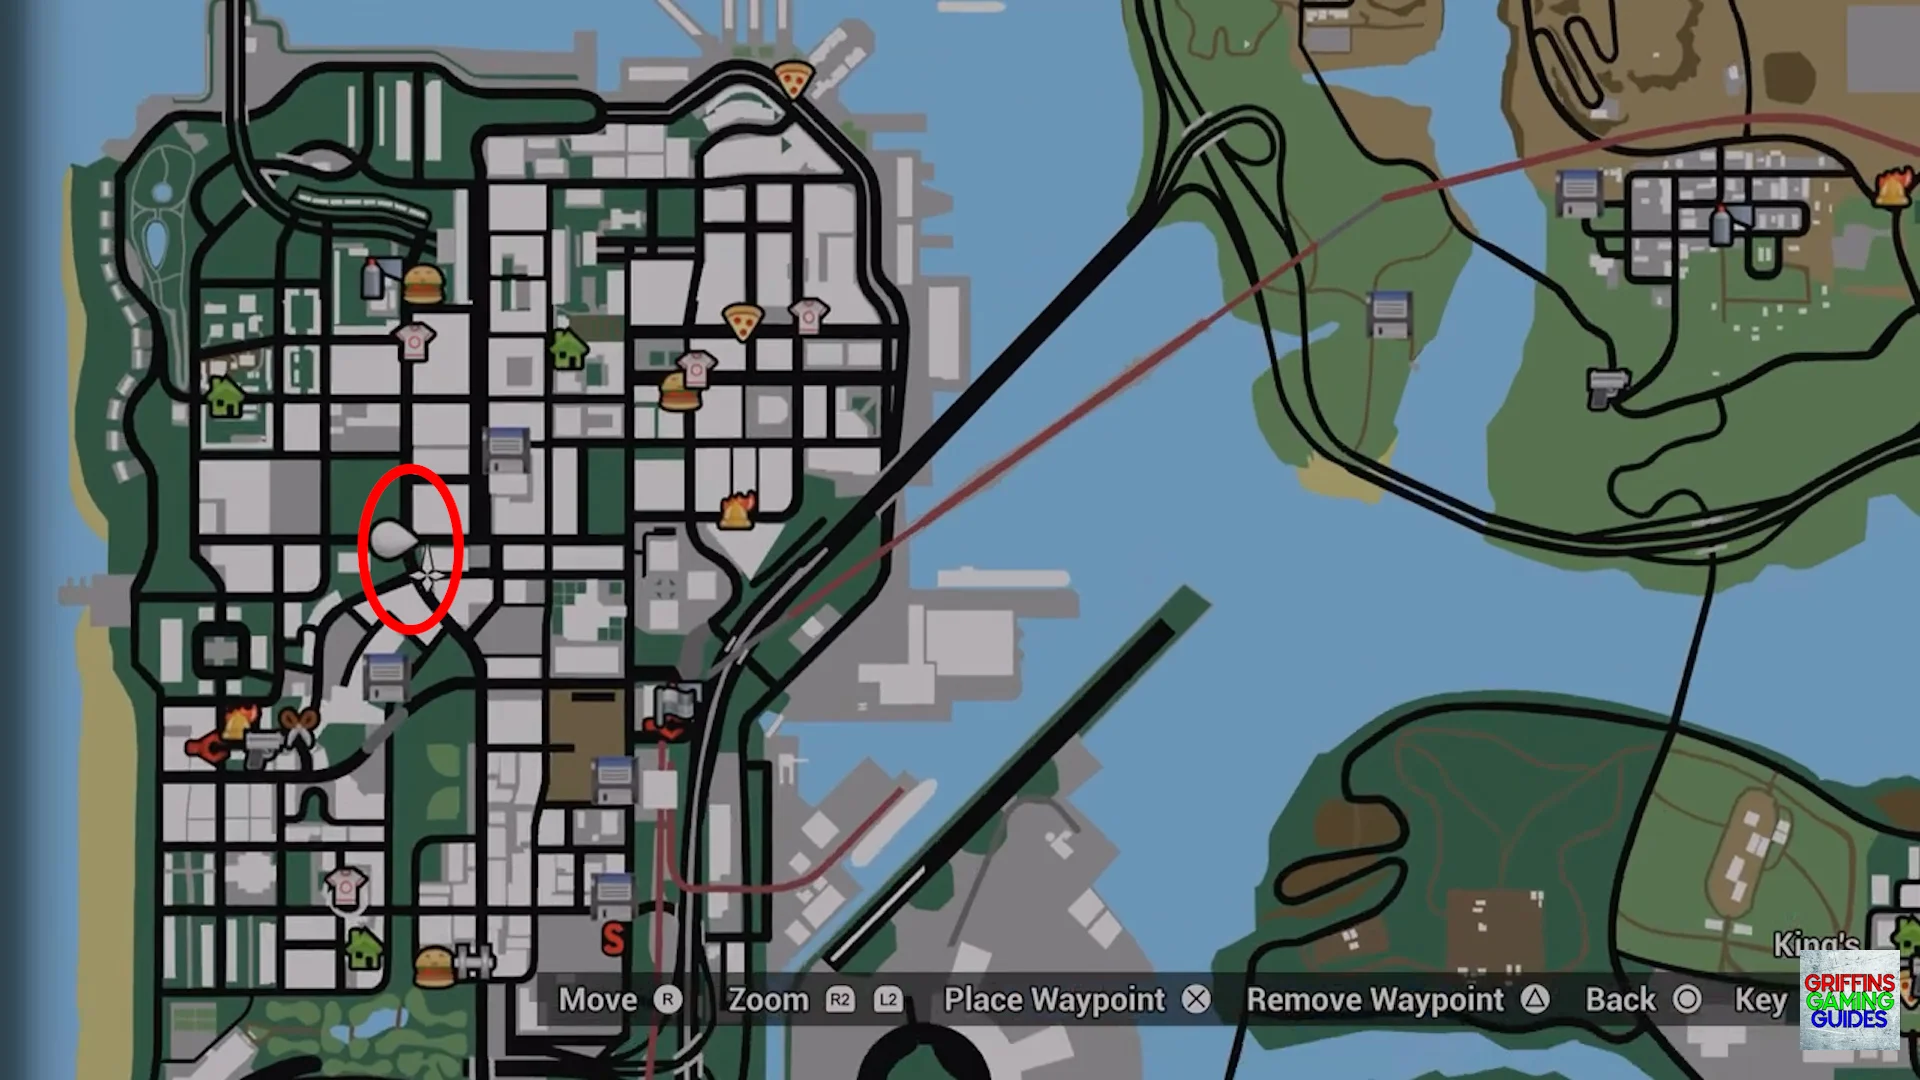
Location: Queens.
Face East with the entrance to the tunnel to the South (on your right) then look high up the rounded building in front of you, 3 sets of windows down from the top to find this snapshot.
Snapshot 37
Location: King’s.
Look high above the top of the chimney coming out from the red building on the crossroads
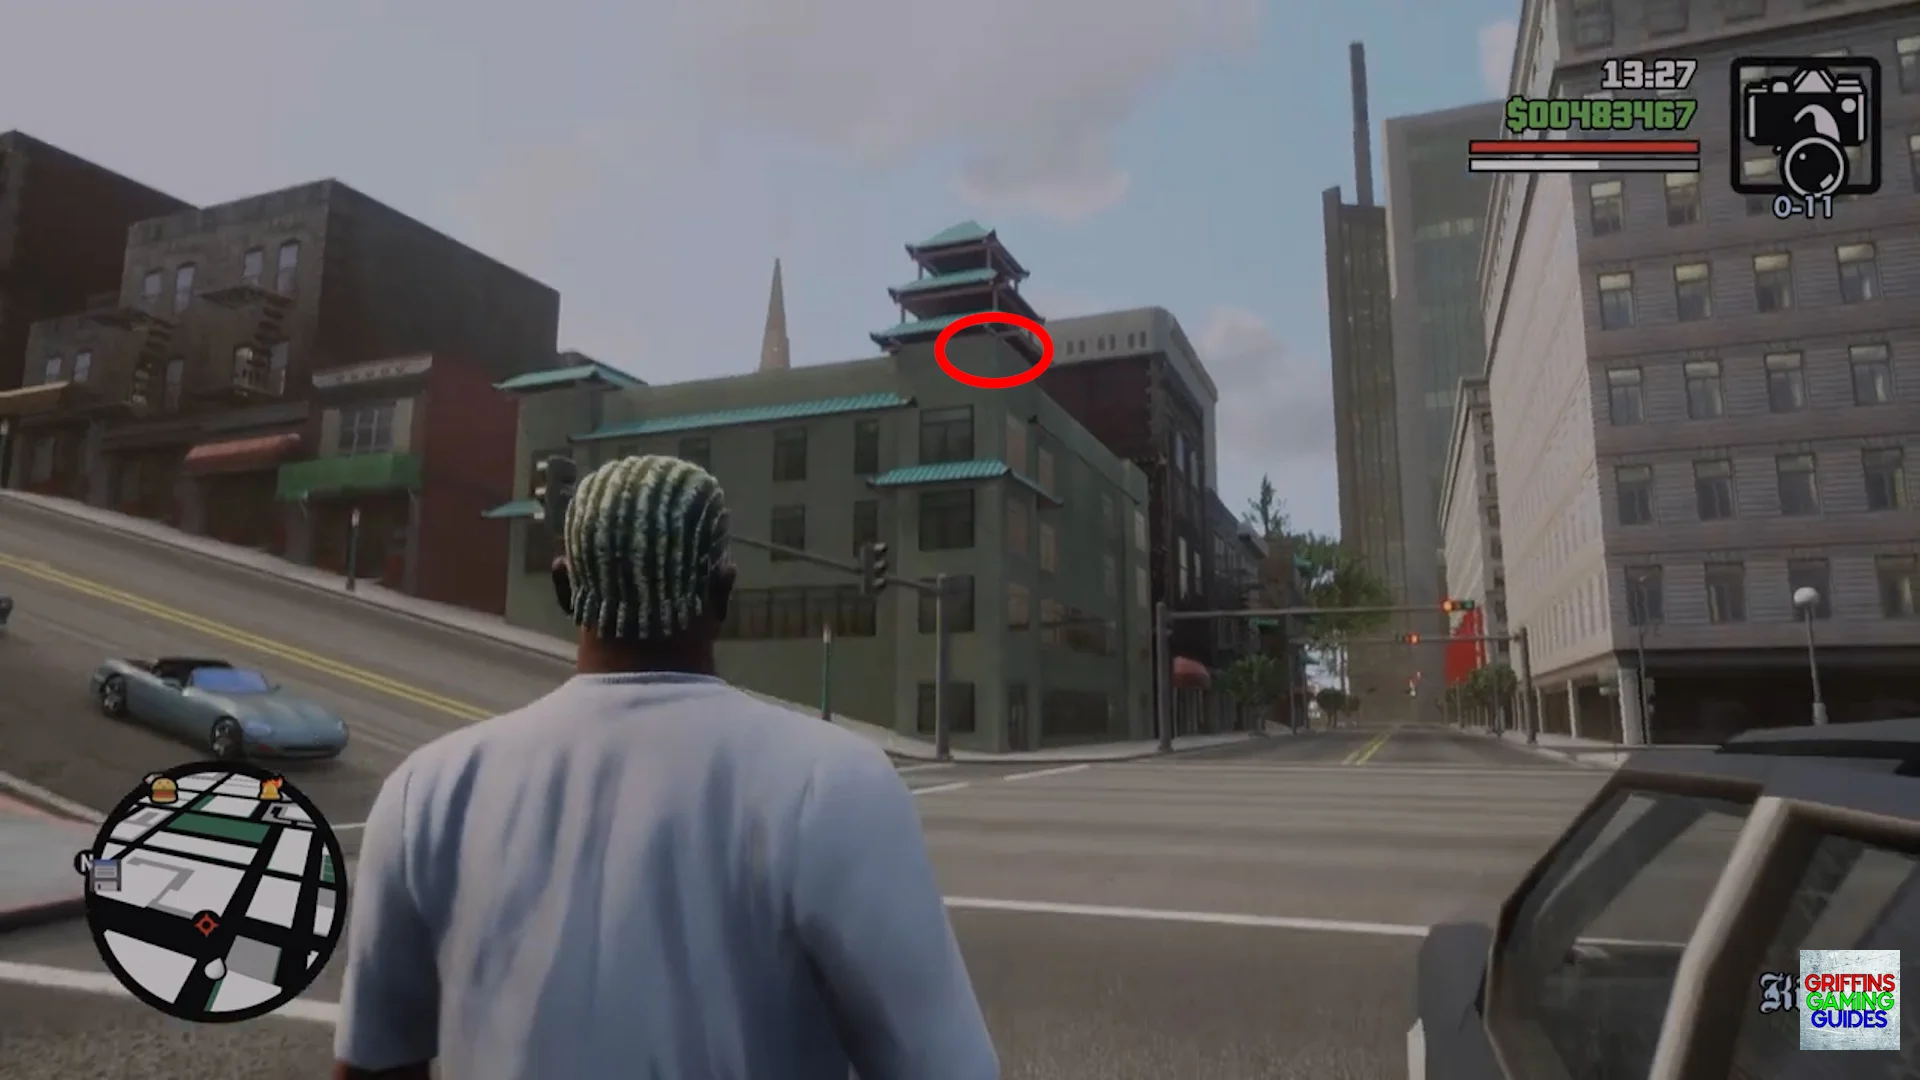
Snapshot 38
Location: Chinatown.
Face East then look to the corner building which has a 3-tier pagod on it’s right side. Aim your camera just down to the right of the pagoda to find this snapshot.
Snapshot 39
Location: King’s.
Stand on the square patches of grass in front of the large yellow building then look West to the building with the W awnings. Look up high to the highest point of the building, just below the domes apex with your camera to find this snapshot.
Snapshot 40
Location: King’s.
For this snapshot you will need to stand in front of the recessed staircase then face West before looking up to the yellow struts sticking out from the top of the large yellow corner building. Aim your camera just higher than the struts and off to the left to find this snapshot.
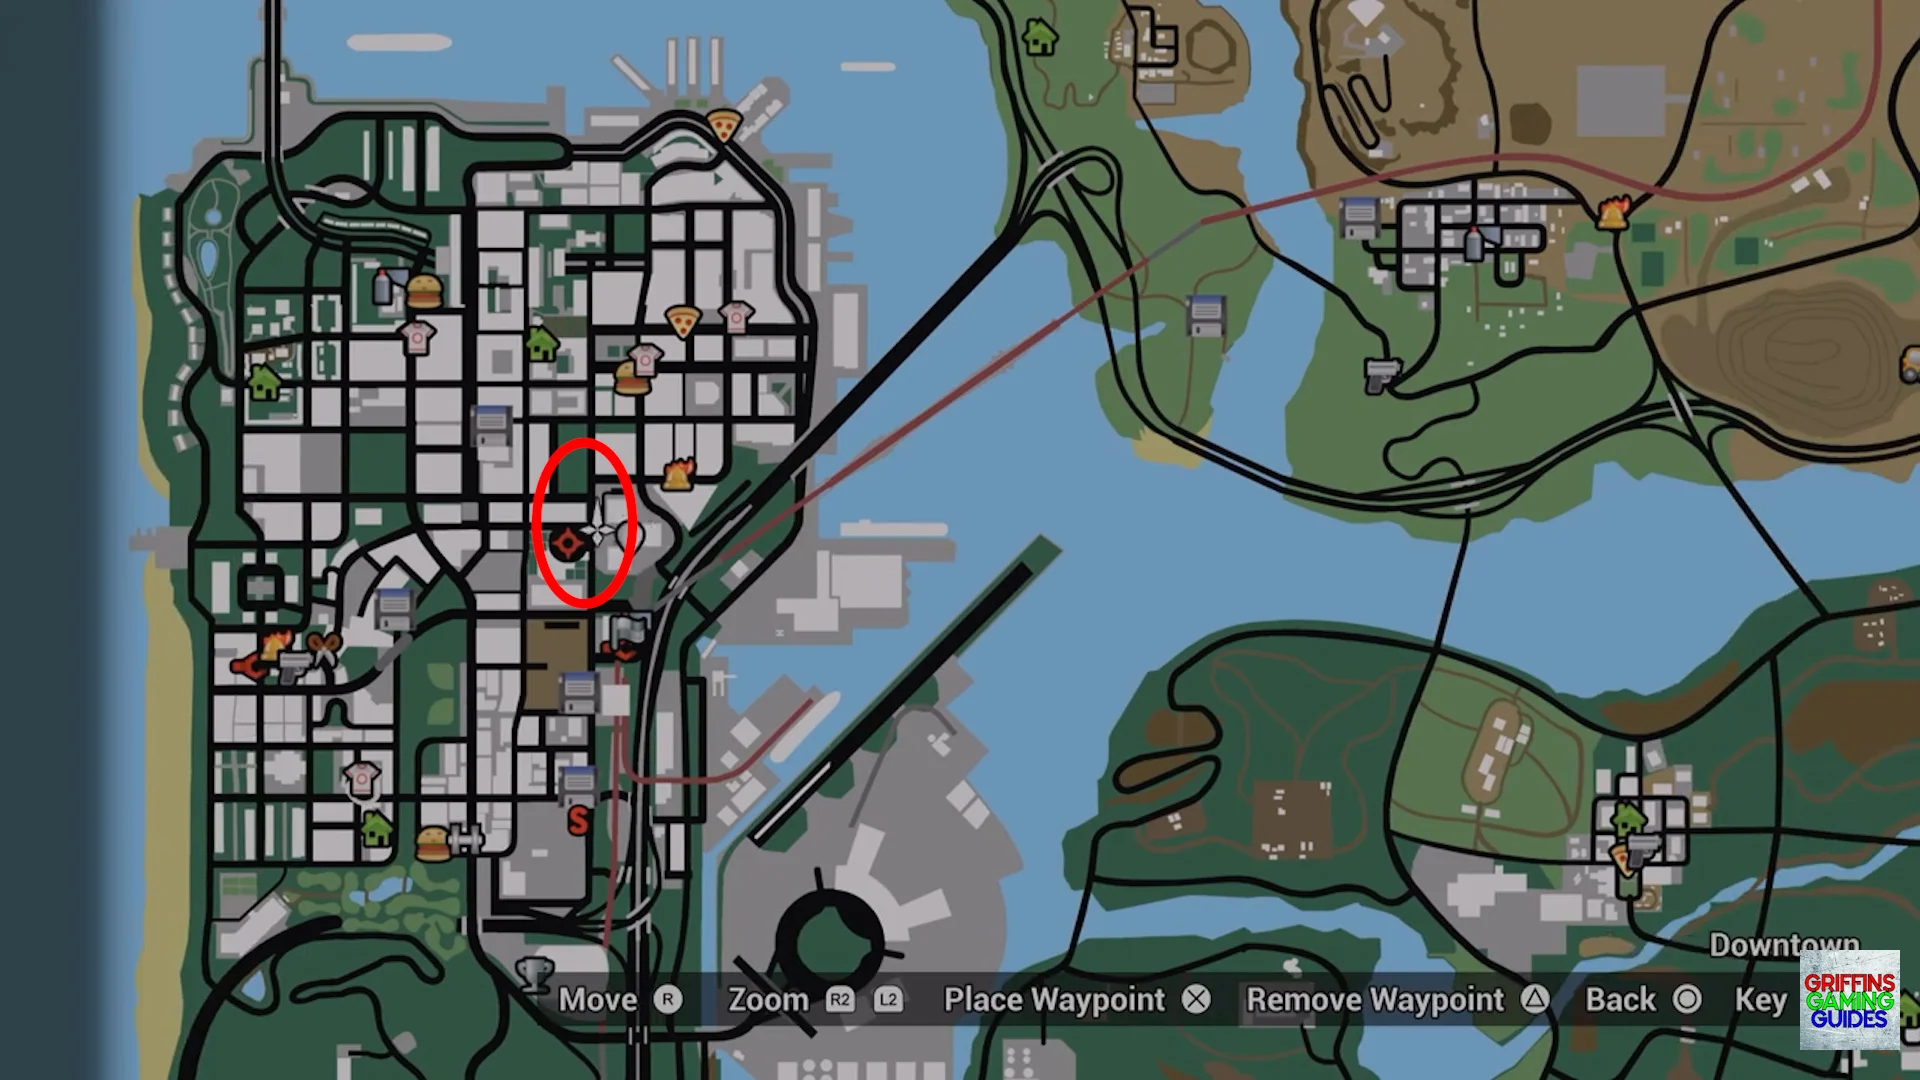
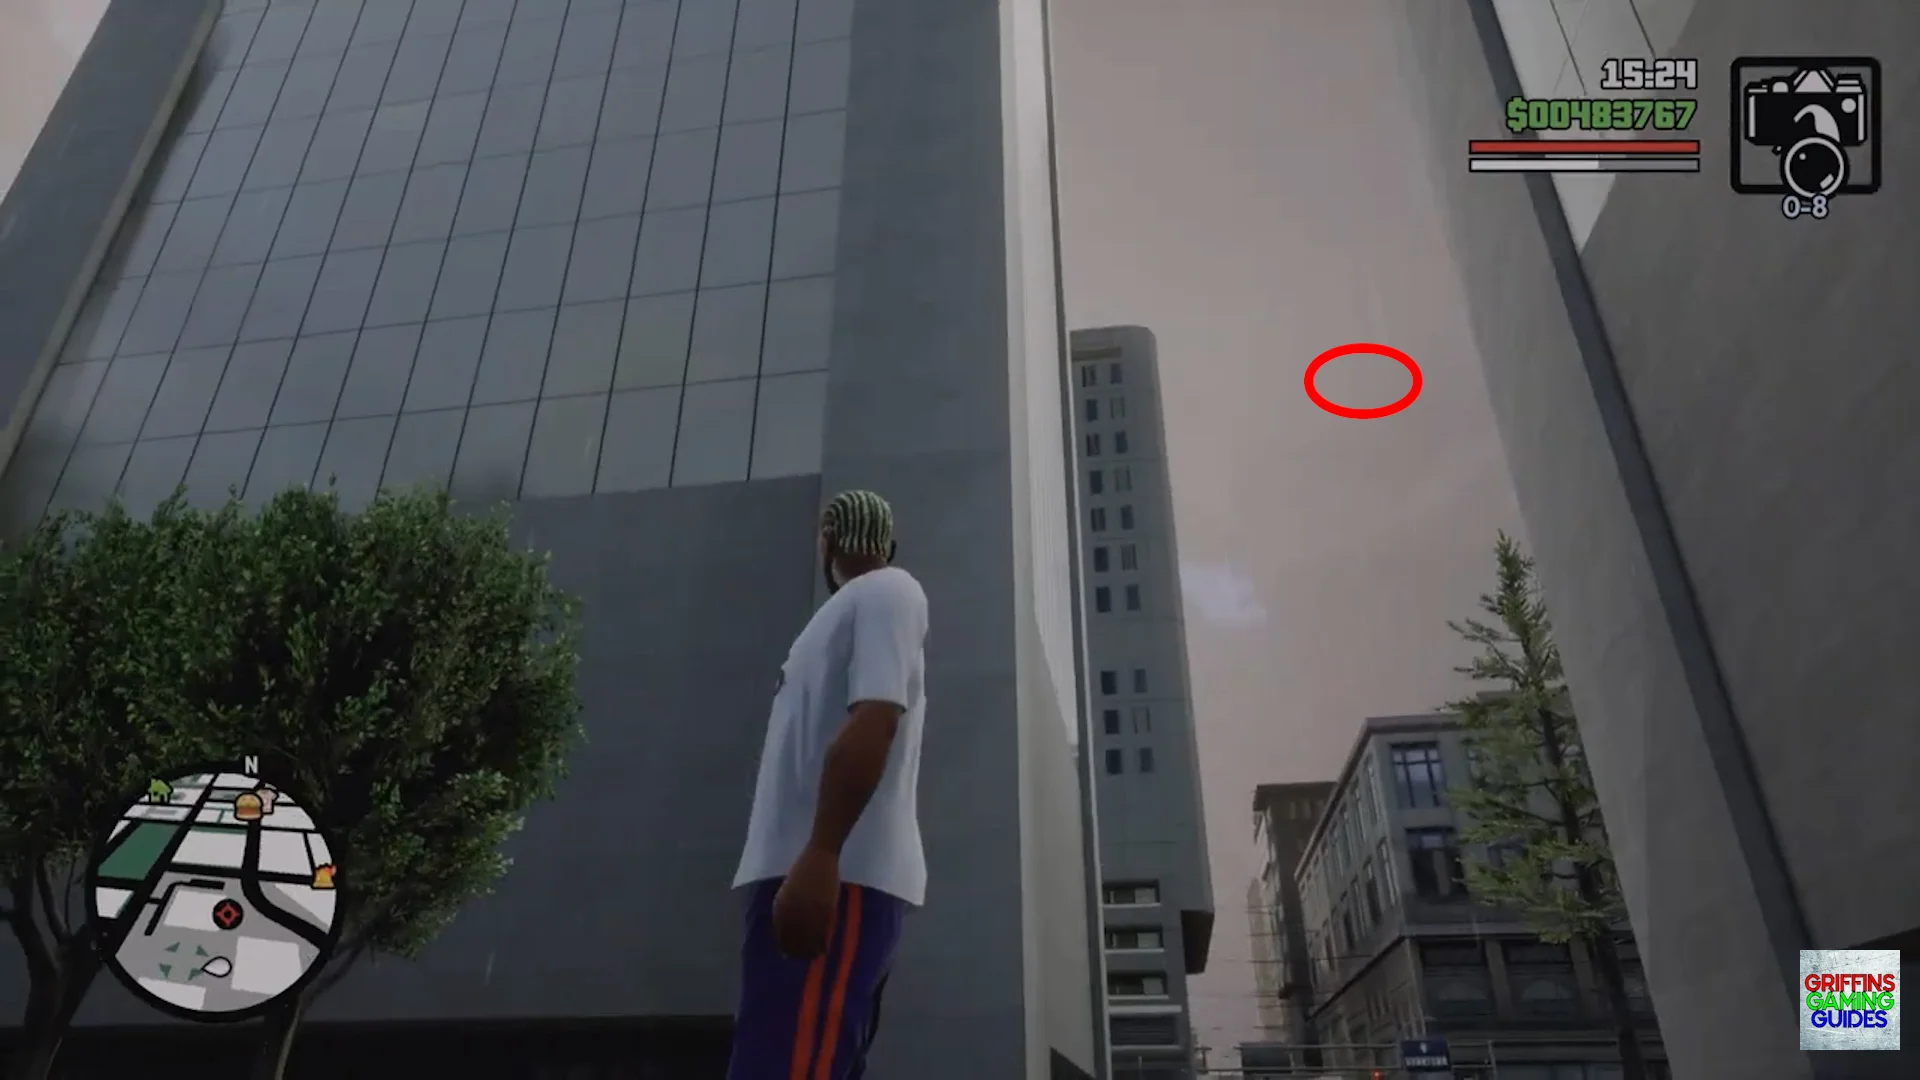
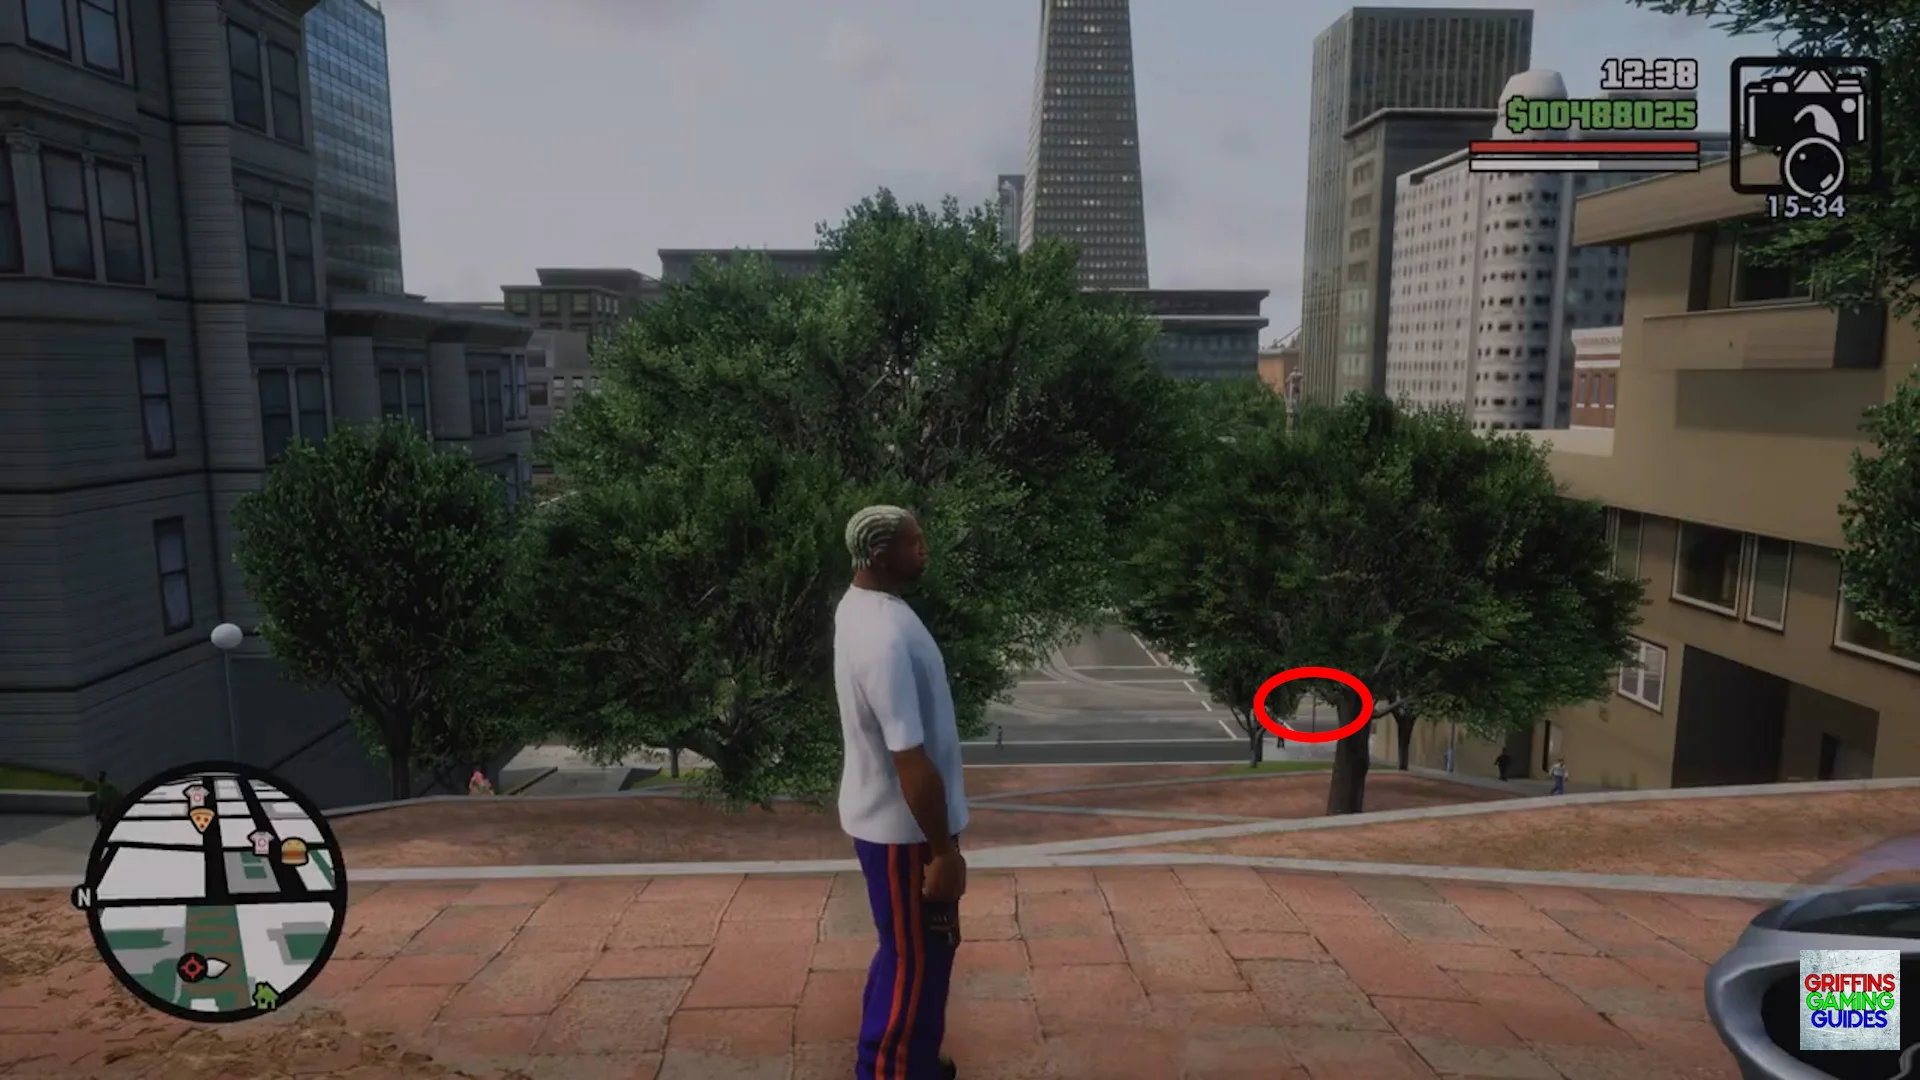
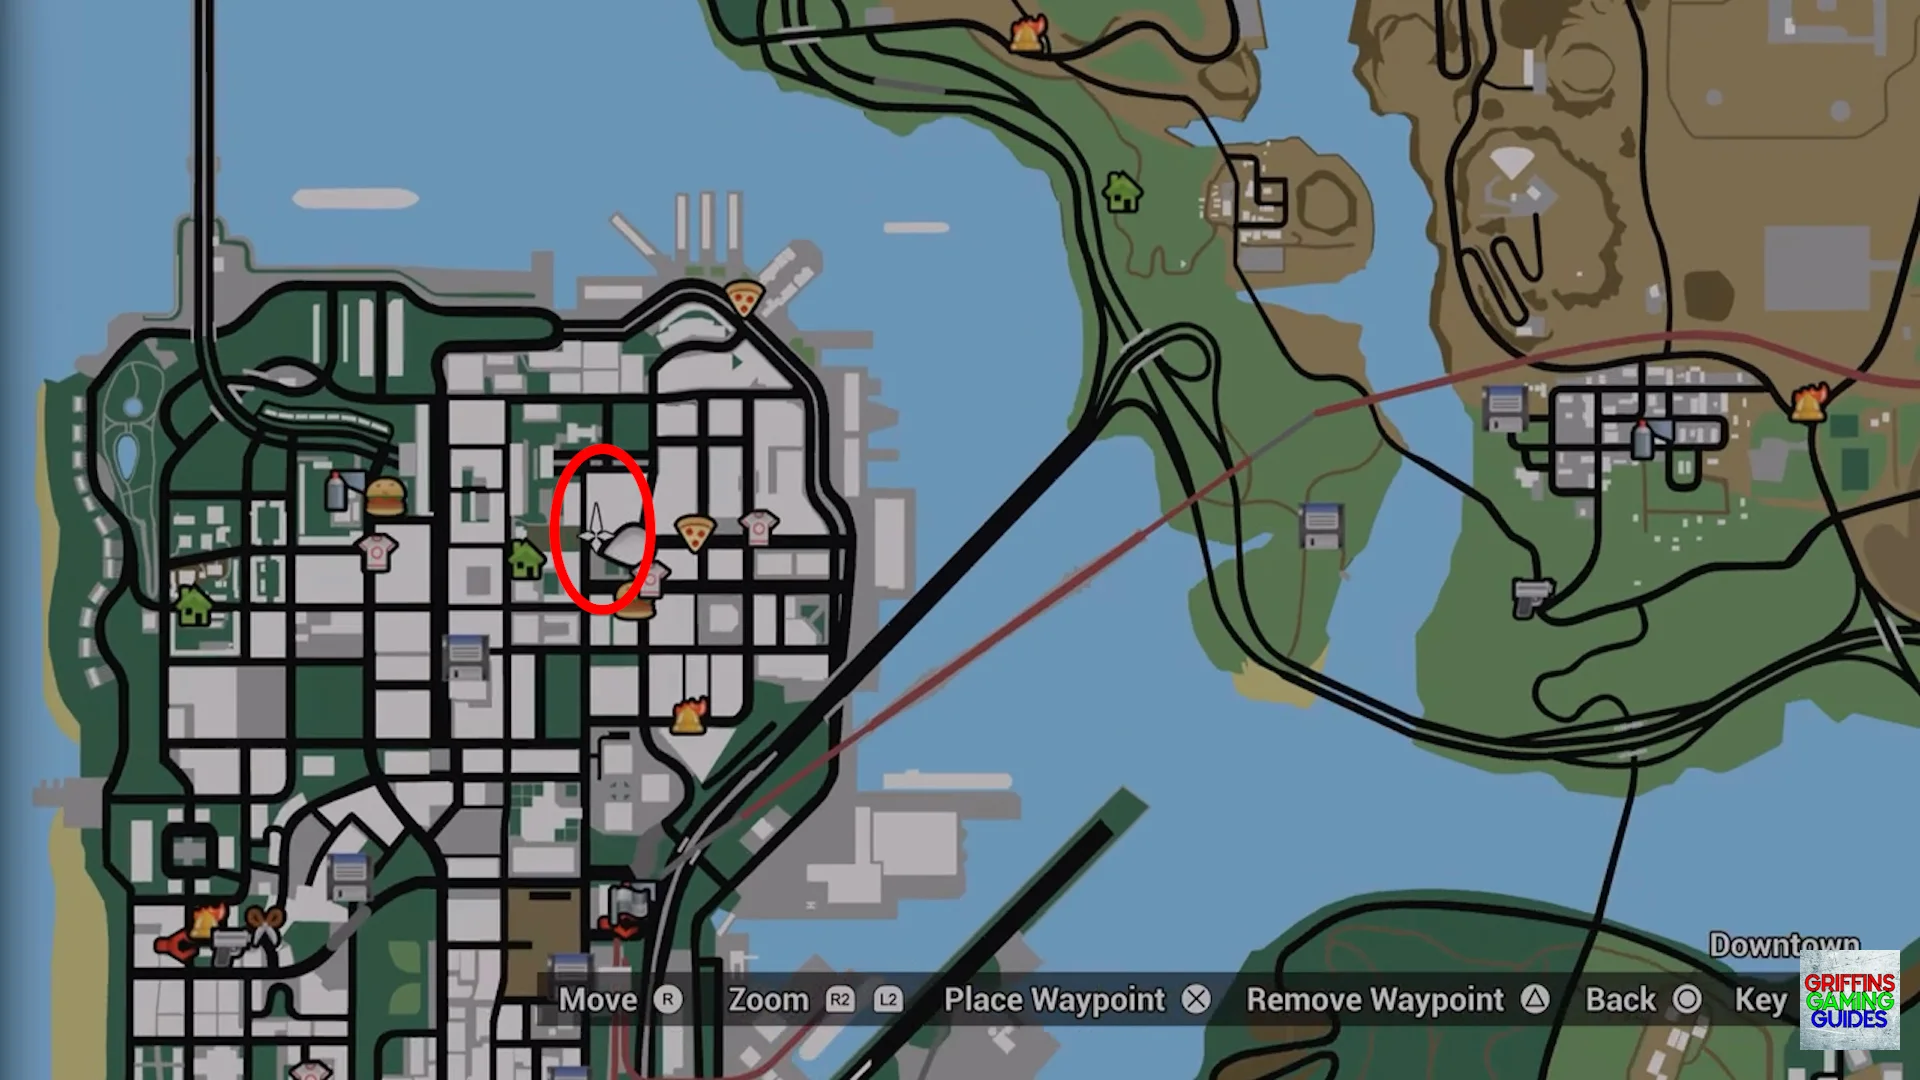
Snapshot 41
Location: Downtown.
Stand in the centre of the 3 skyscrapers marked as white squares on the map then look North and up near the roof of the furthest building on the left to find this snapshot.
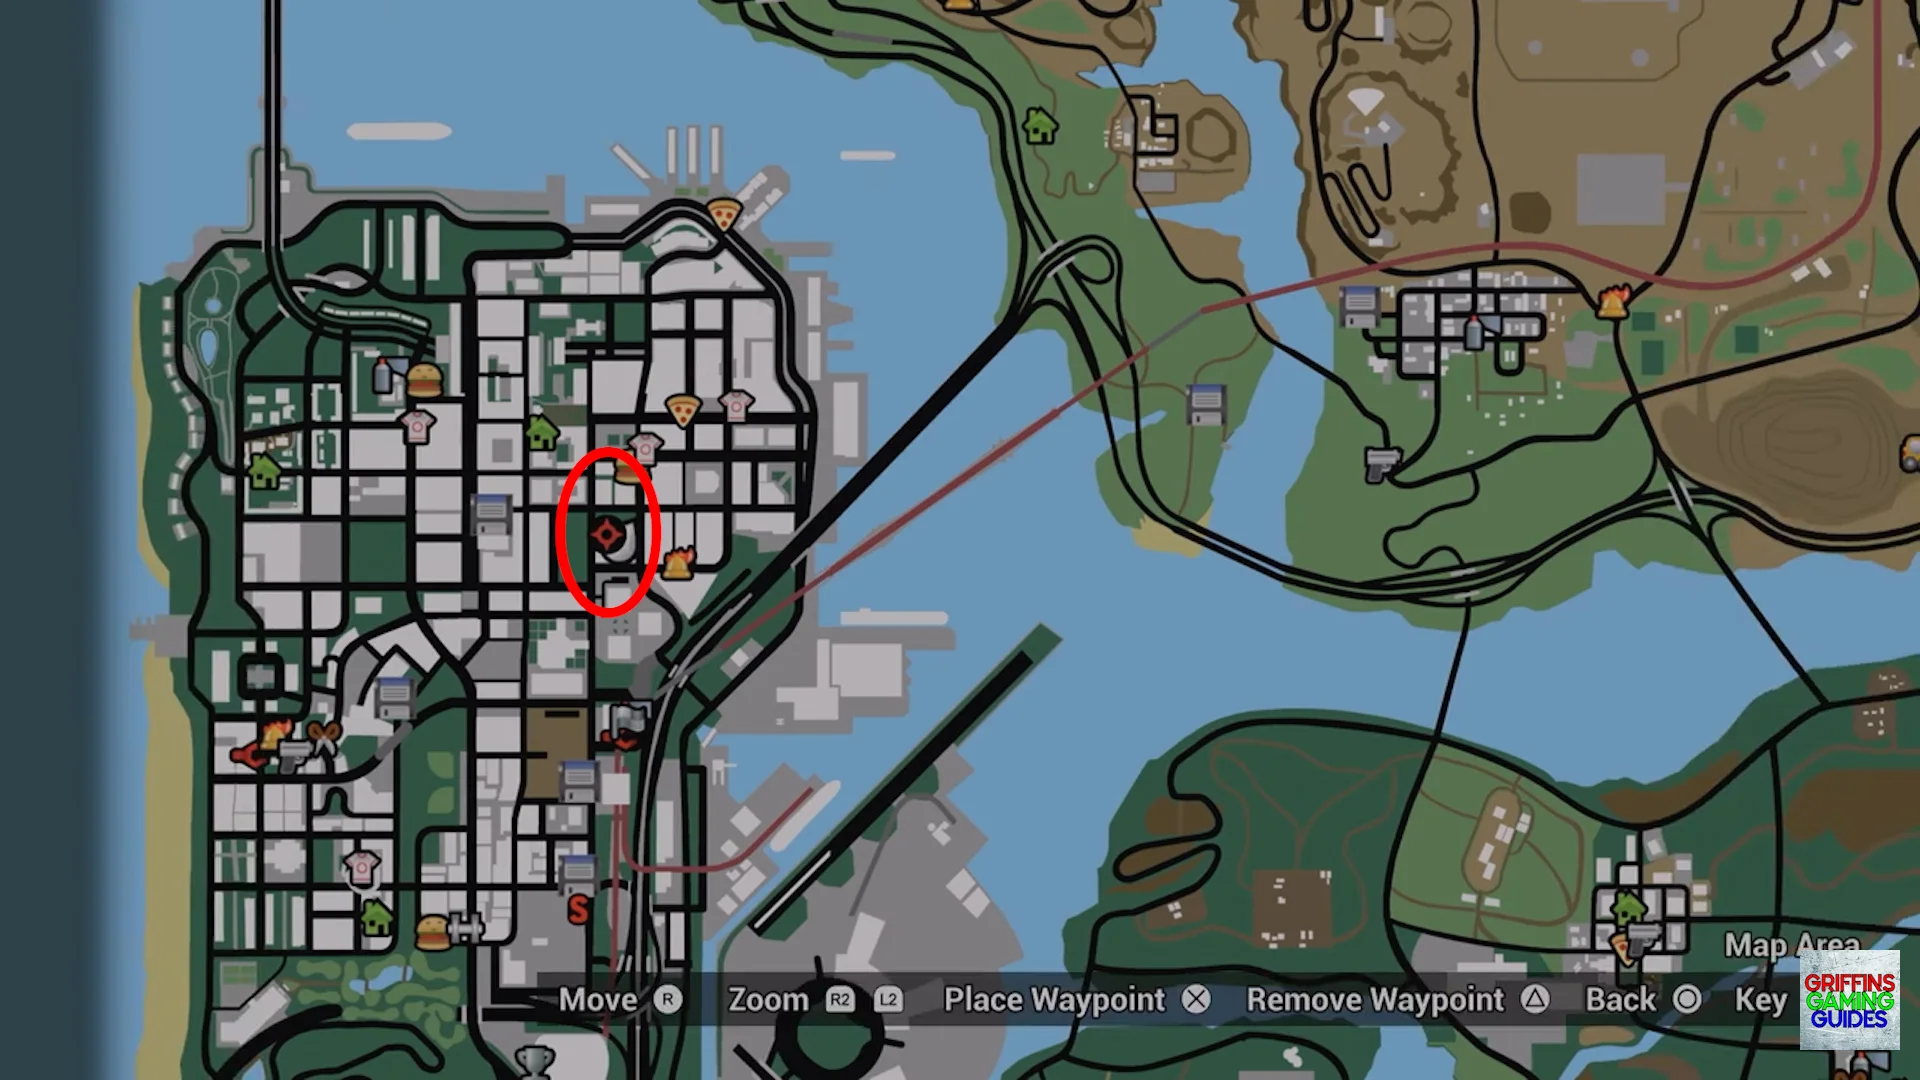
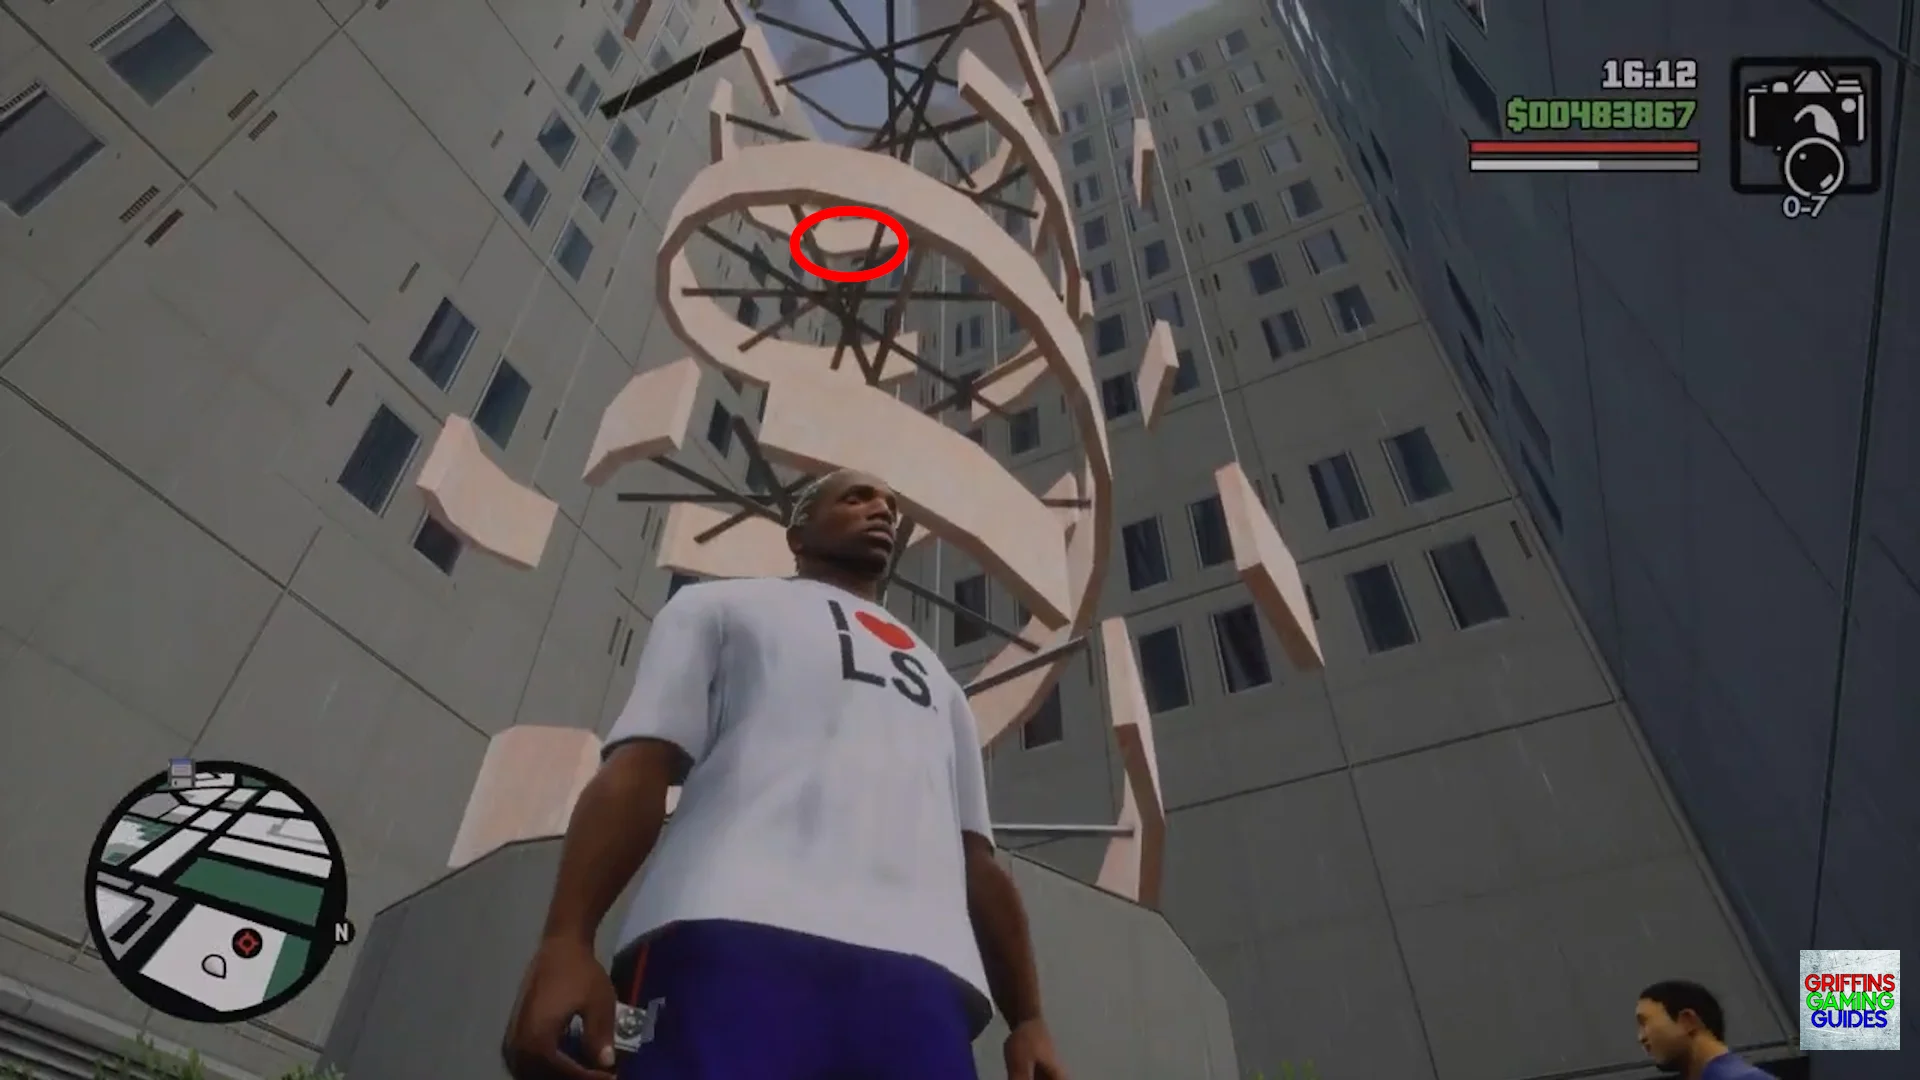
Snapshot 42
Location: Downtown.
Aim your camera straight up the helix aiming in between the 2nd and 3rd spiral columns to find this snapshot.
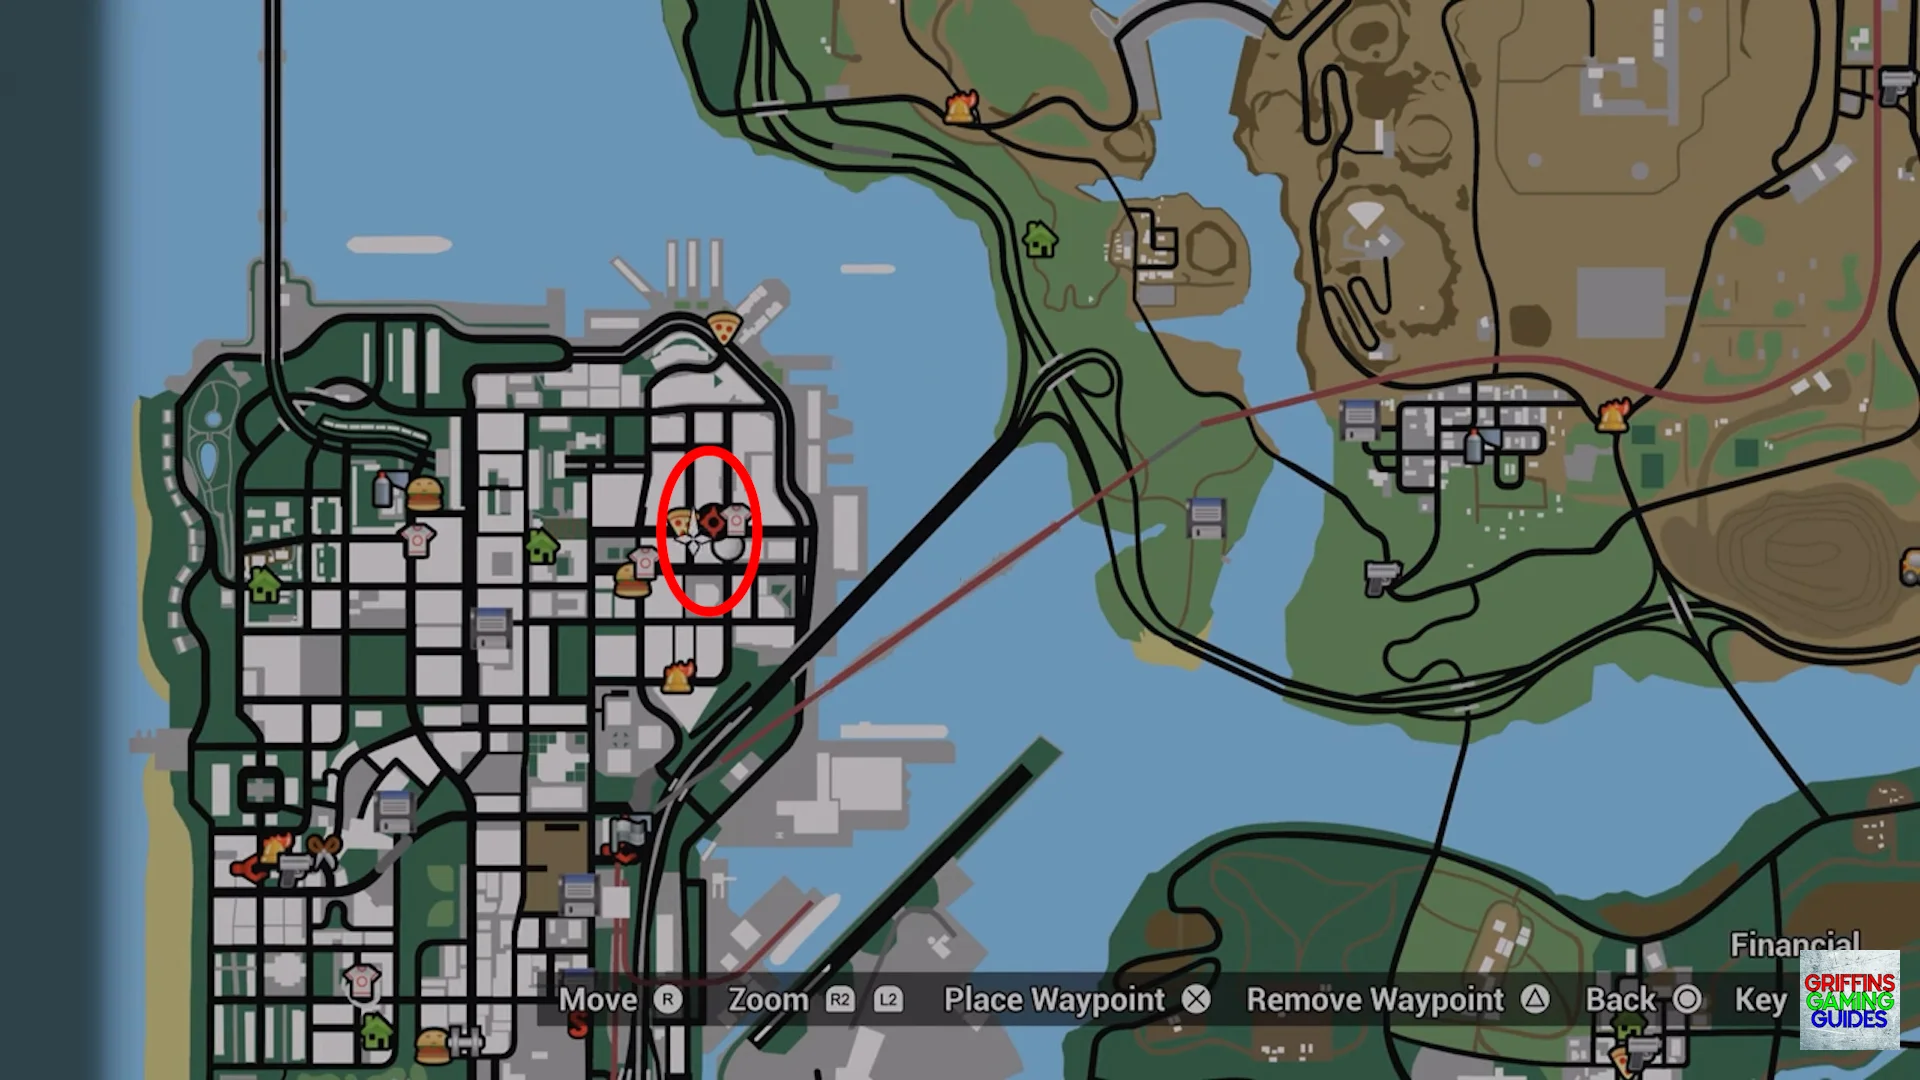
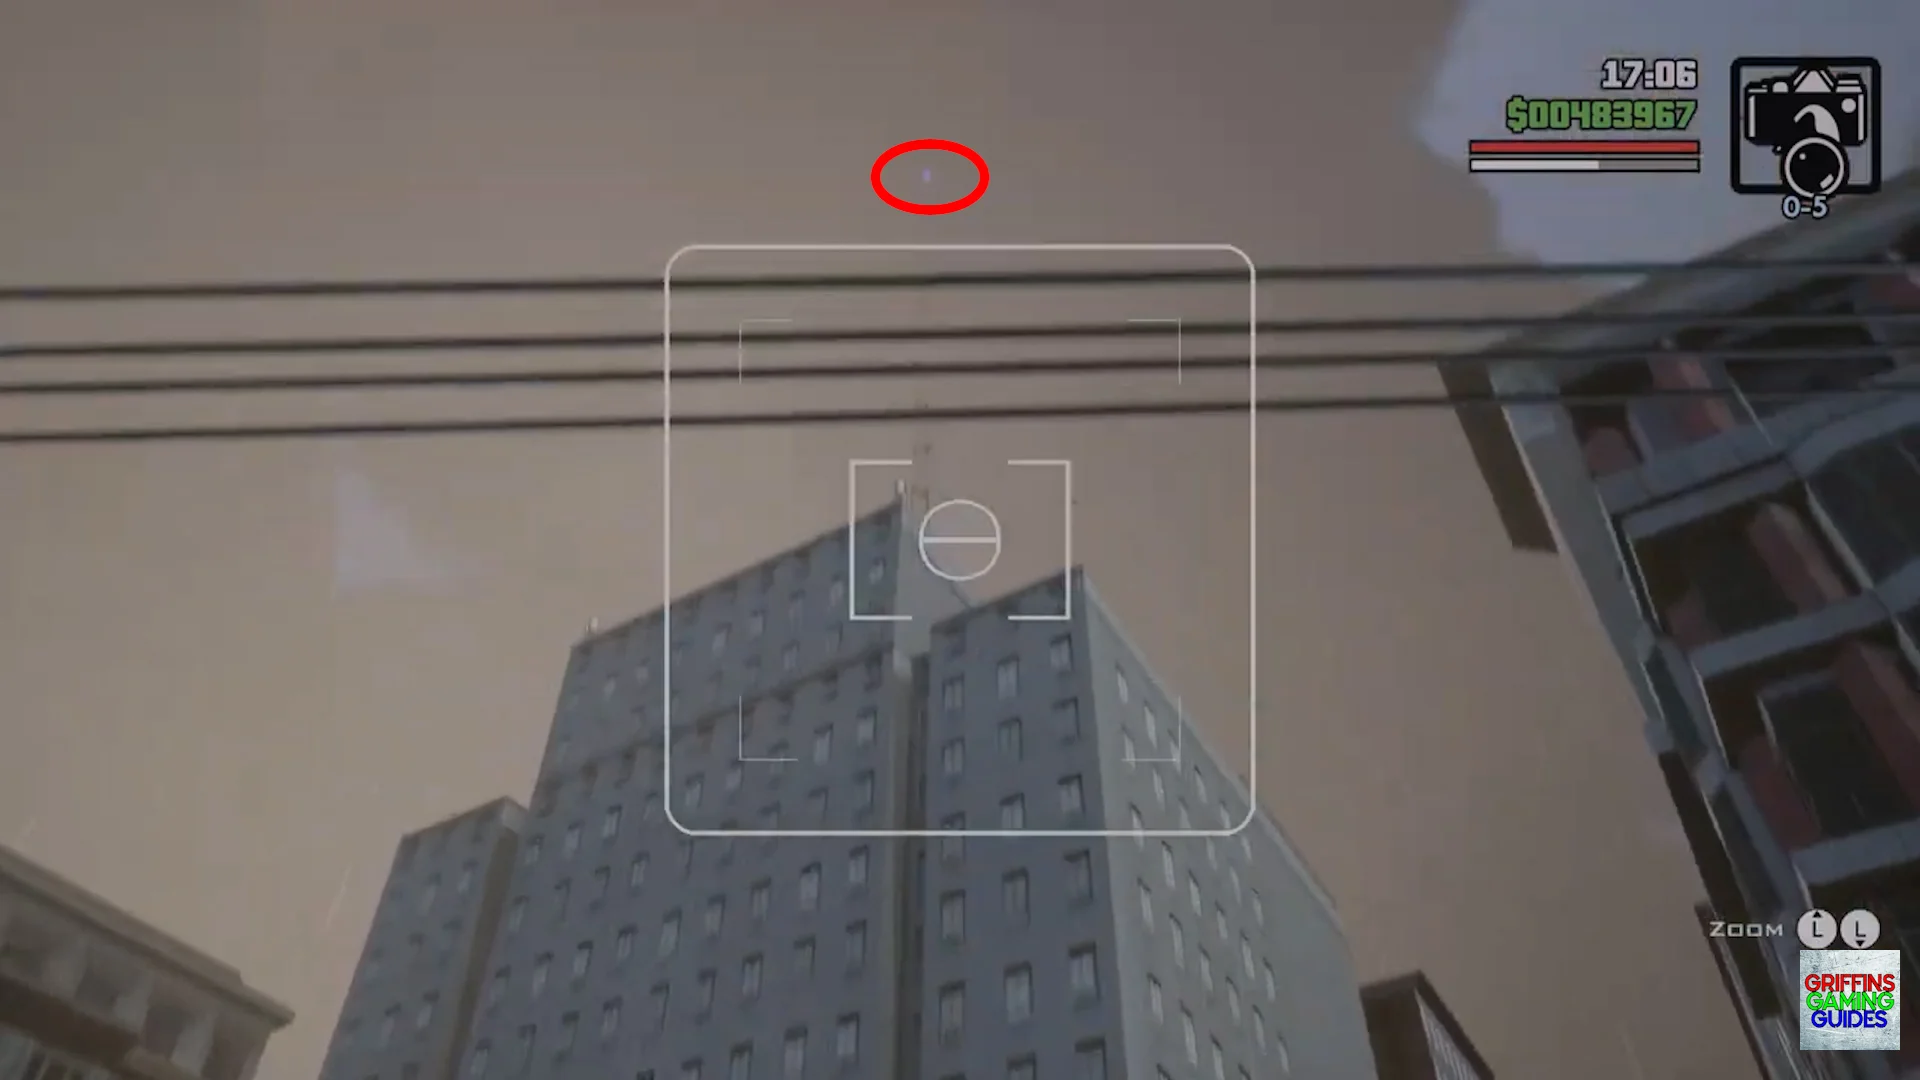
Snapshot 43
Location: Financial.
Stand far back from the Victim clothes shop (over to your right) and the large grey building (over to the left) then aim high to the top of the radio tower coming out from the square grey building ensuring you avoid aiming through the powerlines to find this snapshot.
Snapshot 44
Location: Downtown.
Face South looking at the building with the diamond shaped girders going across the entire section then aim your camera at the second to highest diamond base to find this snapshot.
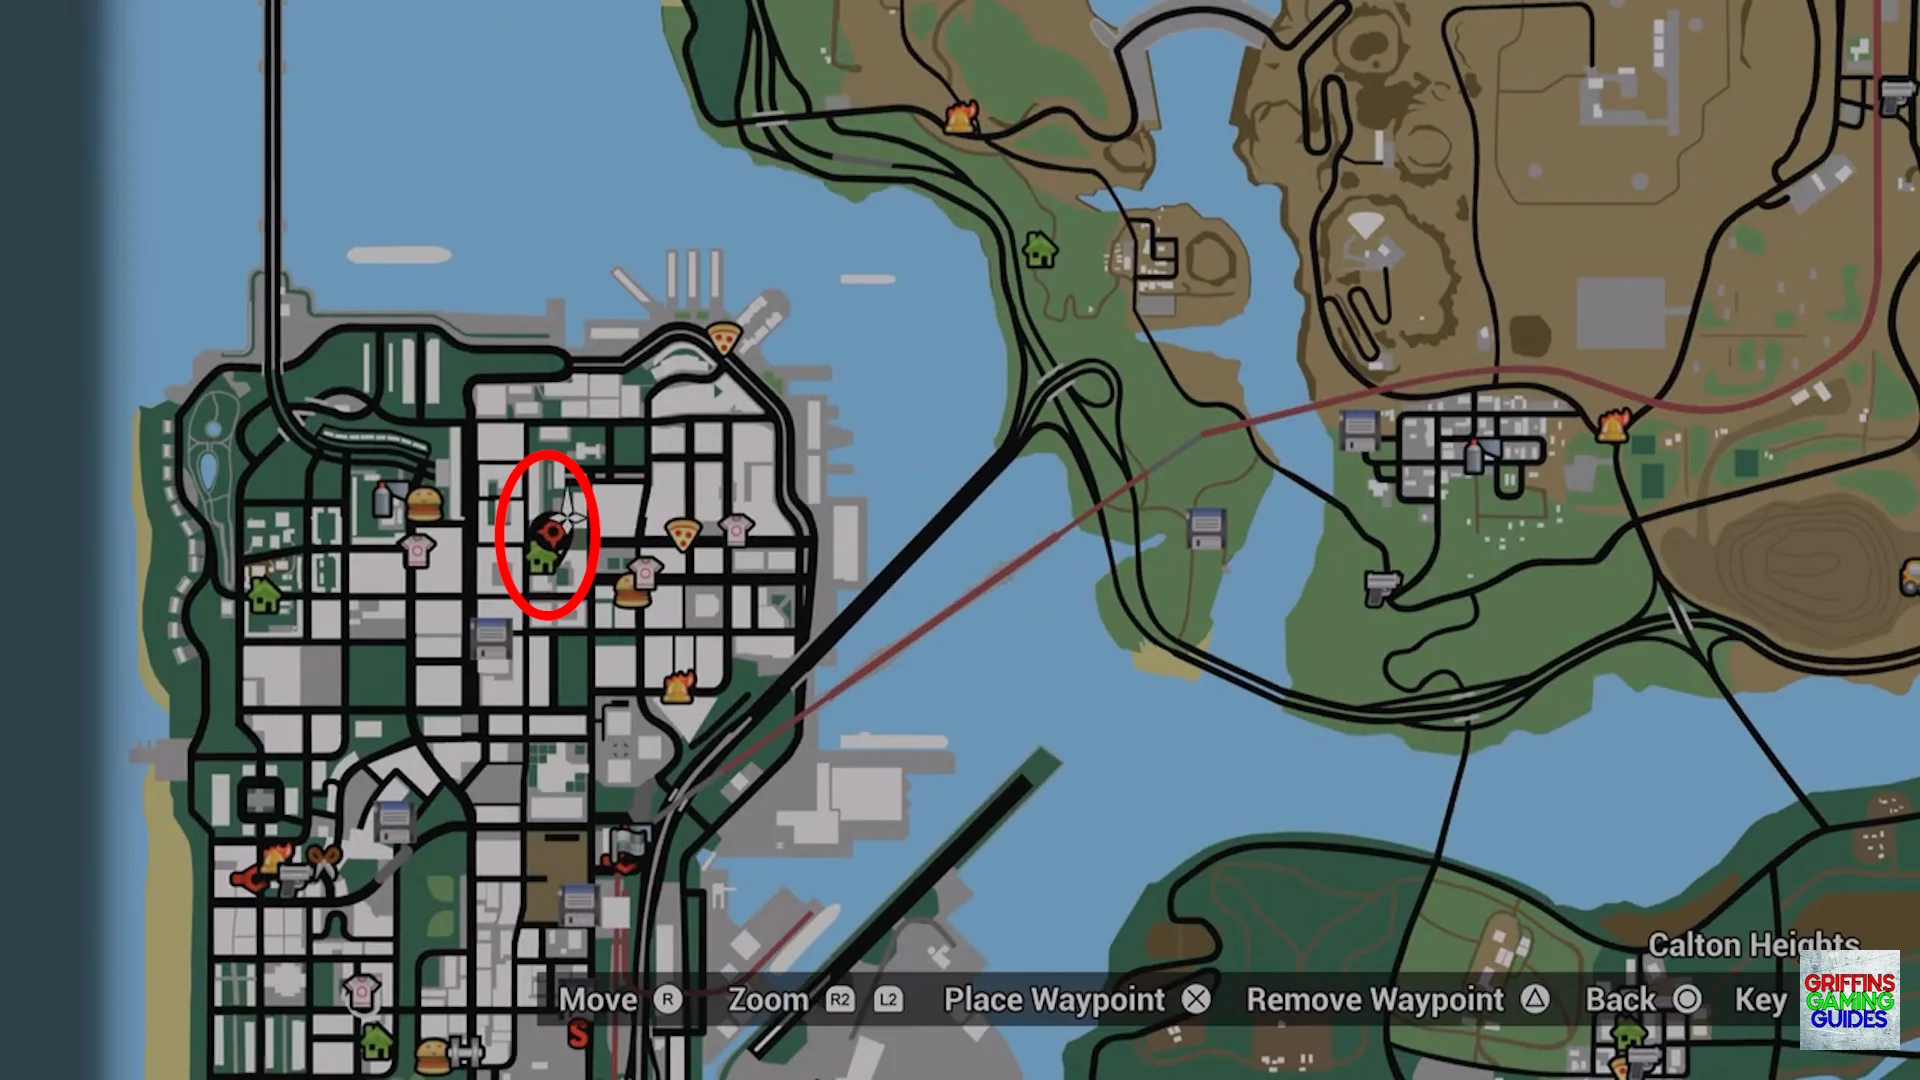
Snapshot 45
Location: Calton Heights.
Go to the tunnel entrance hanging a few metres back then look up to the yellow building. Aim just right of the tall trees to find this snapshot.
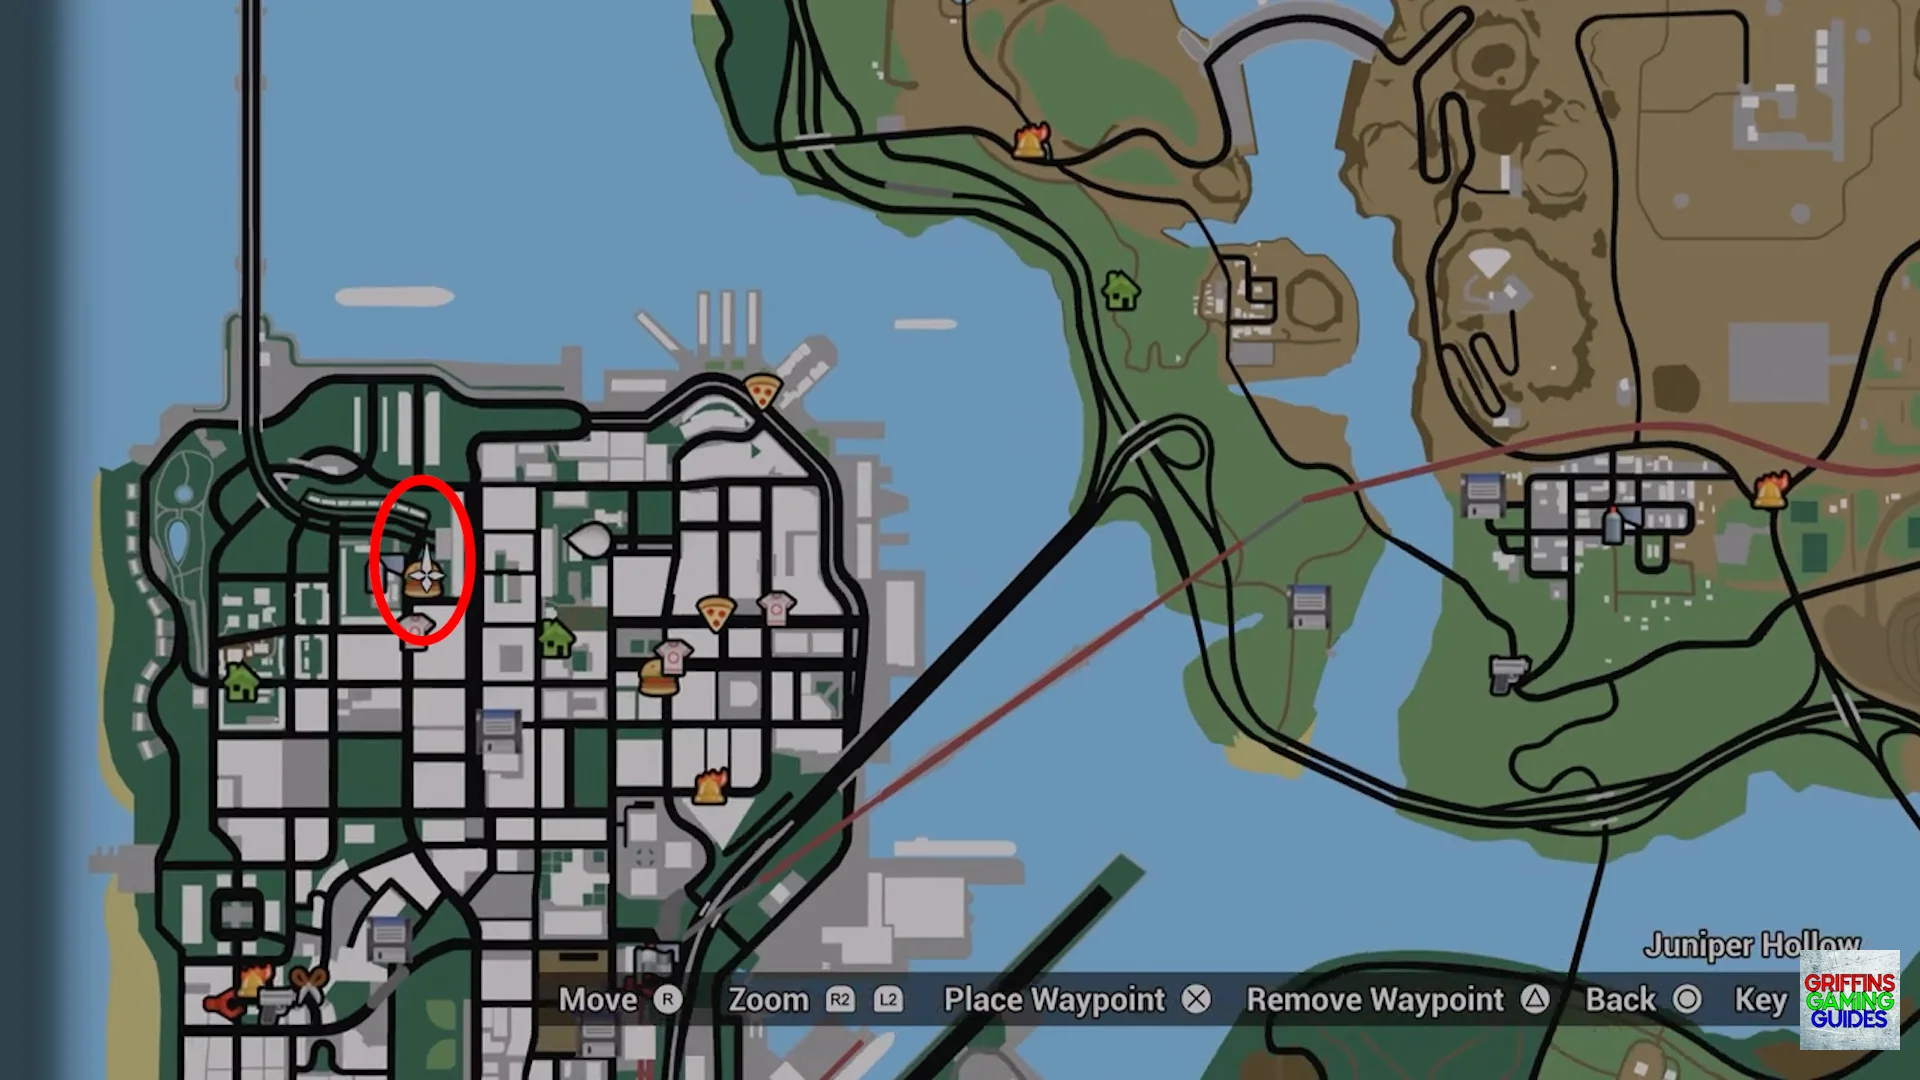
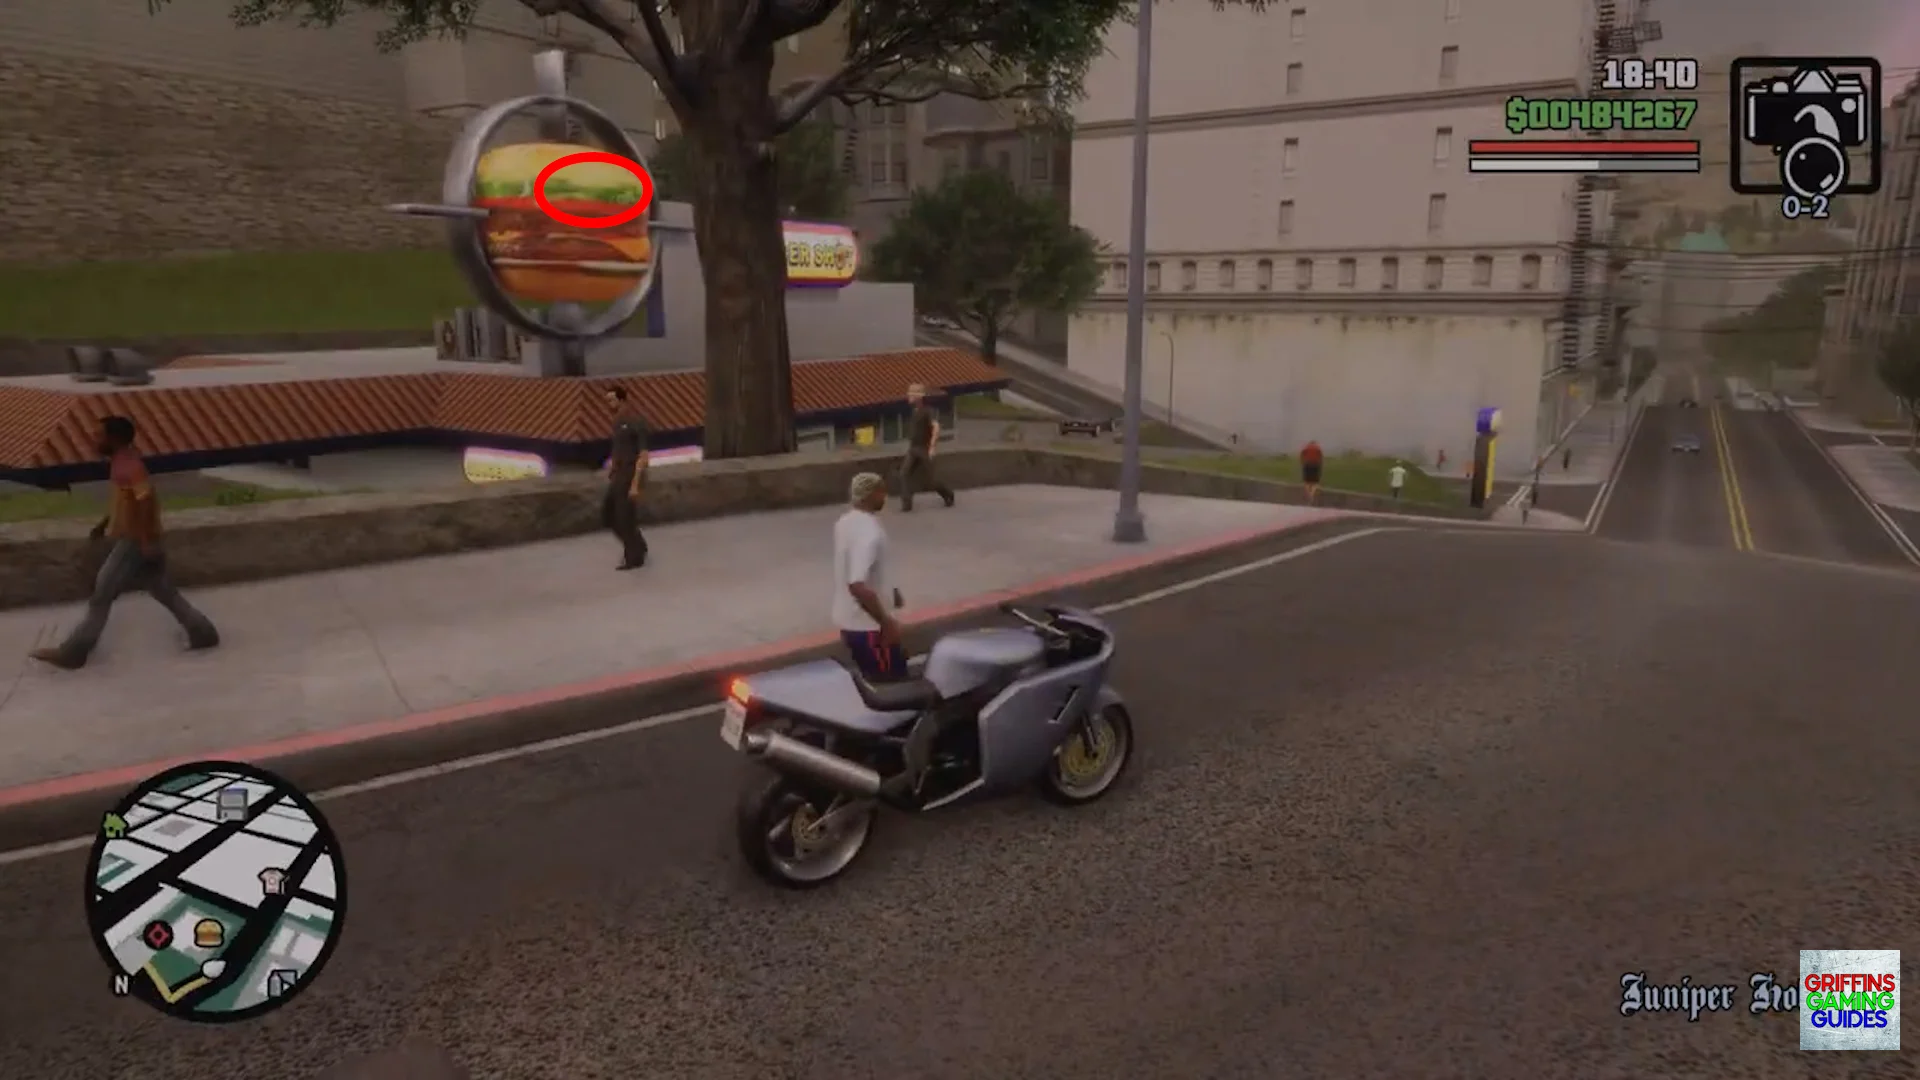
Snapshot 46
Location: Juniper Hollow.
Look to the burger sign on top of the Burger Shot to find this snapshot.
Snapshot 47
Location: Juniper Hill.
Ensure you are in the car park, South of the Supa Save then look just above the store to find this snapshot.
Snapshot 48
Location: Chinatown.
Face East towards the Torri gate then aim just above the highest point of the gate in the middle to find this snapshot.
Snapshot 49
Location: Calton Heights.
Stand near the top of the winding path then aim down and slightly to your right to find this snapshot.
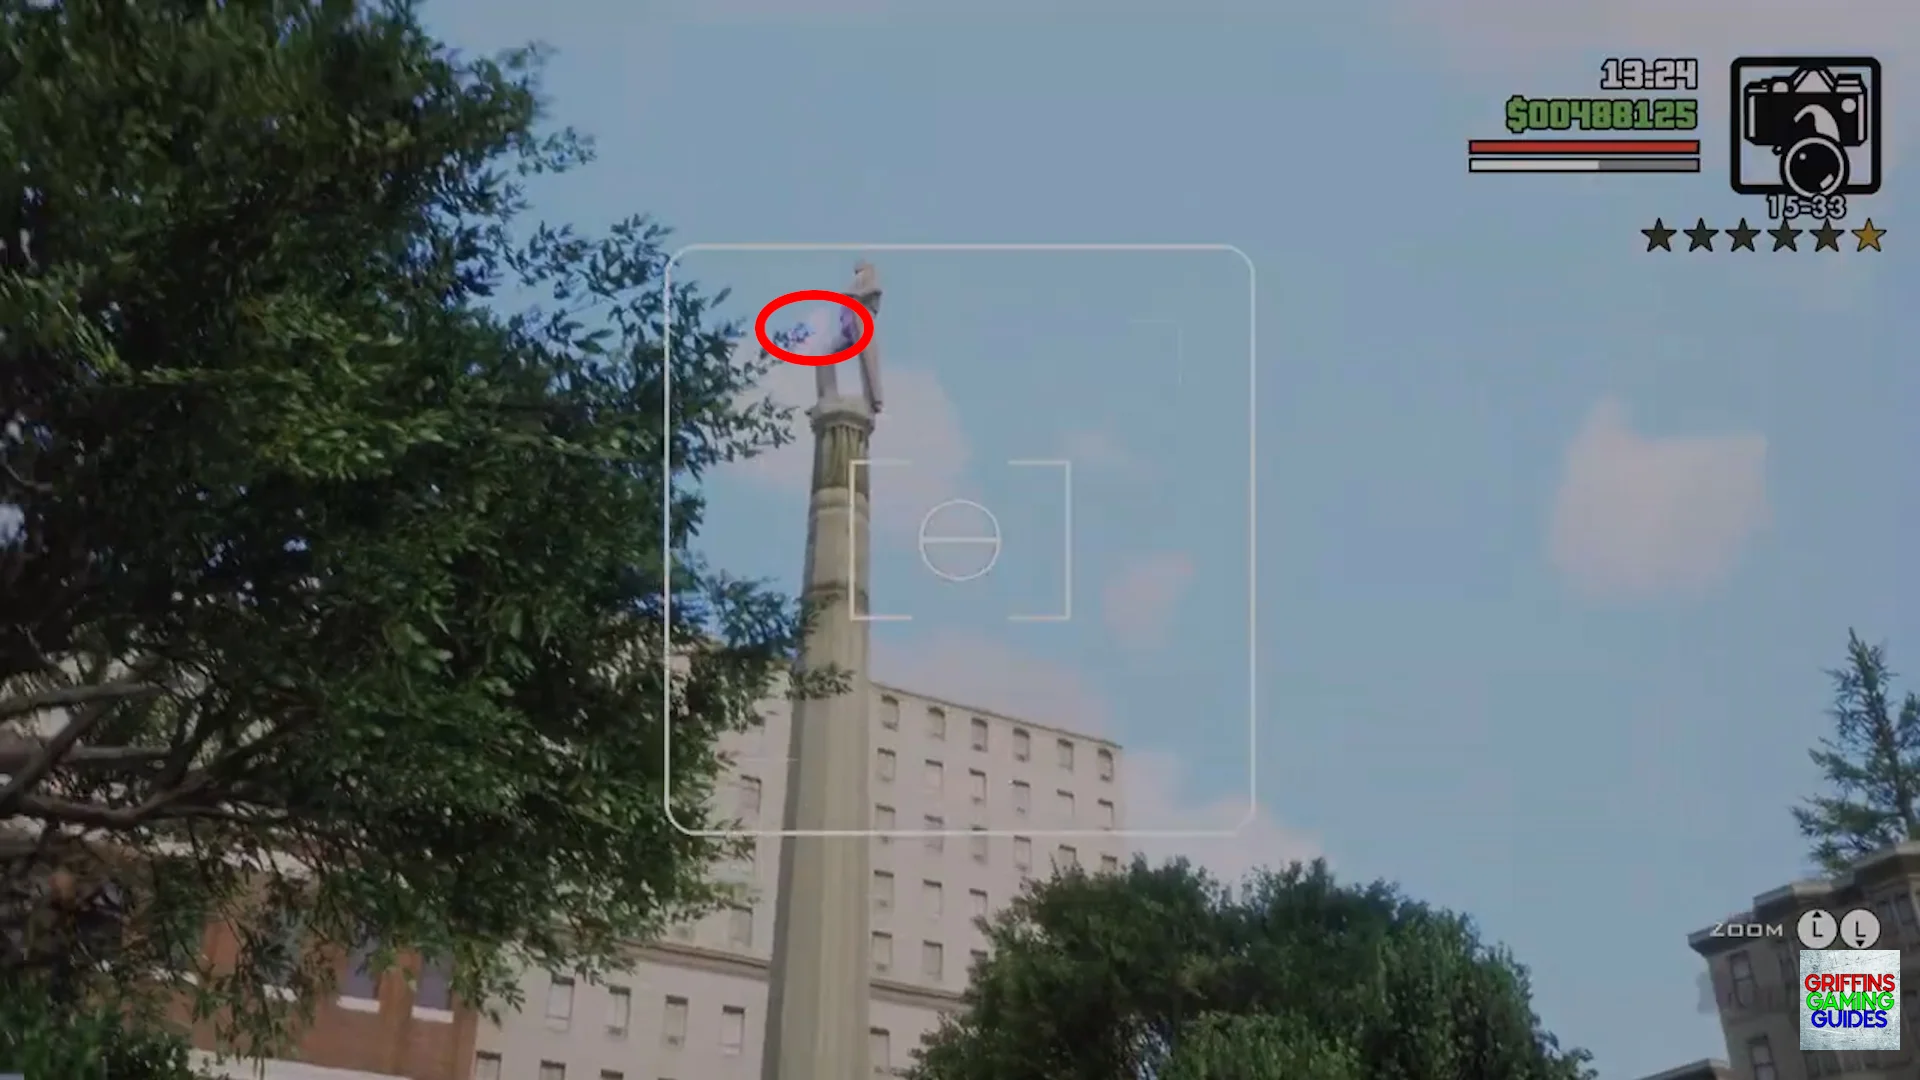
Snapshot 50
Location: Downtown.
Face South then aim your camera just in front of the large statues groin area to find the final snapshot.
That’s where to find all 50 snapshots throughout San Fierro in Grand Theft Auto San Andreas (the Definitive Edition).